

Gear GUide
Caving starts long before you Get underground. From steep hikes to remote entrances, your gear has to handle it all.
This guide breaks down everything we use — boots, packs, Harnesses, ropes — and why we trust it on real expeditions.
What We Carry — Above & Below
Note: Some of the links below are affiliate links. If you use them to make a purchase, we earn a small commission — at no extra cost to you. That support goes directly toward funding future expeditions, documenting wild places, and creating the content you see here. Thanks for being part of the journey.
Explore gear


Gotta get there somehow
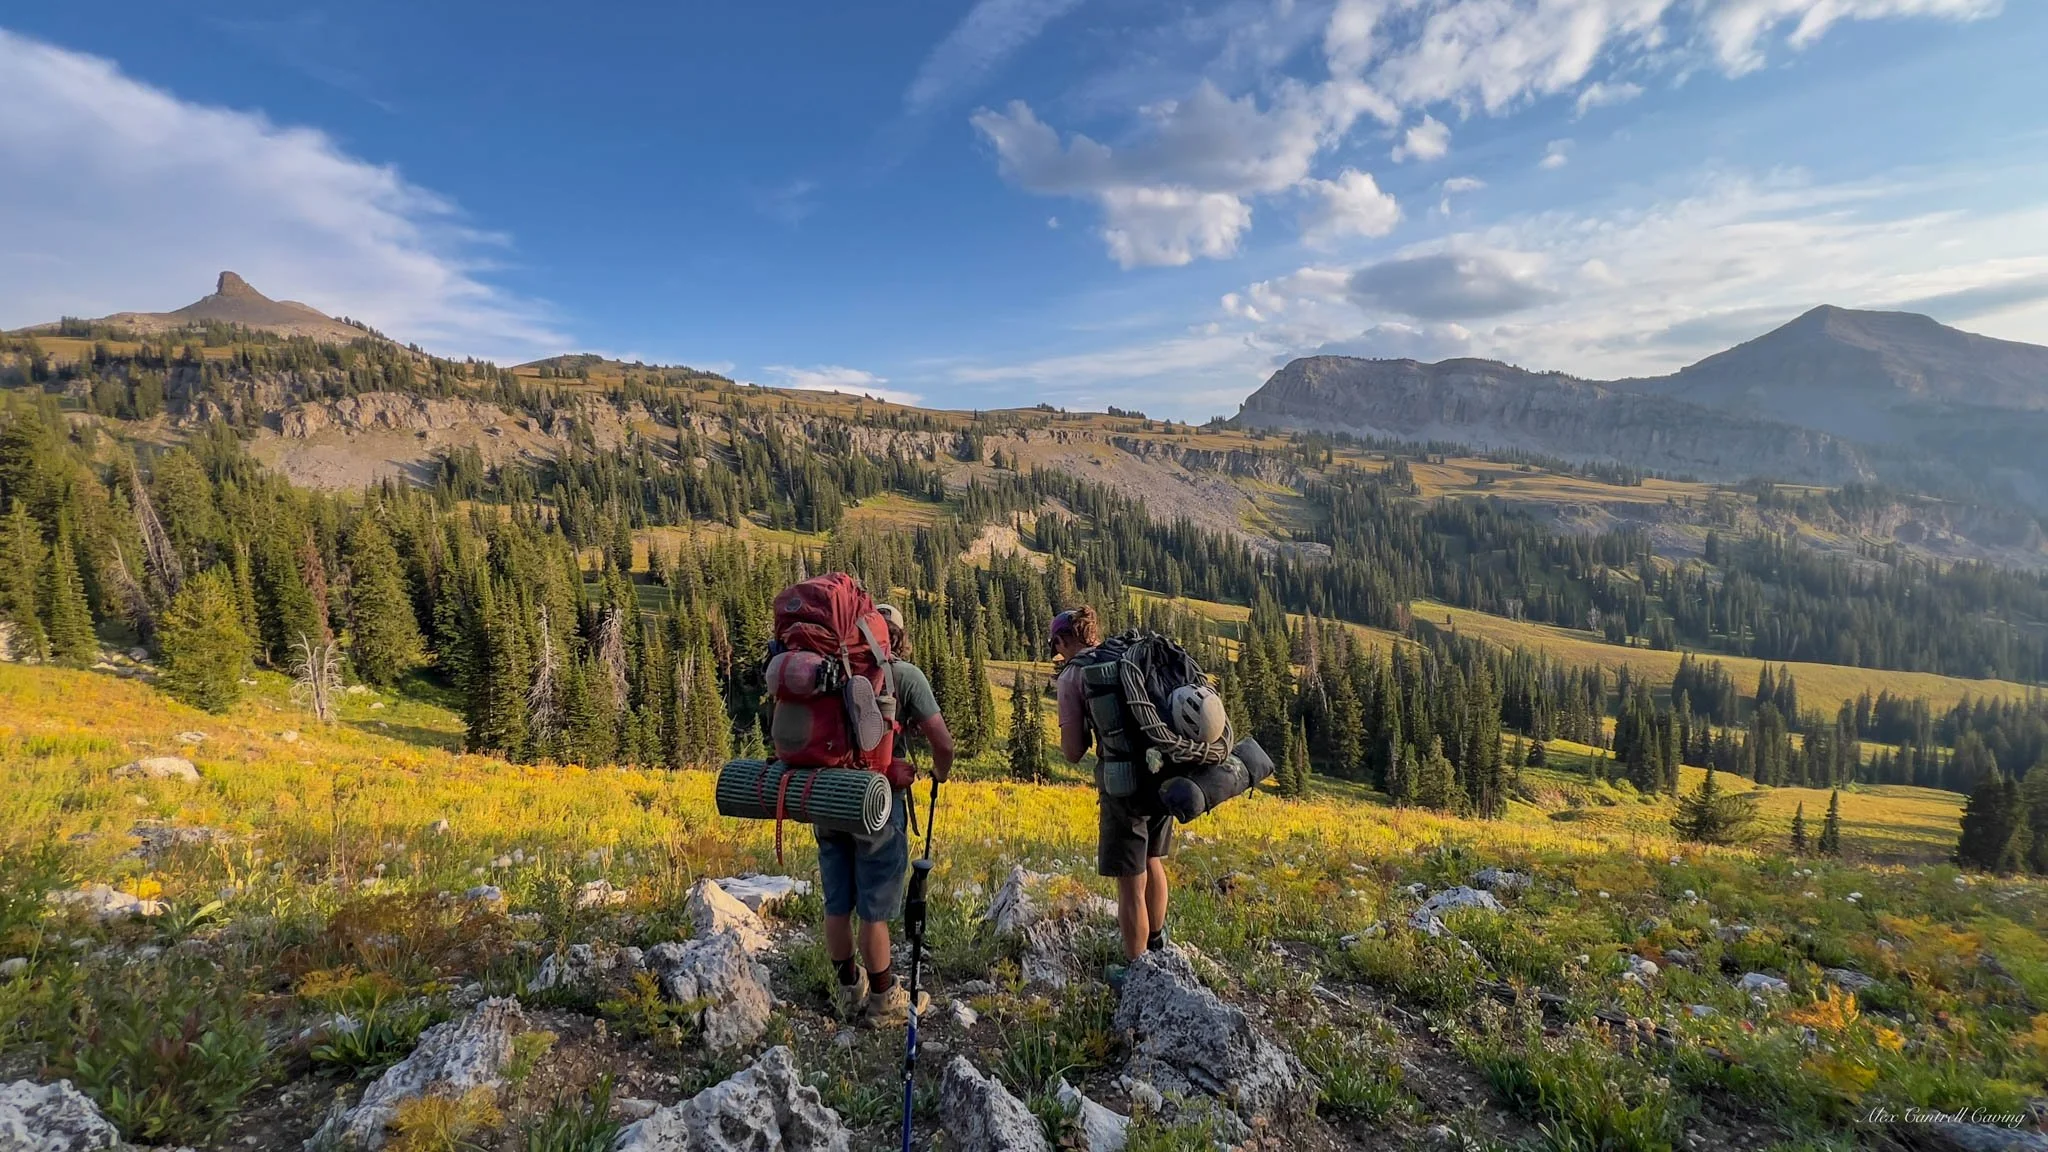
THE APPROACH
The carry-all for ridge walks and multi-day approaches. Here’s what we use to haul gear to the entrance without breaking our backs.
Backpacking Bags
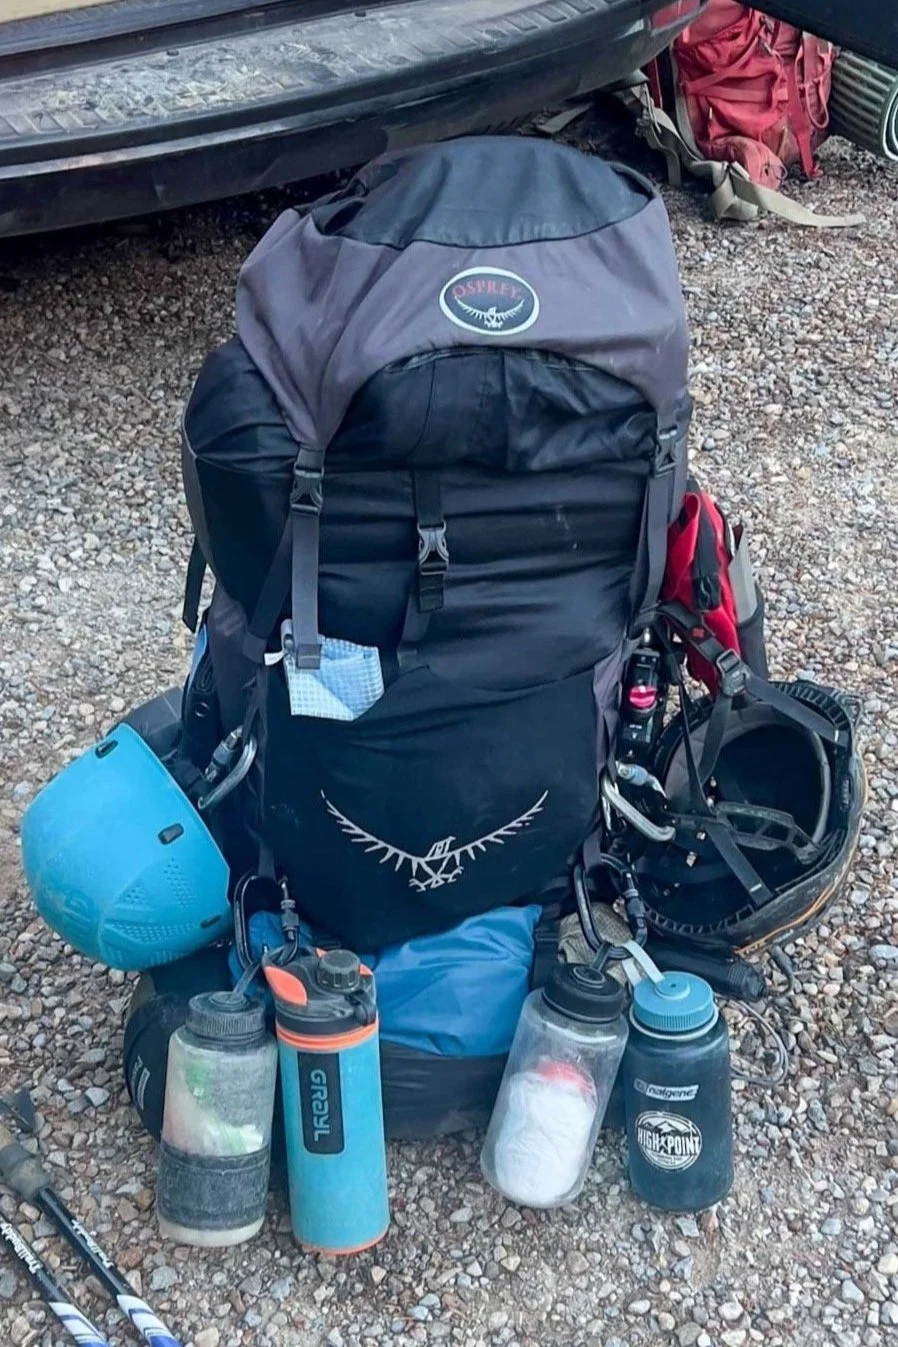
I’ve been using Osprey packs for as long as I can remember — not just in the field, but in my everyday life. My school backpack was an Osprey. My travel sling, the one that holds my EpiPens and essentials on the go? Also Osprey. When it comes to backpacking and hauling gear, every single one of my bags has been made by them. Their durability, comfort, and smart design make them my go-to whether I’m trekking to a ridge, navigating backcountry terrain, or loading up for a multi-day expedition.
I even used to cave with one of their mountaineering packs — and it held up for years! Getting to the entrance of a cave is often half the battle, and Osprey packs have always delivered in getting me — and my gear — there. These are the packs I’ve trusted every step of the way, and they’ve earned their place on my back.
Whether it’s a muddy bushwhack or a rocky ridge slog, the right shoes make or break your approach — Because getting to the cave is half the battle.
Hiking Shoes

I’ve been using the Adidas Men’s Terrex Free Hiker 2.0 shoes lately, and honestly, they’ve been game changers. They’ve got a built-in gaiter-style collar that helps keep dirt and debris out — super helpful when you’re slogging through brush or scrambling on scree. But what really sold me is the comfort. These things feel like you’re walking on clouds, even when you’re weighed down with a fully loaded pack.
Out west, I pushed these shoes hard — long approaches, uneven terrain, and not a single blister or sore spot. The Continental rubber soles have great grip across all surfaces, wet or dry, and the cushioning somehow stays soft without feeling unstable. Whether I’m ridge-walking or hustling down a muddy trail, they’ve held up and kept my feet feeling surprisingly fresh.
Layers
Your first line of defense. Thermals and socks keep you warm, dry, and moving when conditions get rough.
Base Layer
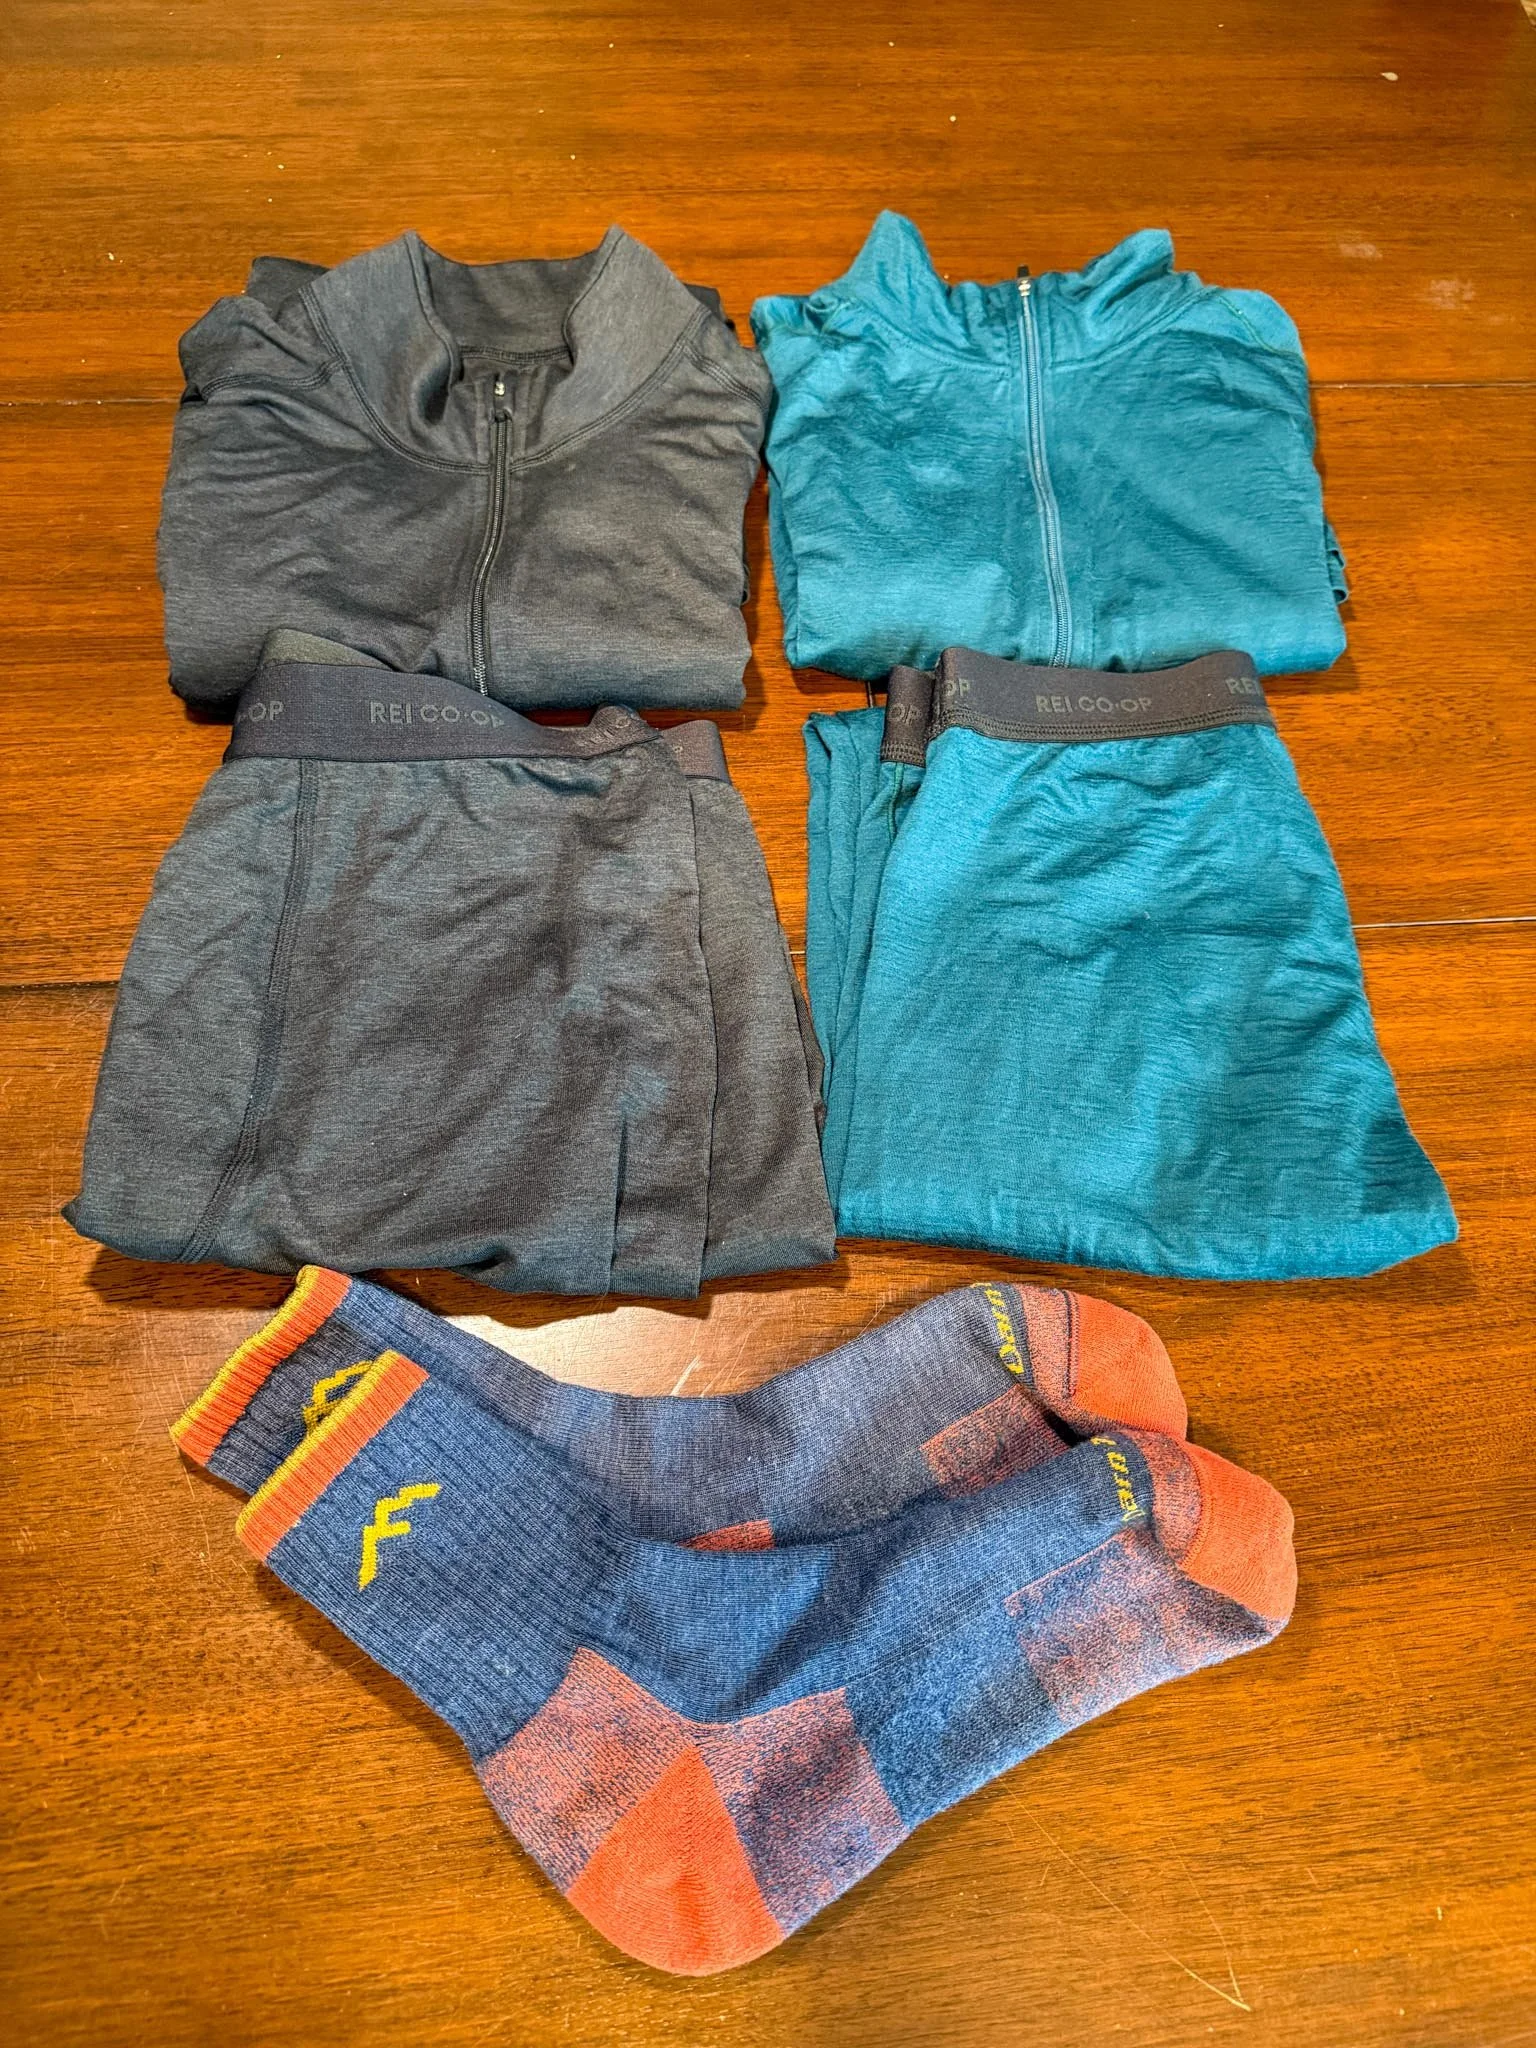
When it comes to base layers, I like to keep it simple and effective — I usually rotate between REI’s merino wool and synthetic options, depending on the trip and climate. Merino is my go-to for its warmth and odor resistance, but the synthetics hold up really well in wet, active environments too. For socks, I run Darn Tough hiking socks exclusively — they’re crazy comfortable, hold up for miles, and I’ve never once gotten a blister in them. Whether I’m ridge walking or deep in a crawl, my base layers are what keep my core regulated and my feet happy.
The flexible comfort zone. Sun hoodies and zip-offs that adapt as you gain elevation or hit the heat.
Mid Layer
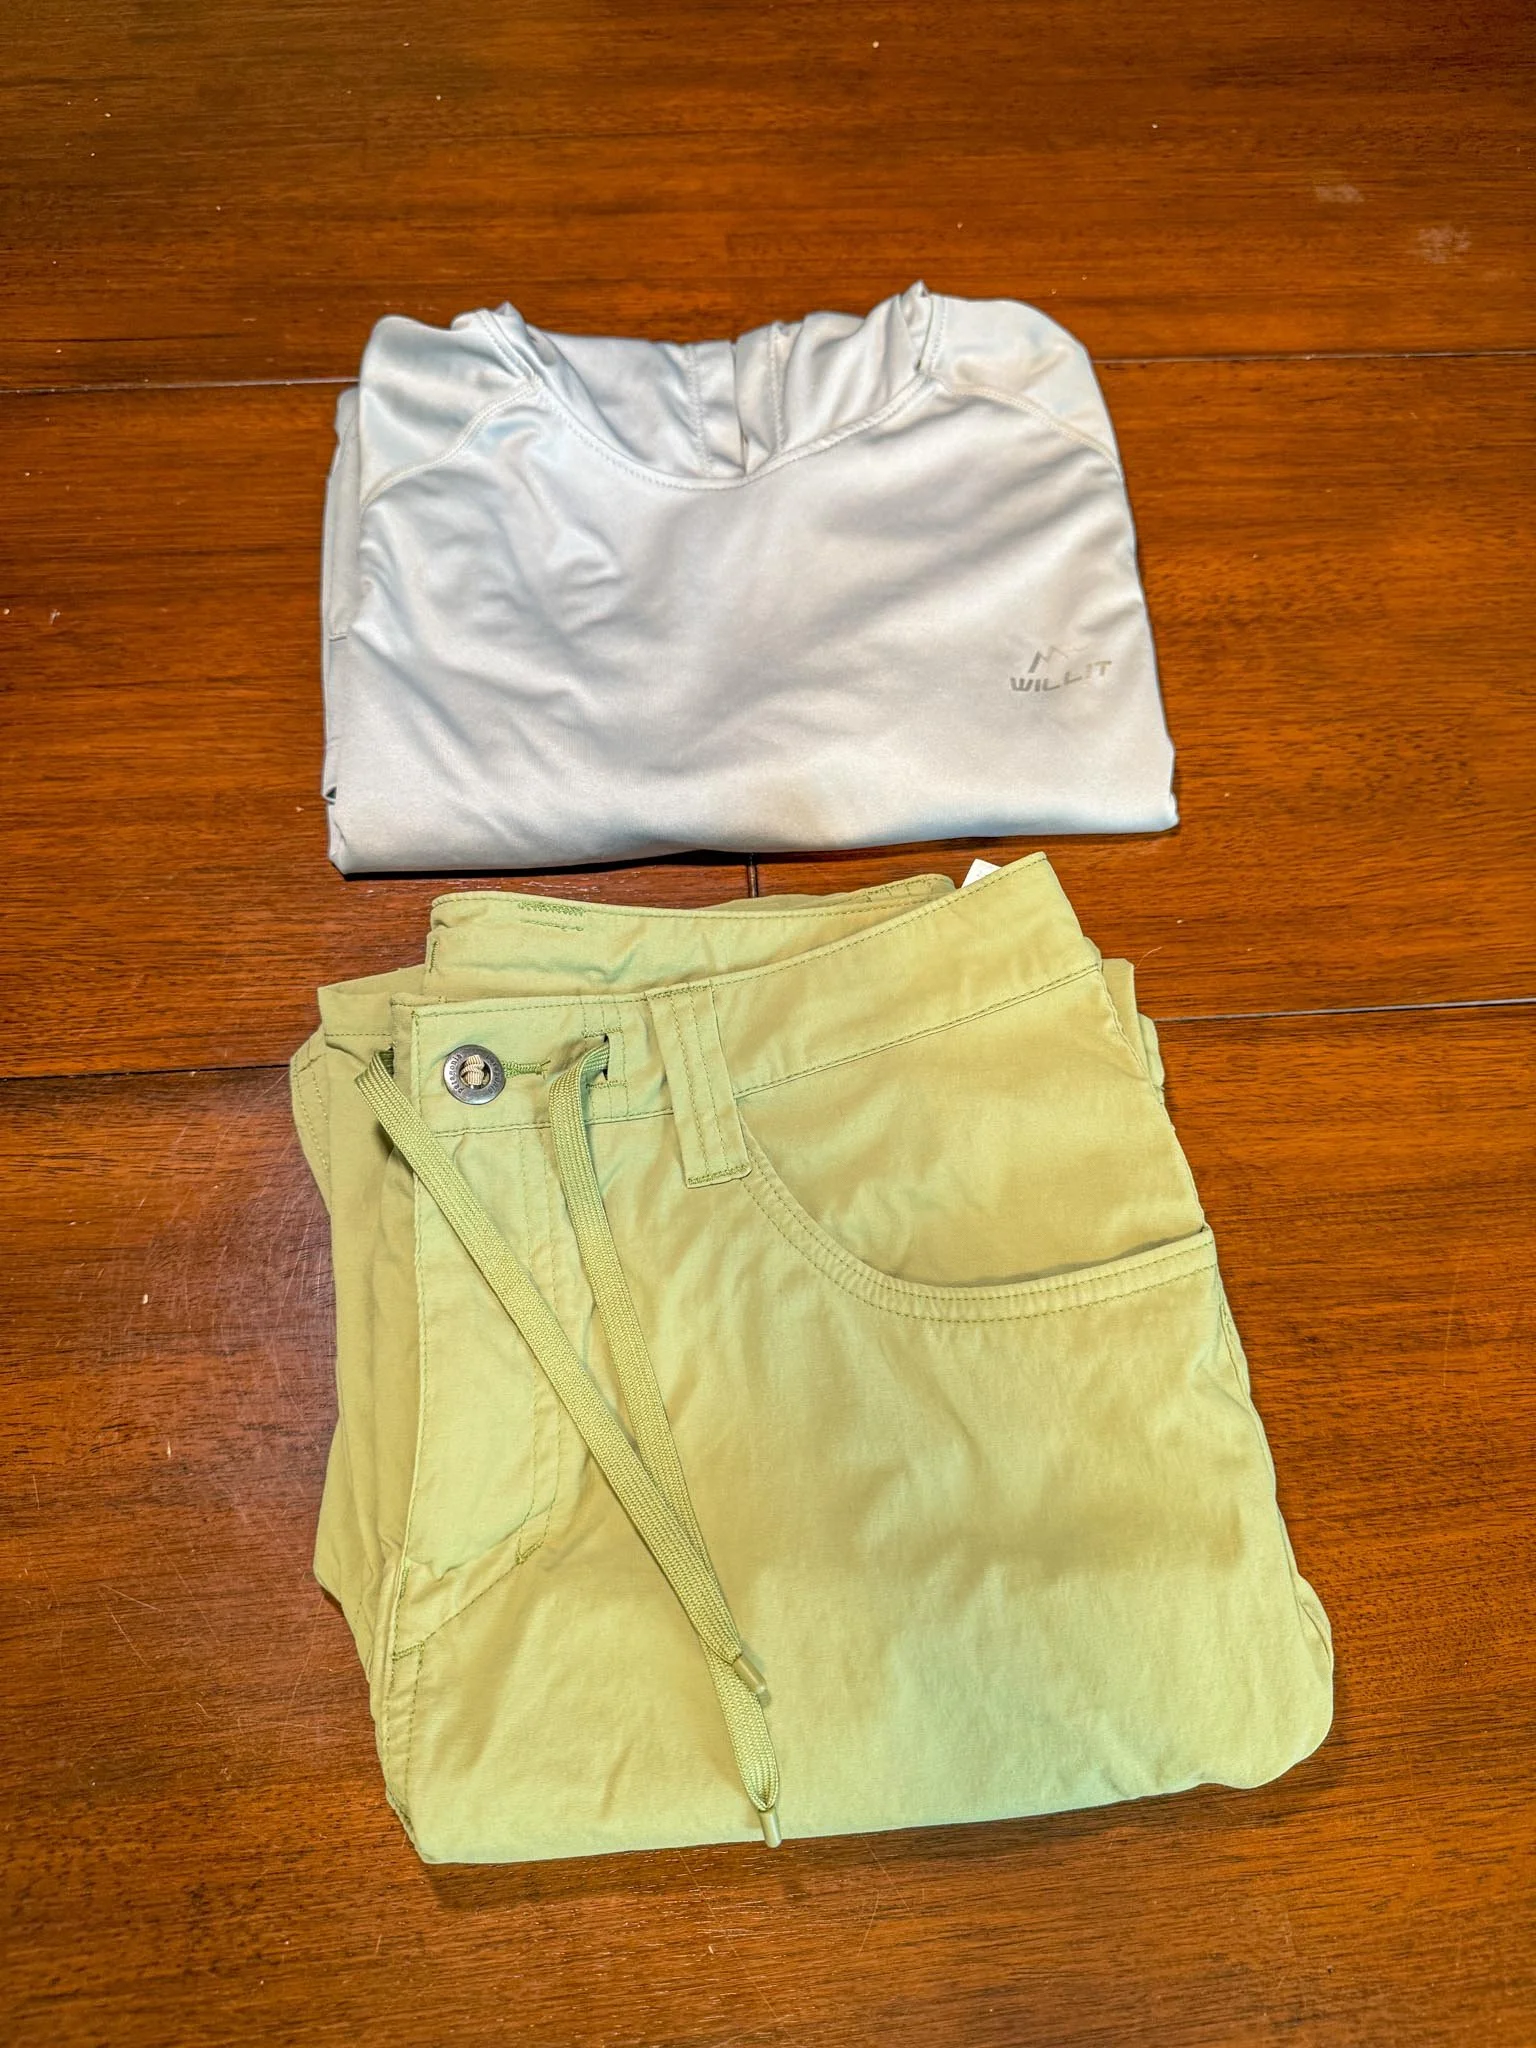
Mid layers are all about comfort and adaptability. I’m a big fan of sun hoodies, whether it’s a Patagonia staple or a cheap Amazon find — they breathe well, protect from sun exposure, and dry out fast. For pants, I’ll go with zip-offs when I need options, but honestly, Walmart Wrangler hiking pants have been a sleeper hit. They’re cheap, surprisingly durable, and perfect for cave approaches or rough bushwhacks without worrying about tearing up something expensive.
Your weather armor. Puffies and rain shells that keep the cold and wet where it belongs — outside.
Outer Shell
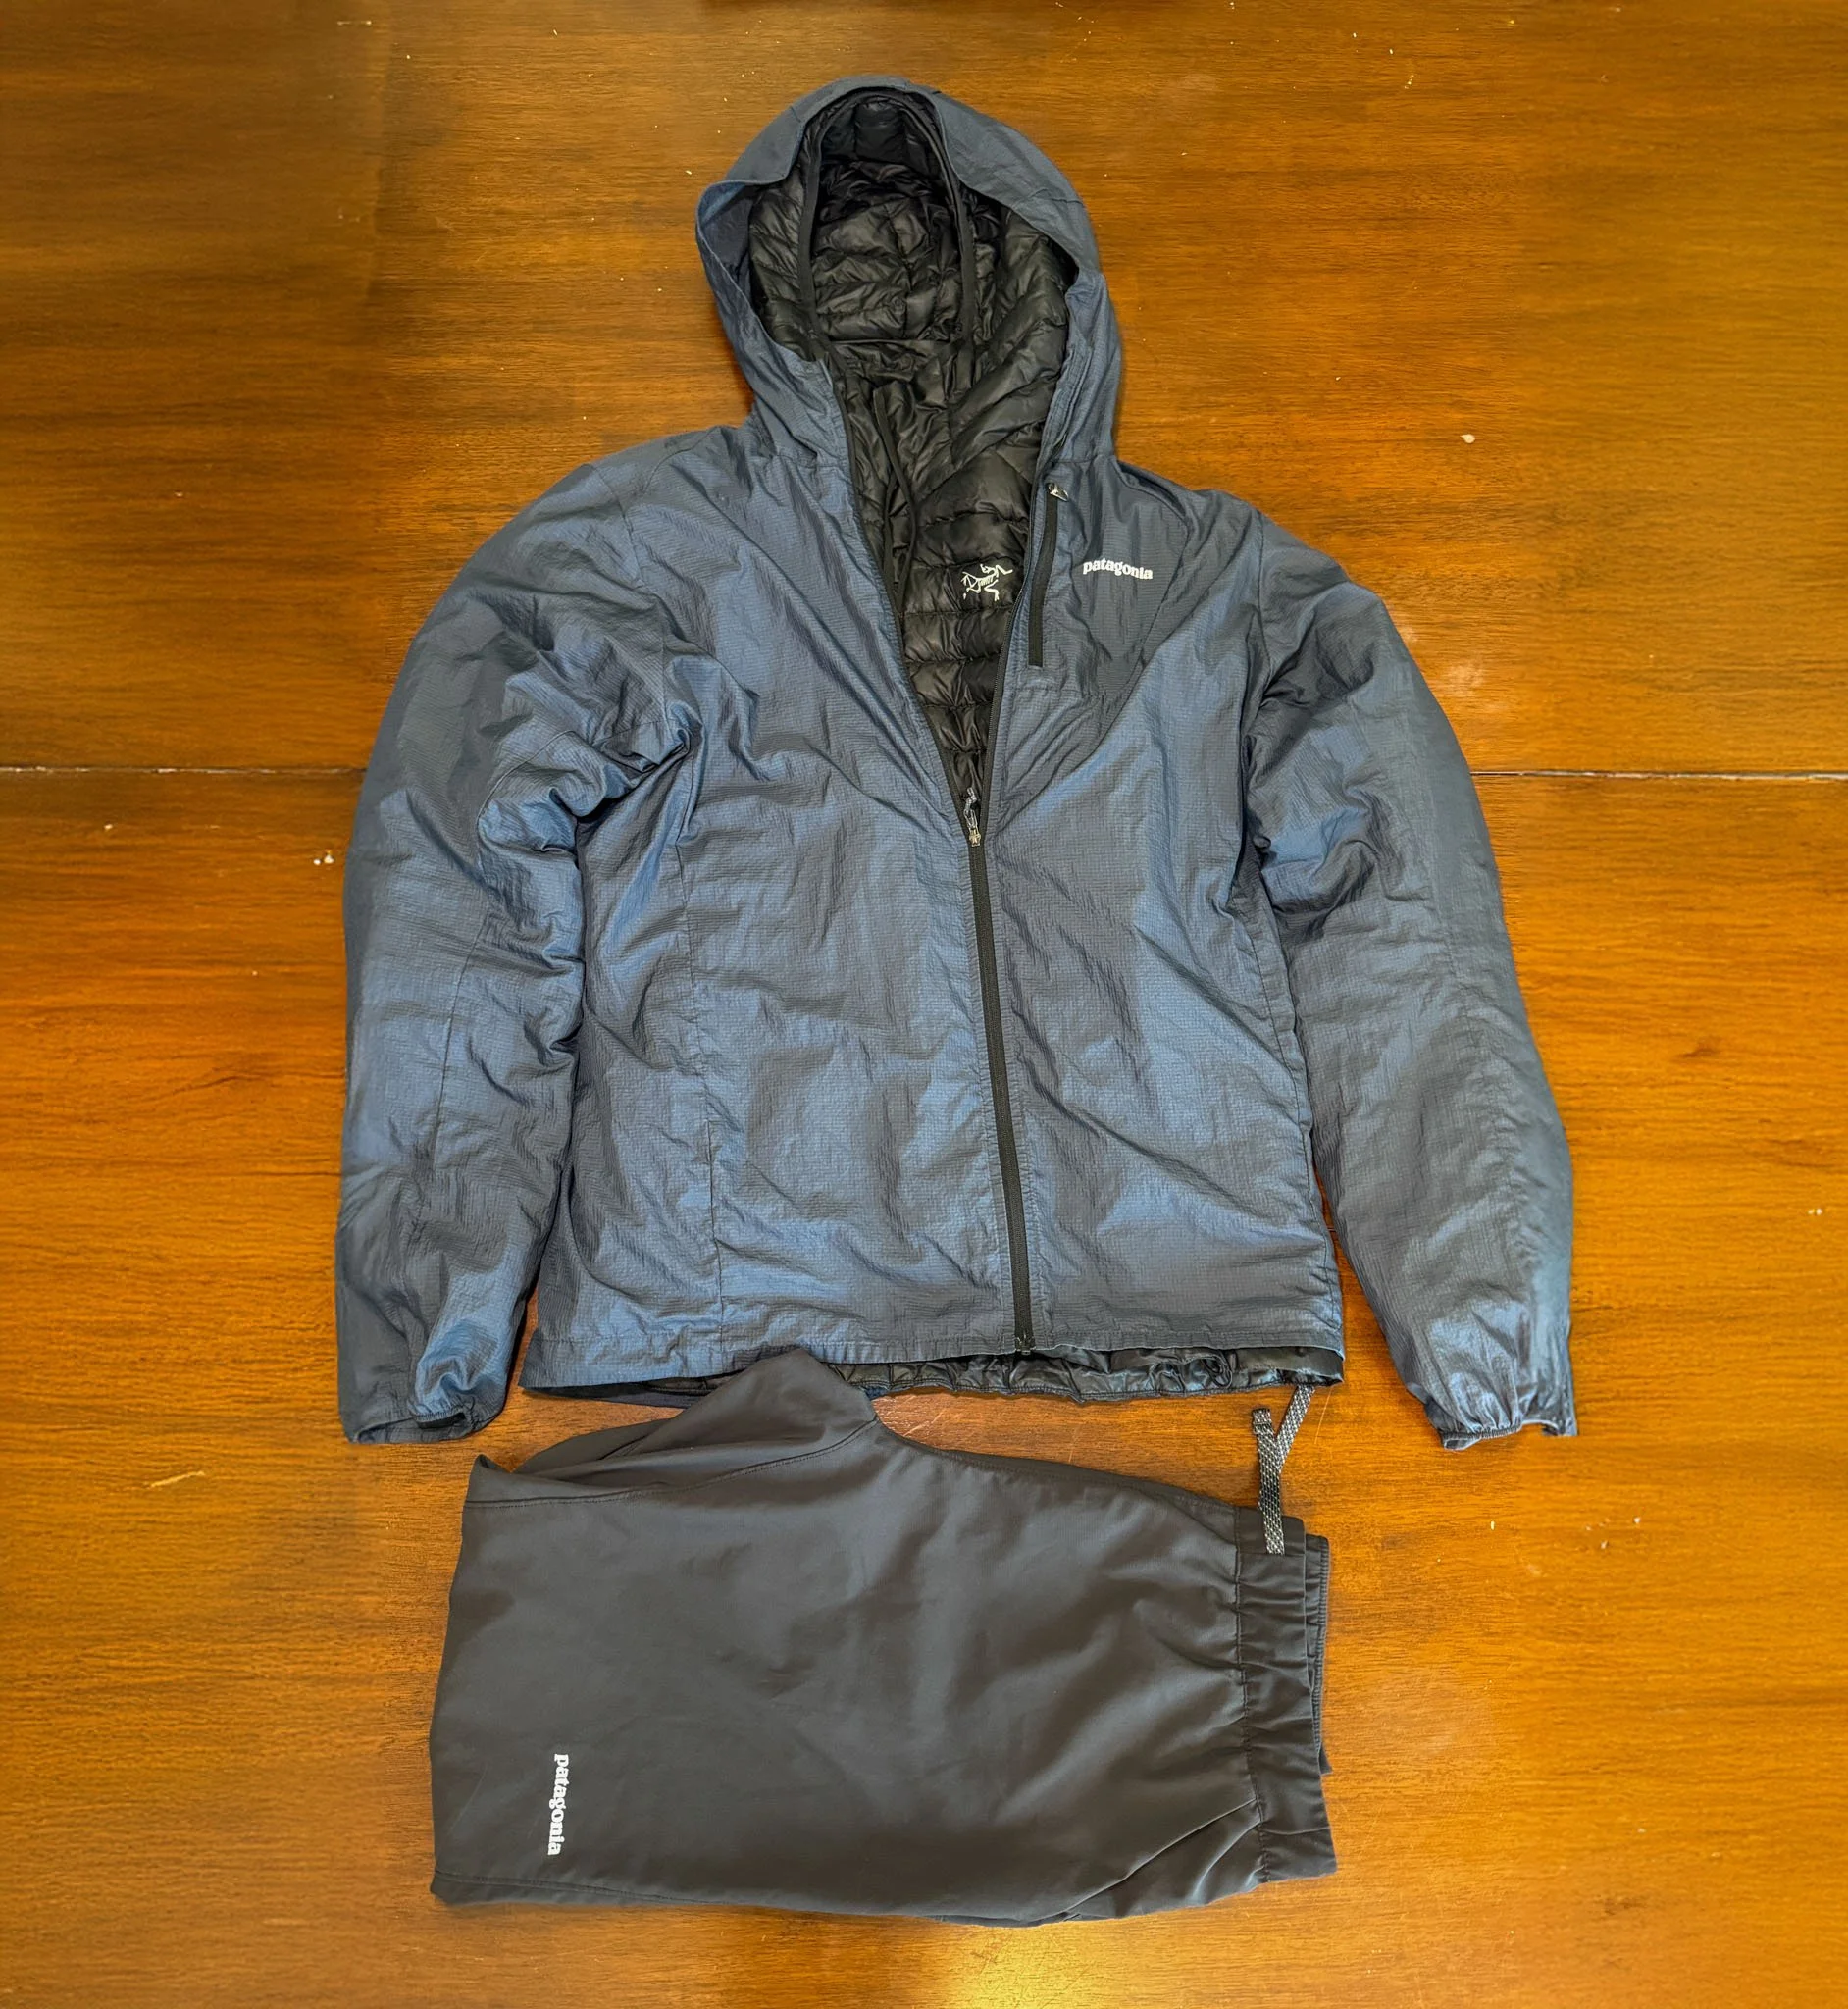
This is the layer that matters when weather rolls in or temps drop. I use a Patagonia Houdini for most conditions — it’s light, windproof, and packs down to nothing. For colder trips or cave camps, I bring an Arc’teryx puffy, which adds warmth without bulk. If it’s going to be wet, I’ve also used The North Face rain jackets and Patagonia’s hiking rain pants to stay dry without overheating. I don’t carry a hard shell on every trip, but when I do, it’s because the conditions call for it — and I want to be ready.
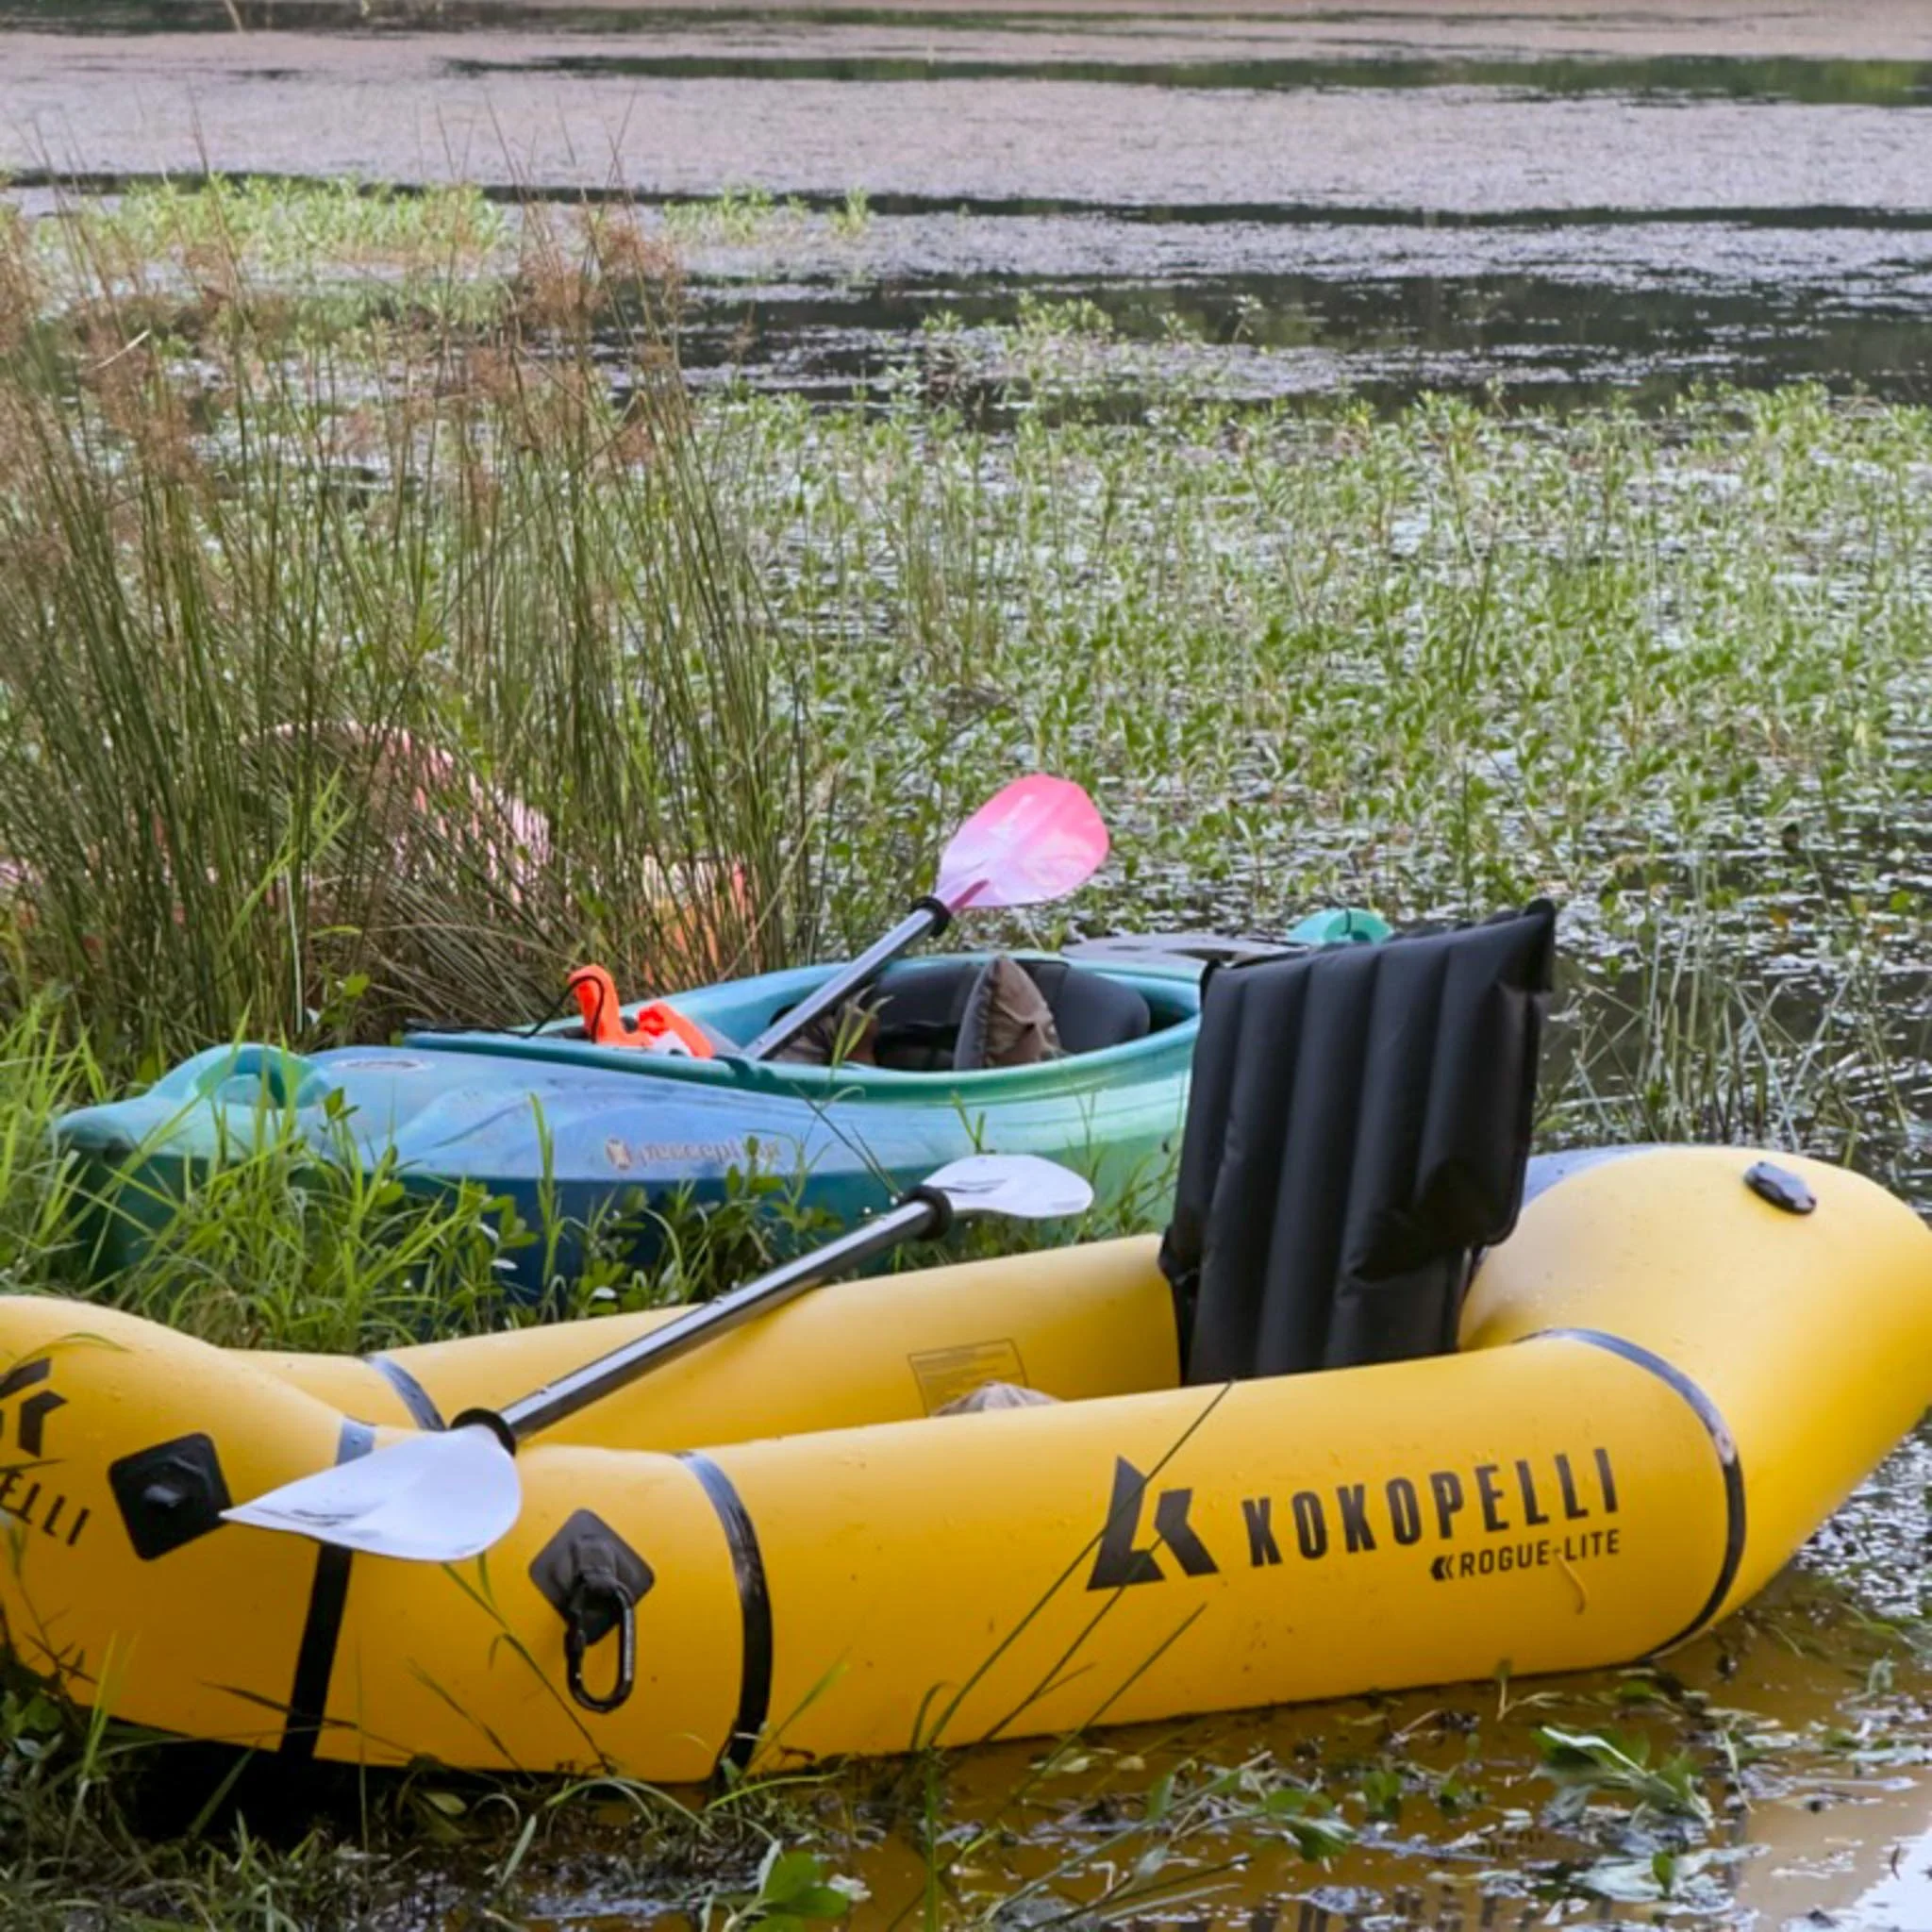
Whether you’re floating out of a canyon, crossing an unruly river, or just reaching a hard-to-access spot — a packraft turns water into a highway.
Packrafts
I’ve been using Kokopelli Packrafts, and they’ve quickly become one of the most useful tools in my kit. Whether I’m crossing a lake to reach a remote cave entrance or floating through a subterranean river, they’ve made the journey possible. These boats pack down small, weigh almost nothing, and are way easier to manage than a full-sized kayak.
Setup is fast, the ride is stable and surprisingly comfortable, and they’re tough enough to take a beating. Different models are rated for different environments — from calm lakes to serious whitewater — so it’s worth choosing the right one for your goals. If you’re looking for a way to turn water into a shortcut, this is it.
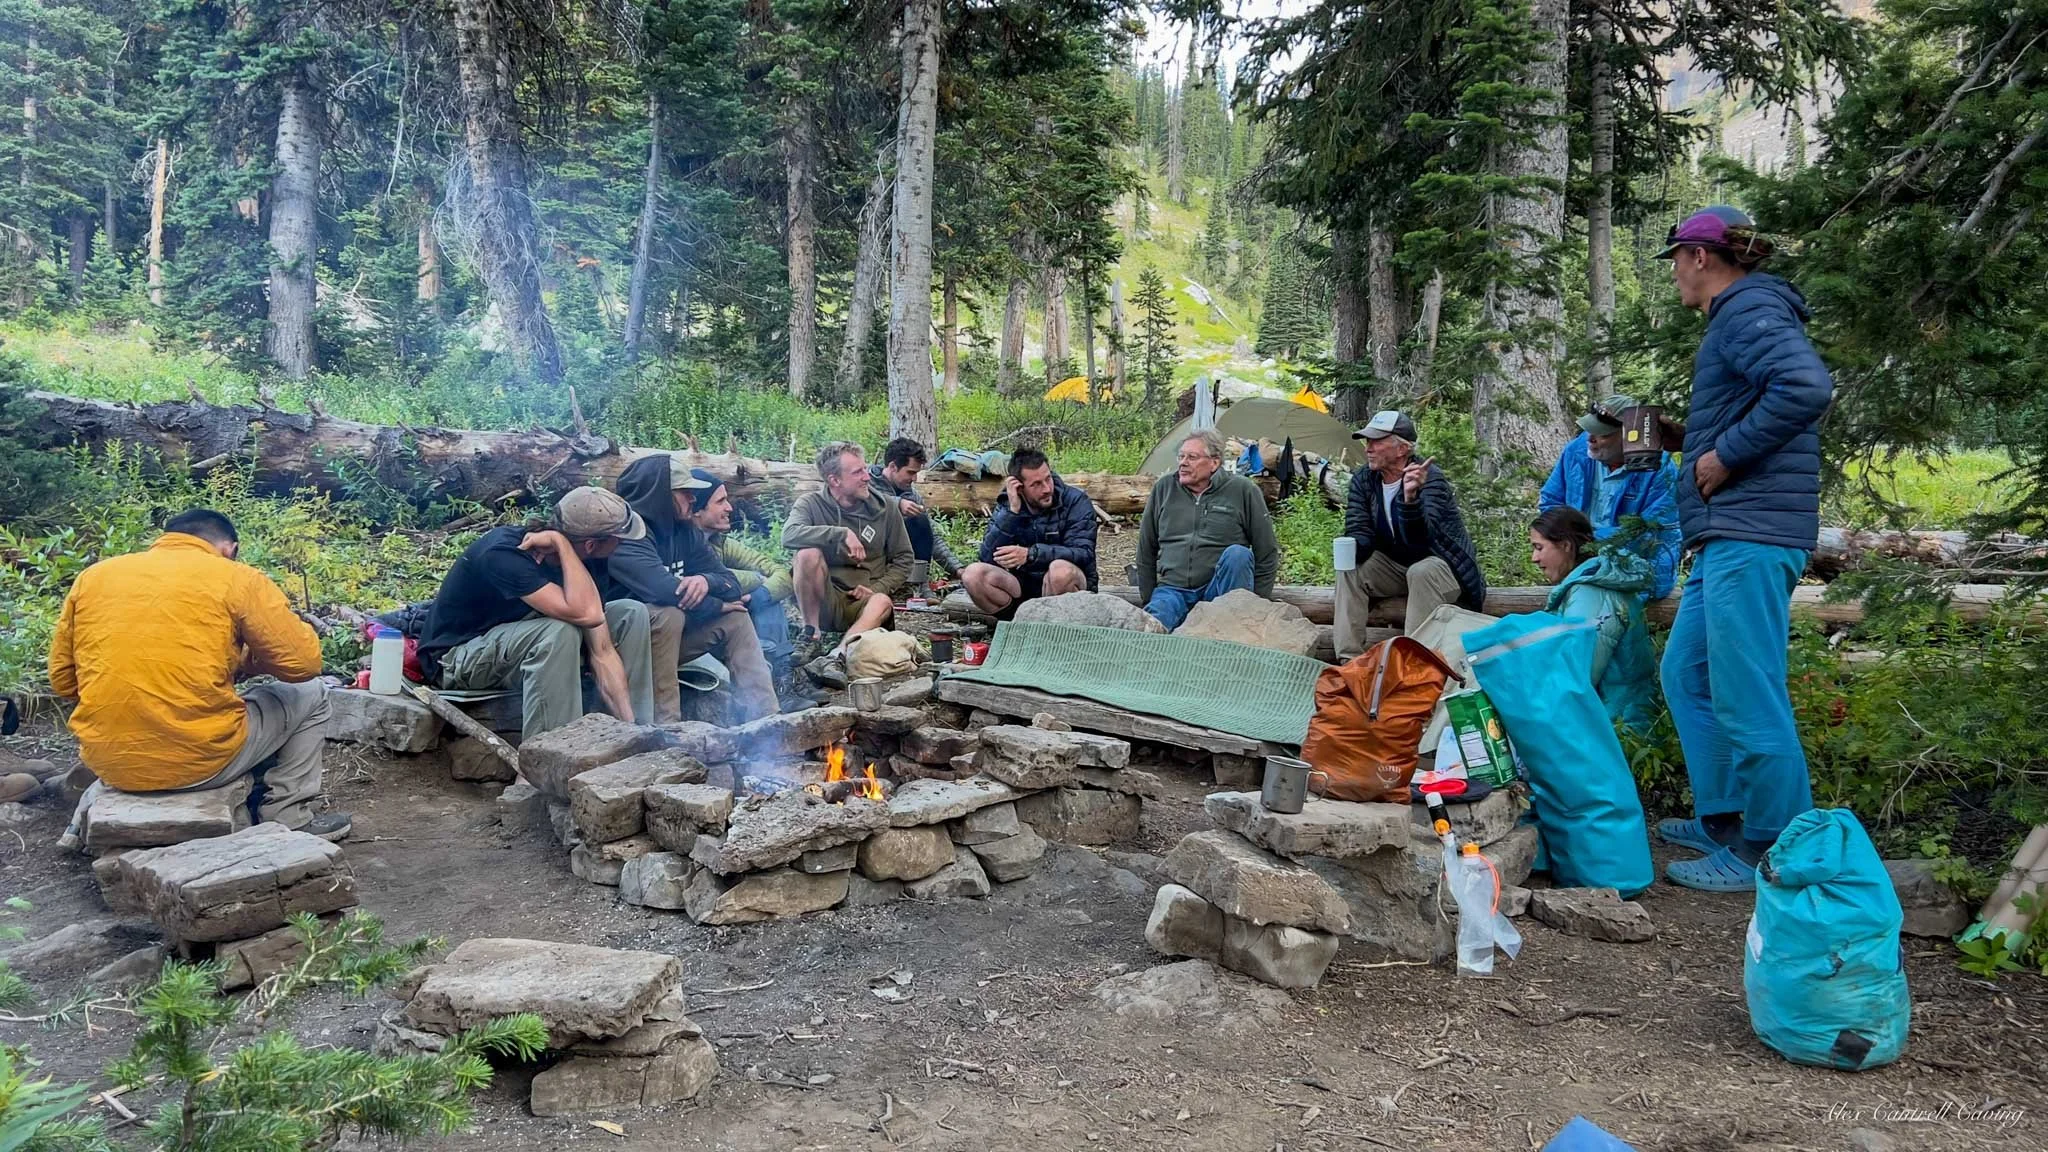
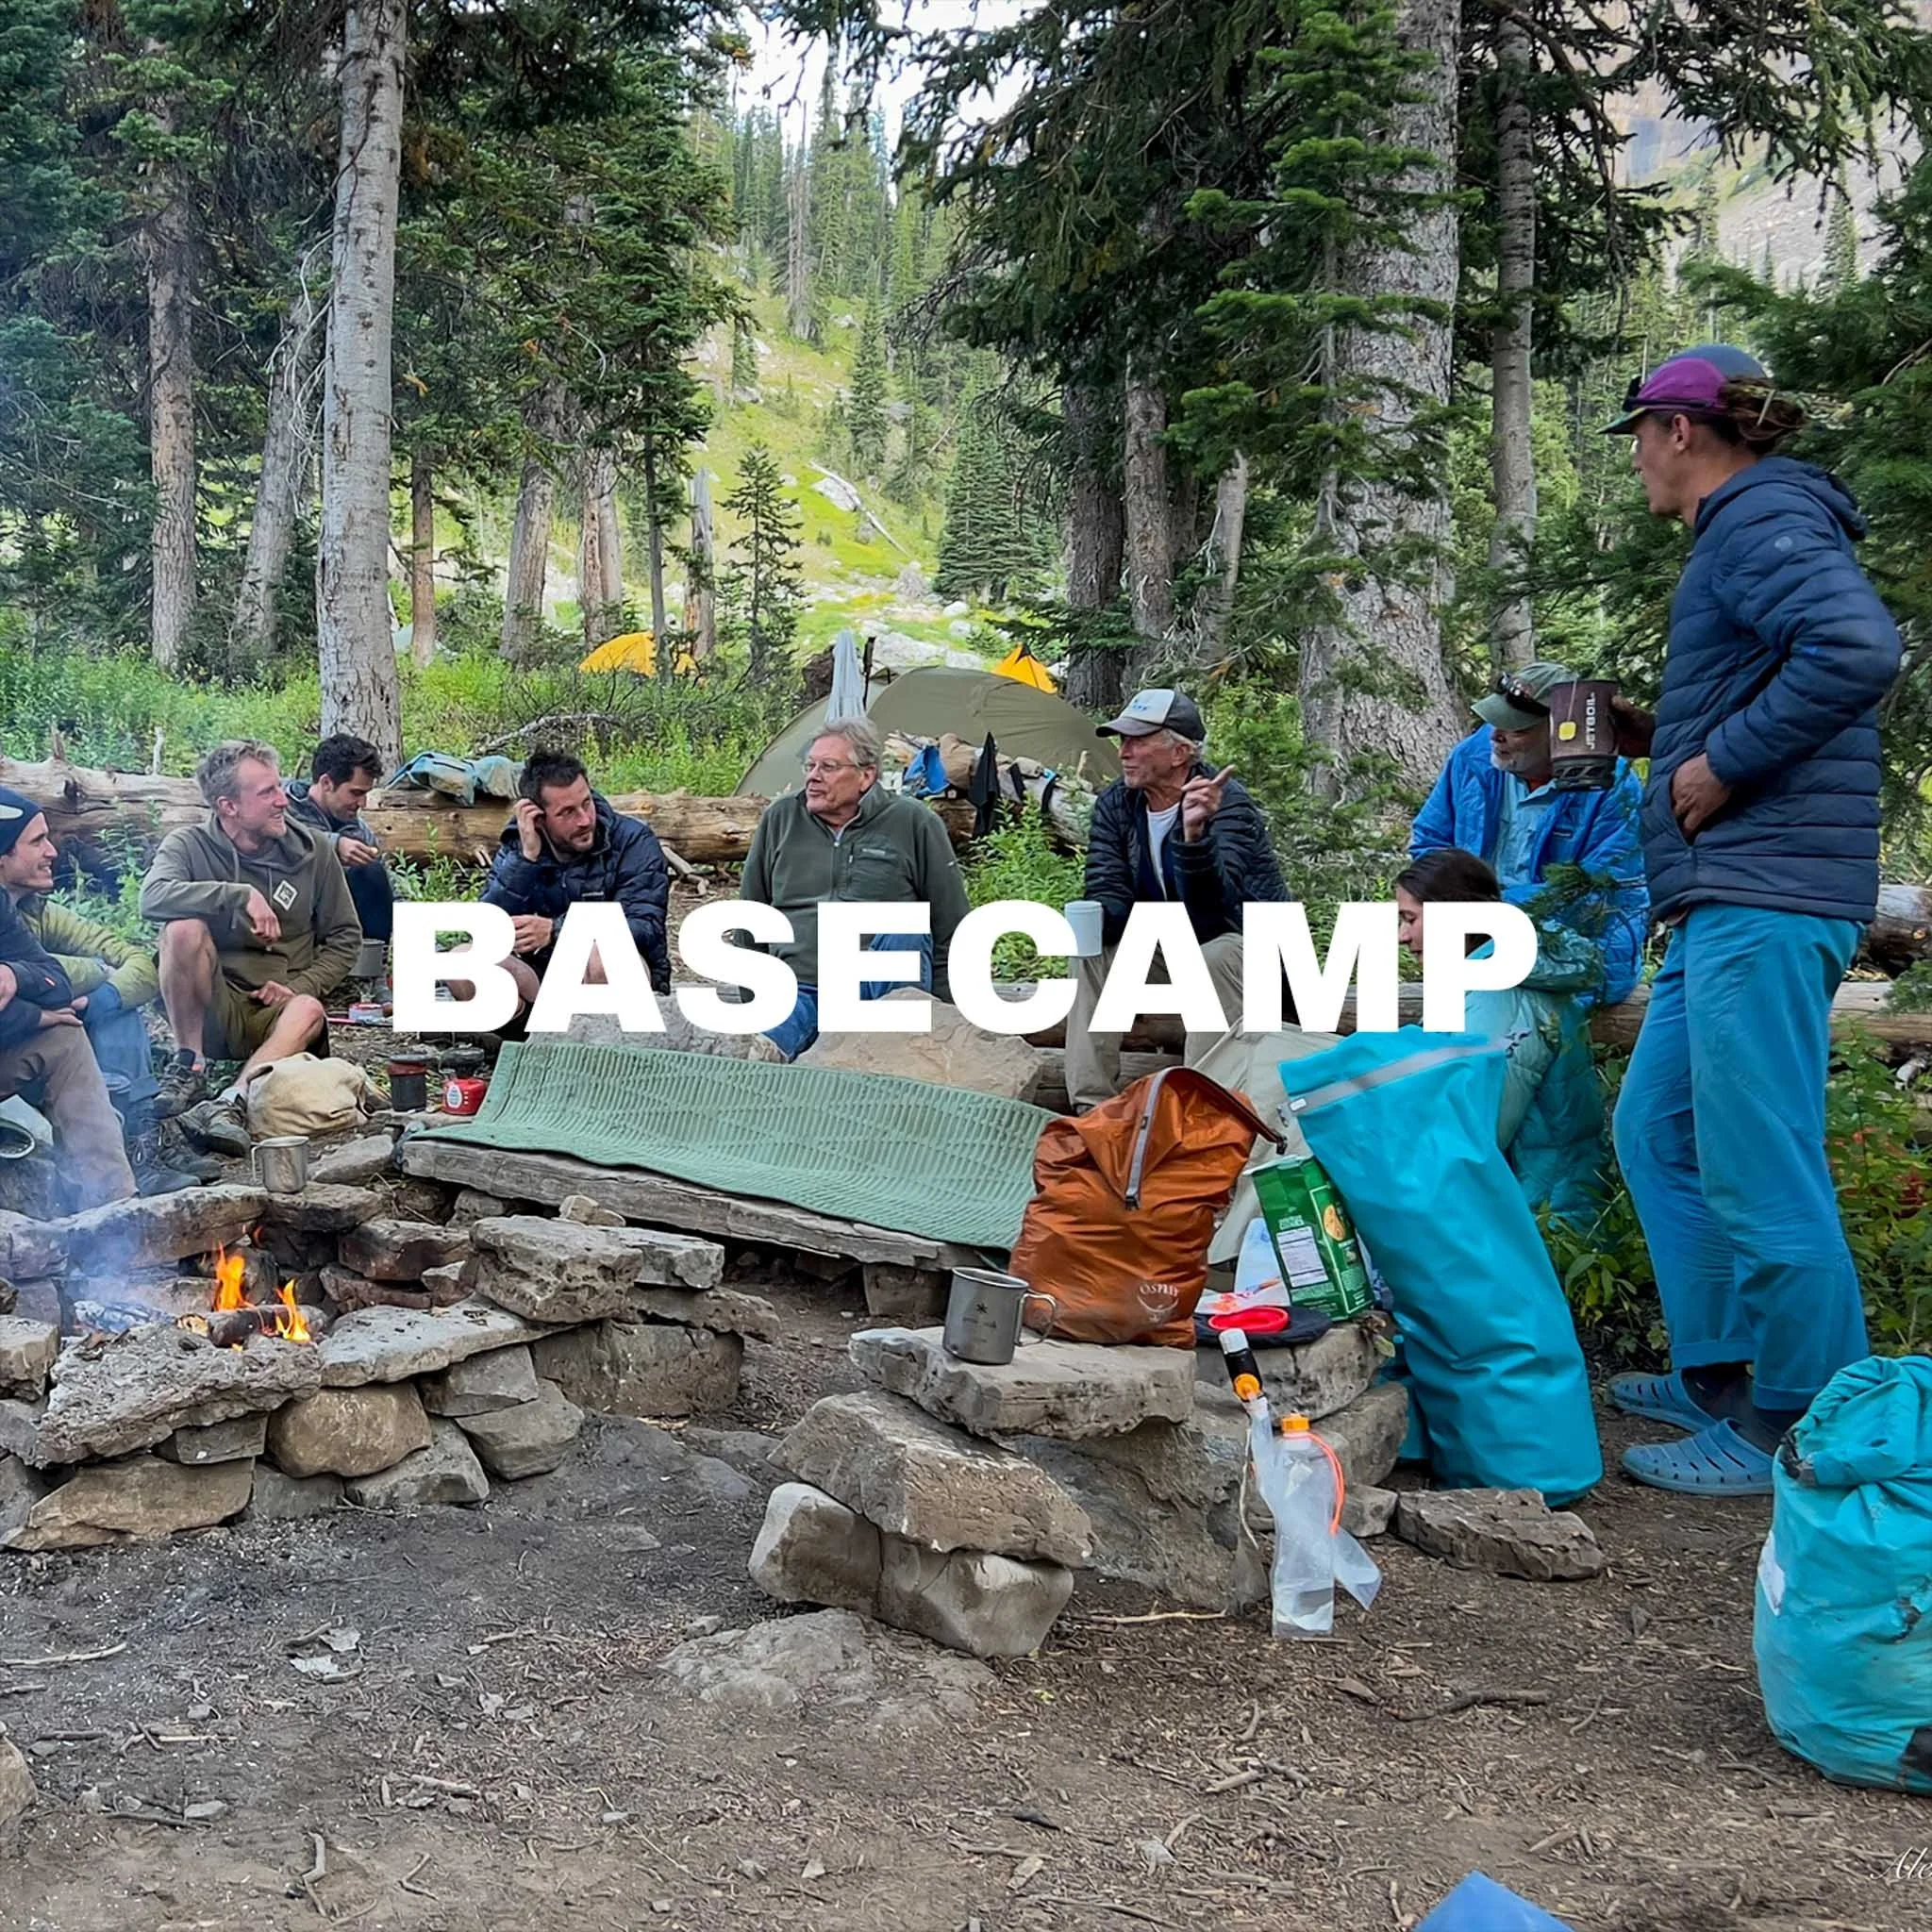
The Expedition HQ
Basecamp
The best tent is no tent… but when the bugs, rain, or cold say otherwise, I pack one.
Tents
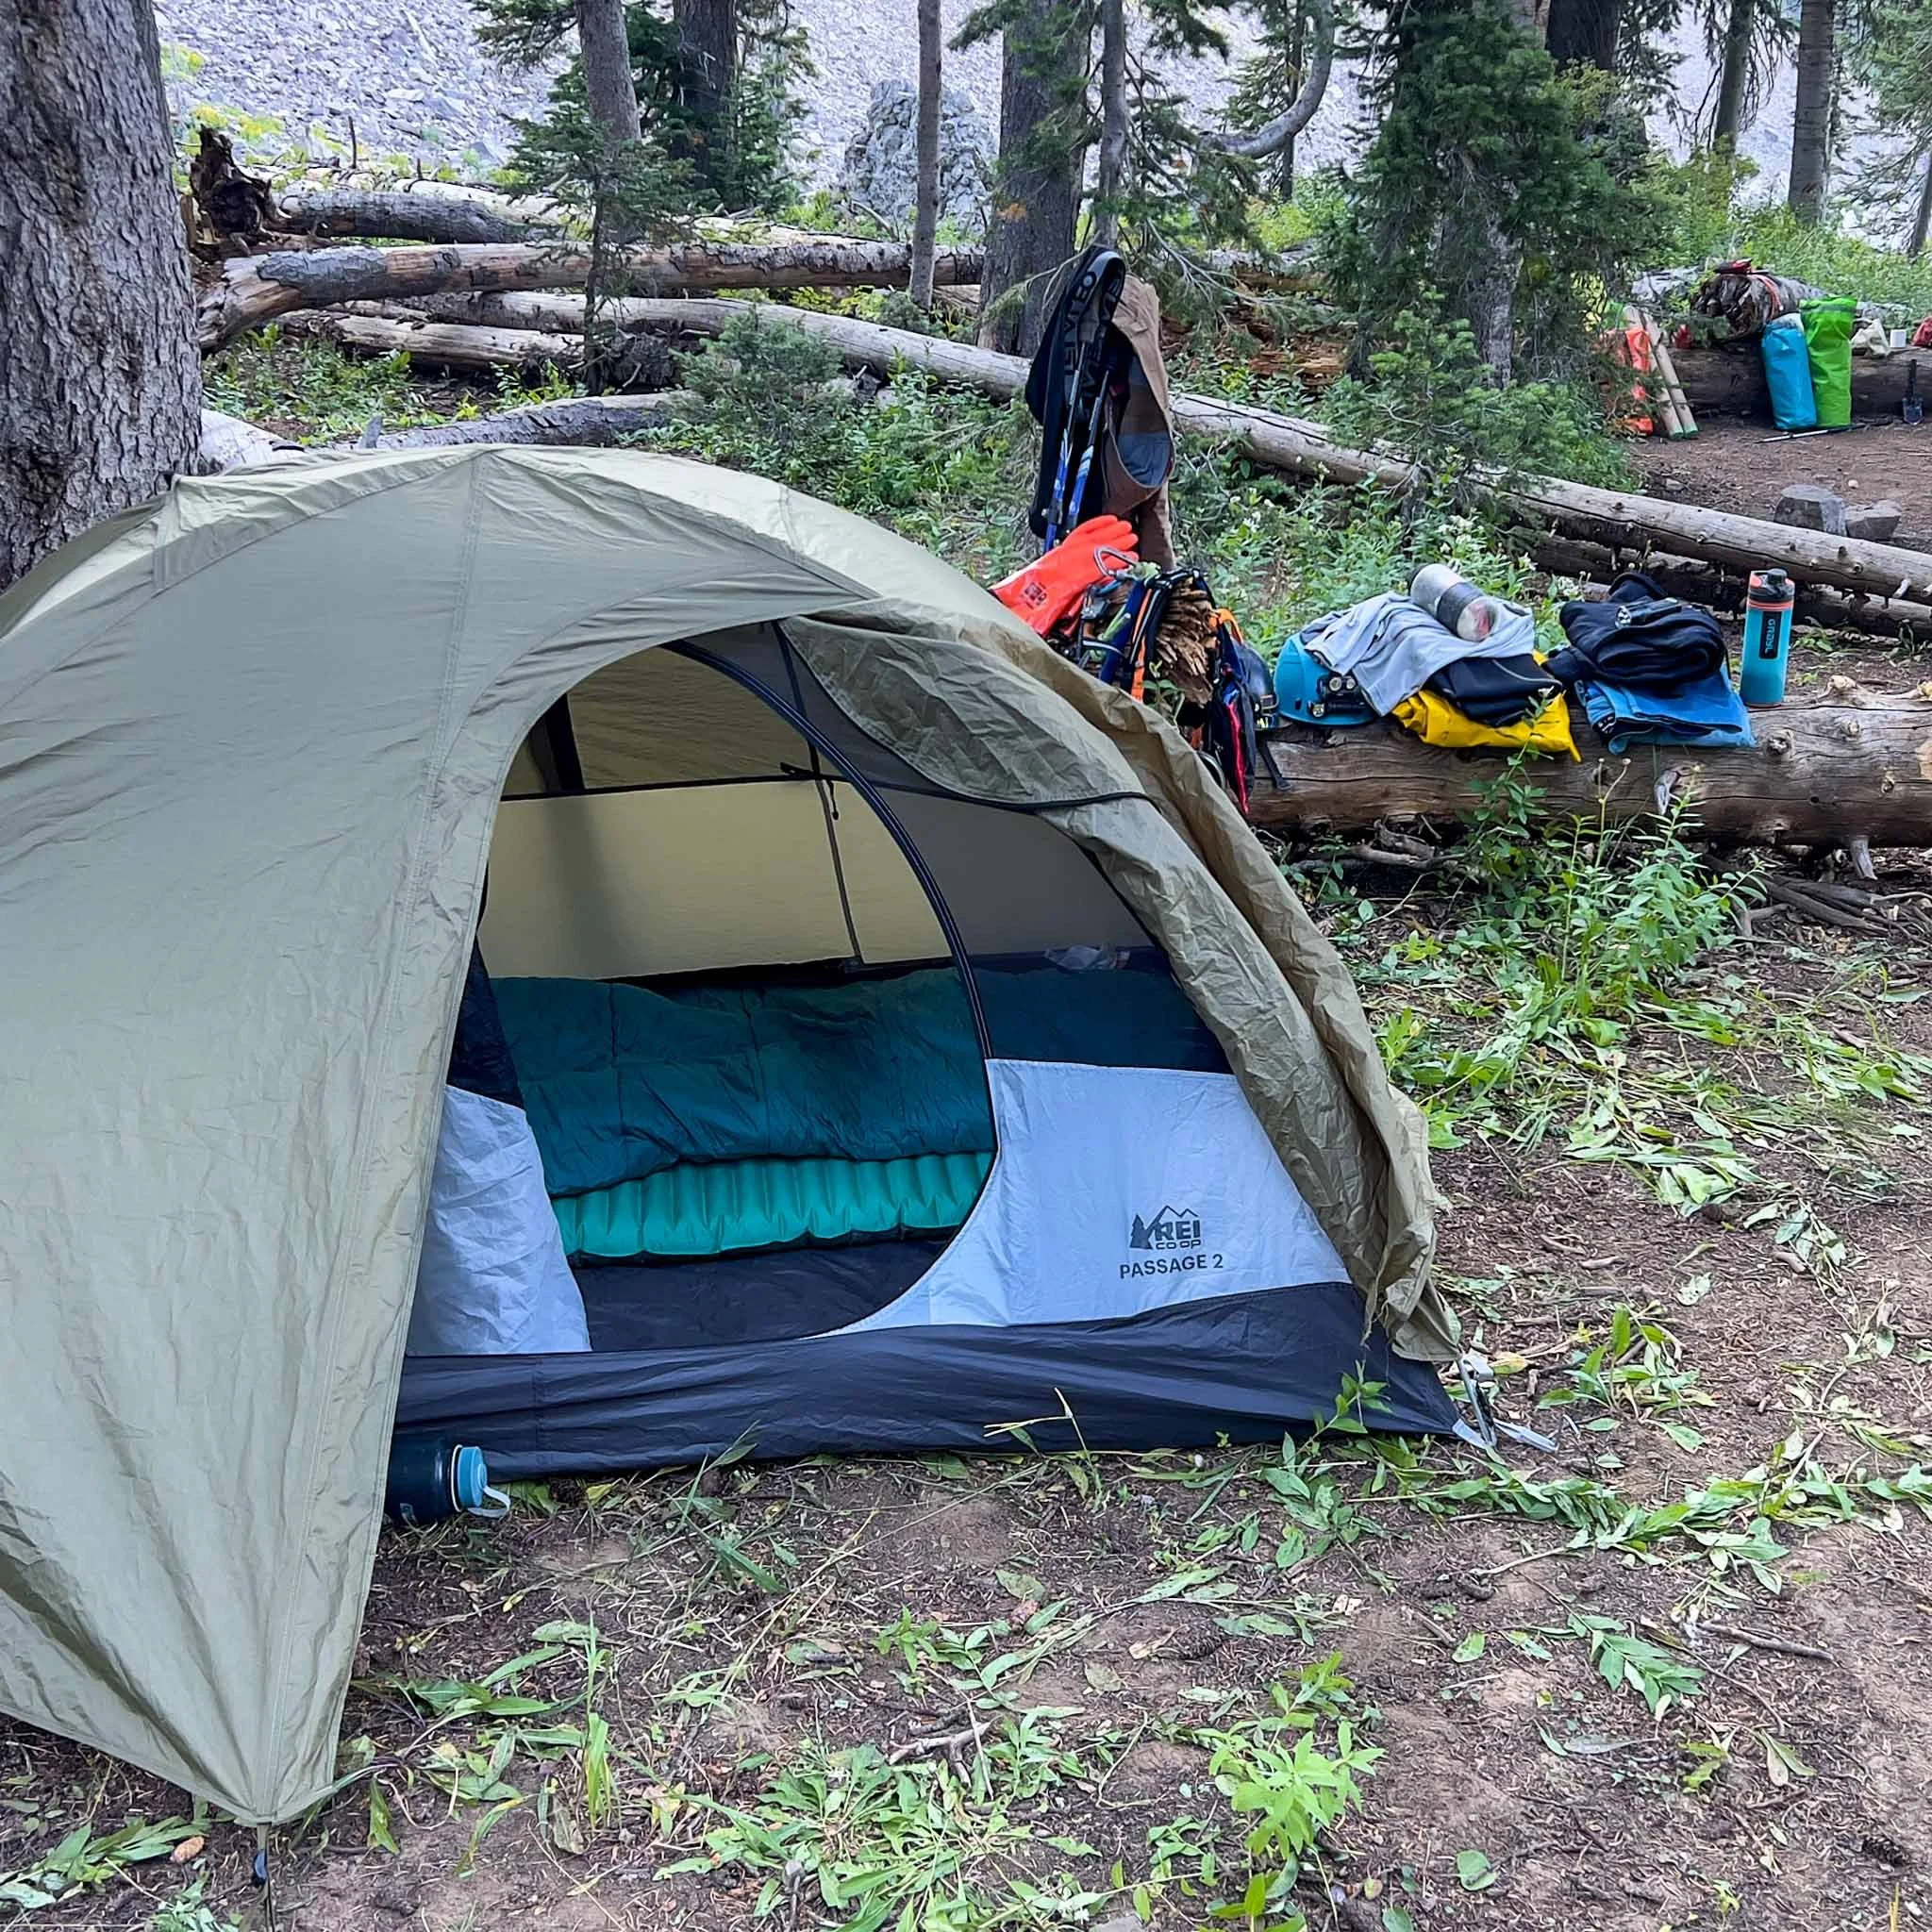
I’ve used the REI Passage 2 for years, and it’s been solid — especially when I’m setting up surface camp near caves or after a long approach. It’s not the lightest setup, but it’s roomy, easy to pitch, and holds up in the rain. Sometimes I’ll skip the tent entirely and just cowboy camp if the weather’s right, because nothing beats sleeping under the stars after a long day in the field.
That said, I’ve been thinking about switching it up — something lighter for alpine approaches and longer hikes. I’ve looked into bivvy sacks and ultralight tents like those from Big Agnes, but I haven’t pulled the trigger yet. At the end of the day, use whatever works for your style and your terrain. My setup’s a little heavier, but it’s what I’ve got — and it gets the job done.
Sleeping essentials
Keeps you warm, cushioned, and off the unforgiving ground.
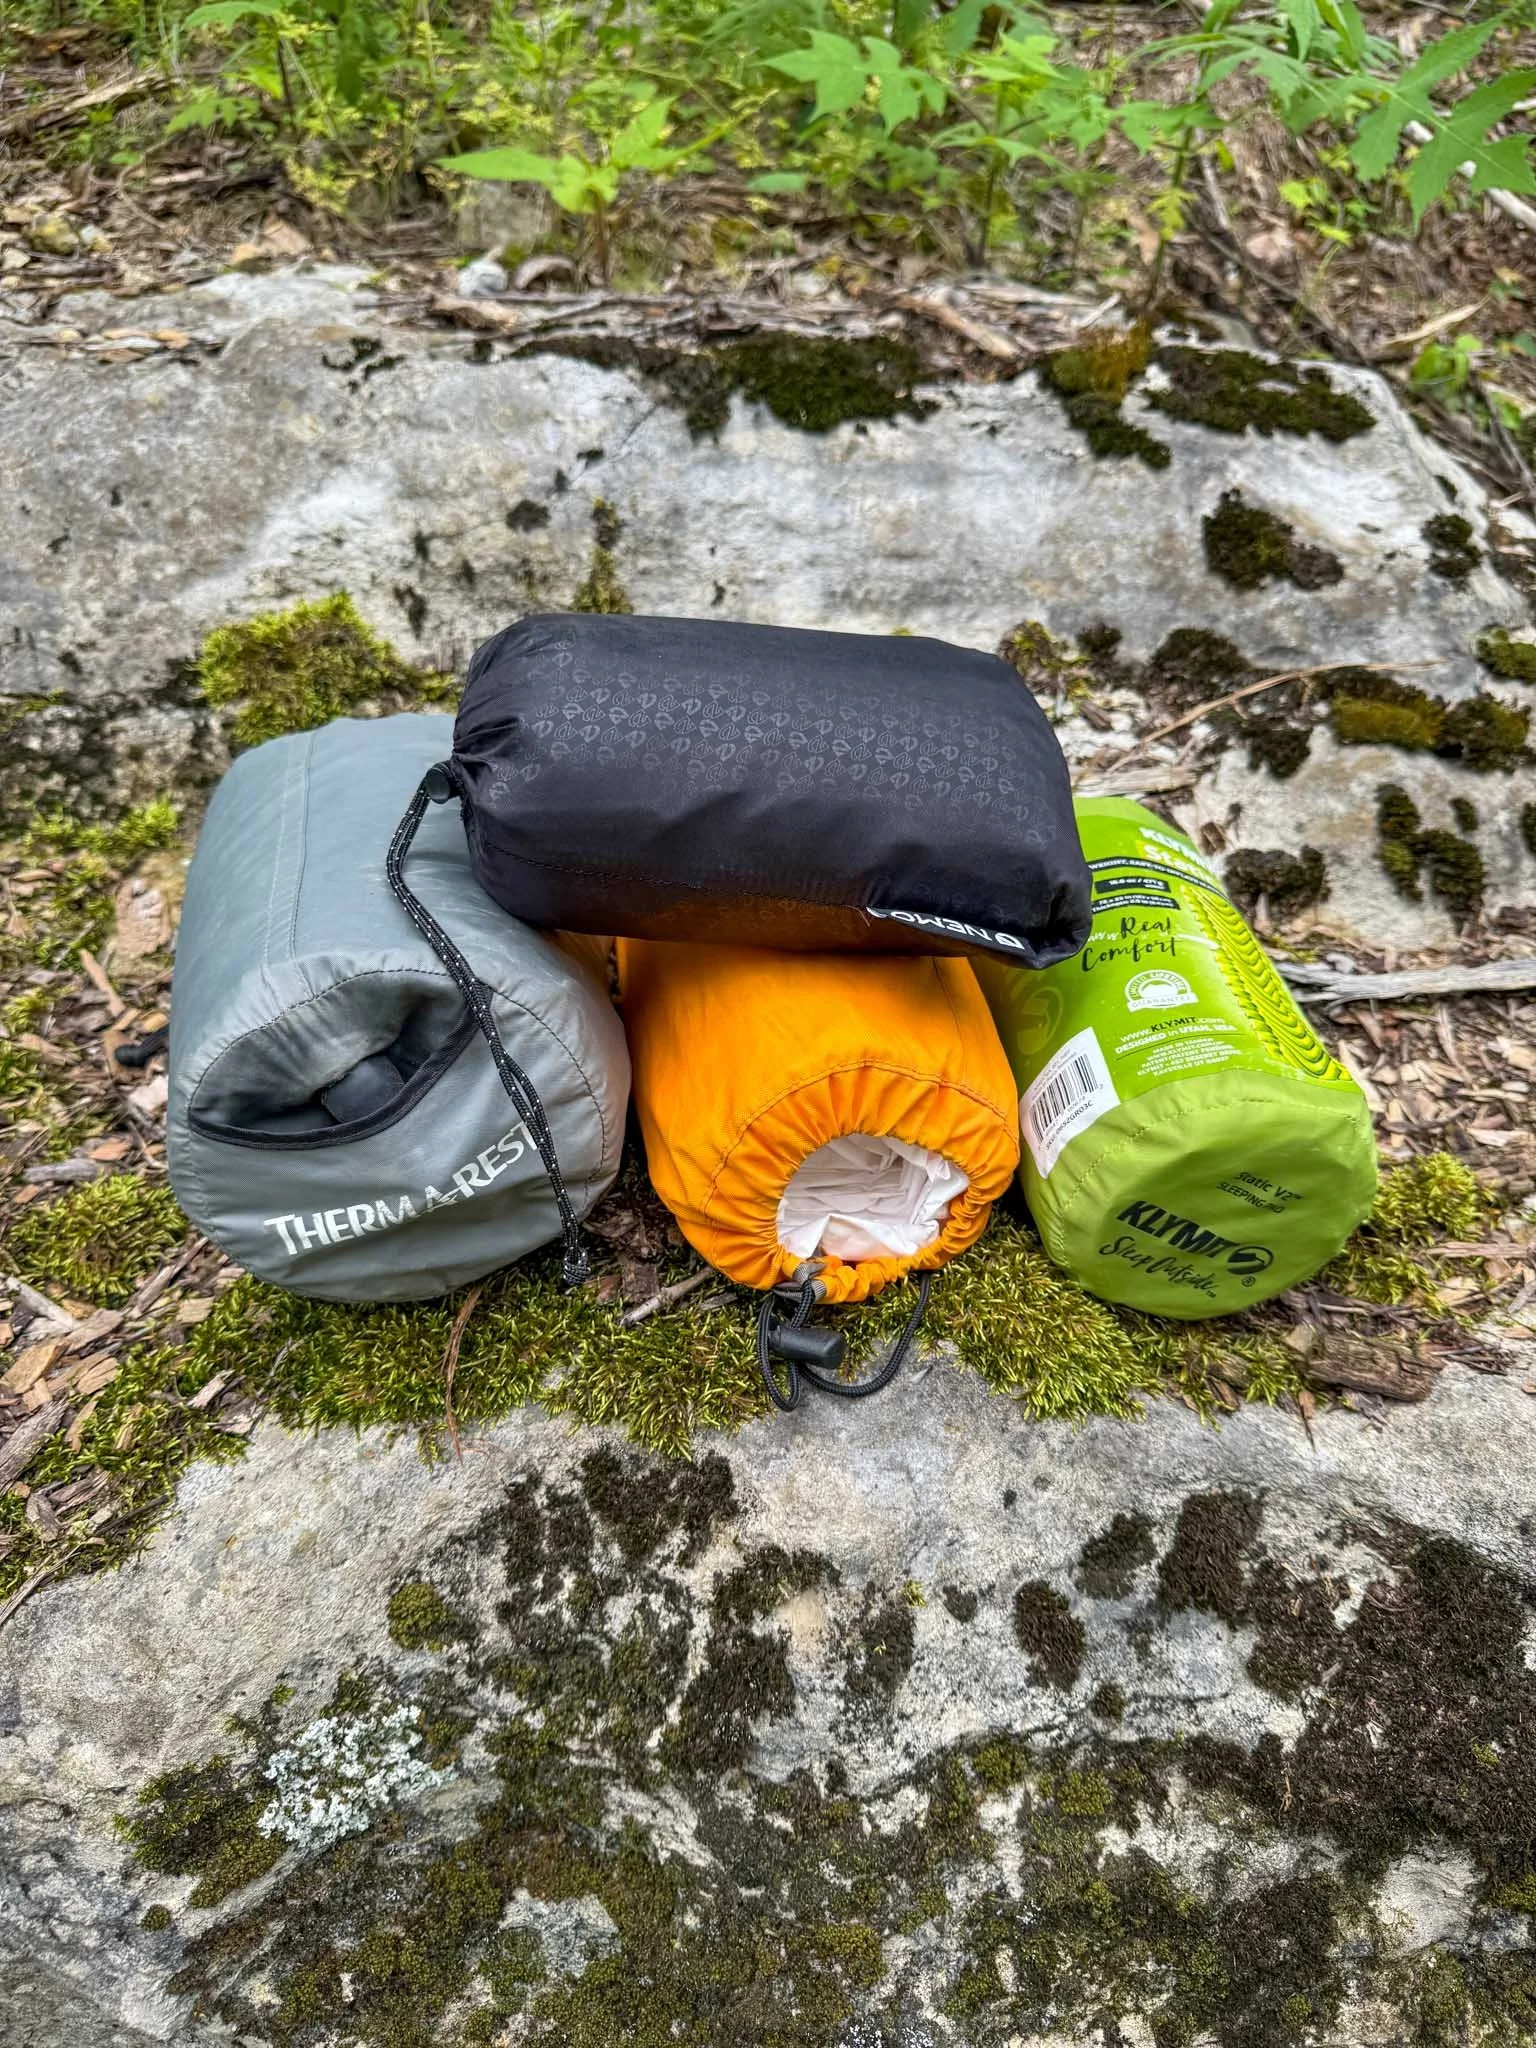
Sleeping pads

For most trips — including cave camp — I use the Klymit Static V. It’s lightweight, compact, and has a simple design that still feels super comfortable. My sleeping bag usually does most of the warmth work, so this pad strikes a good balance for three-season use.
When things get colder, I switch to an insulated Therm-a-Rest pad. They don’t make the one I use anymore, but it’s a blow-up style that packs down small and often comes with its own pump sack. It’s cozy, durable, and adds a nice buffer between you and the cold ground — a small upgrade that makes a big difference.
Your bed in the wild — warmth and survival in one bundle.
Sleeping bags
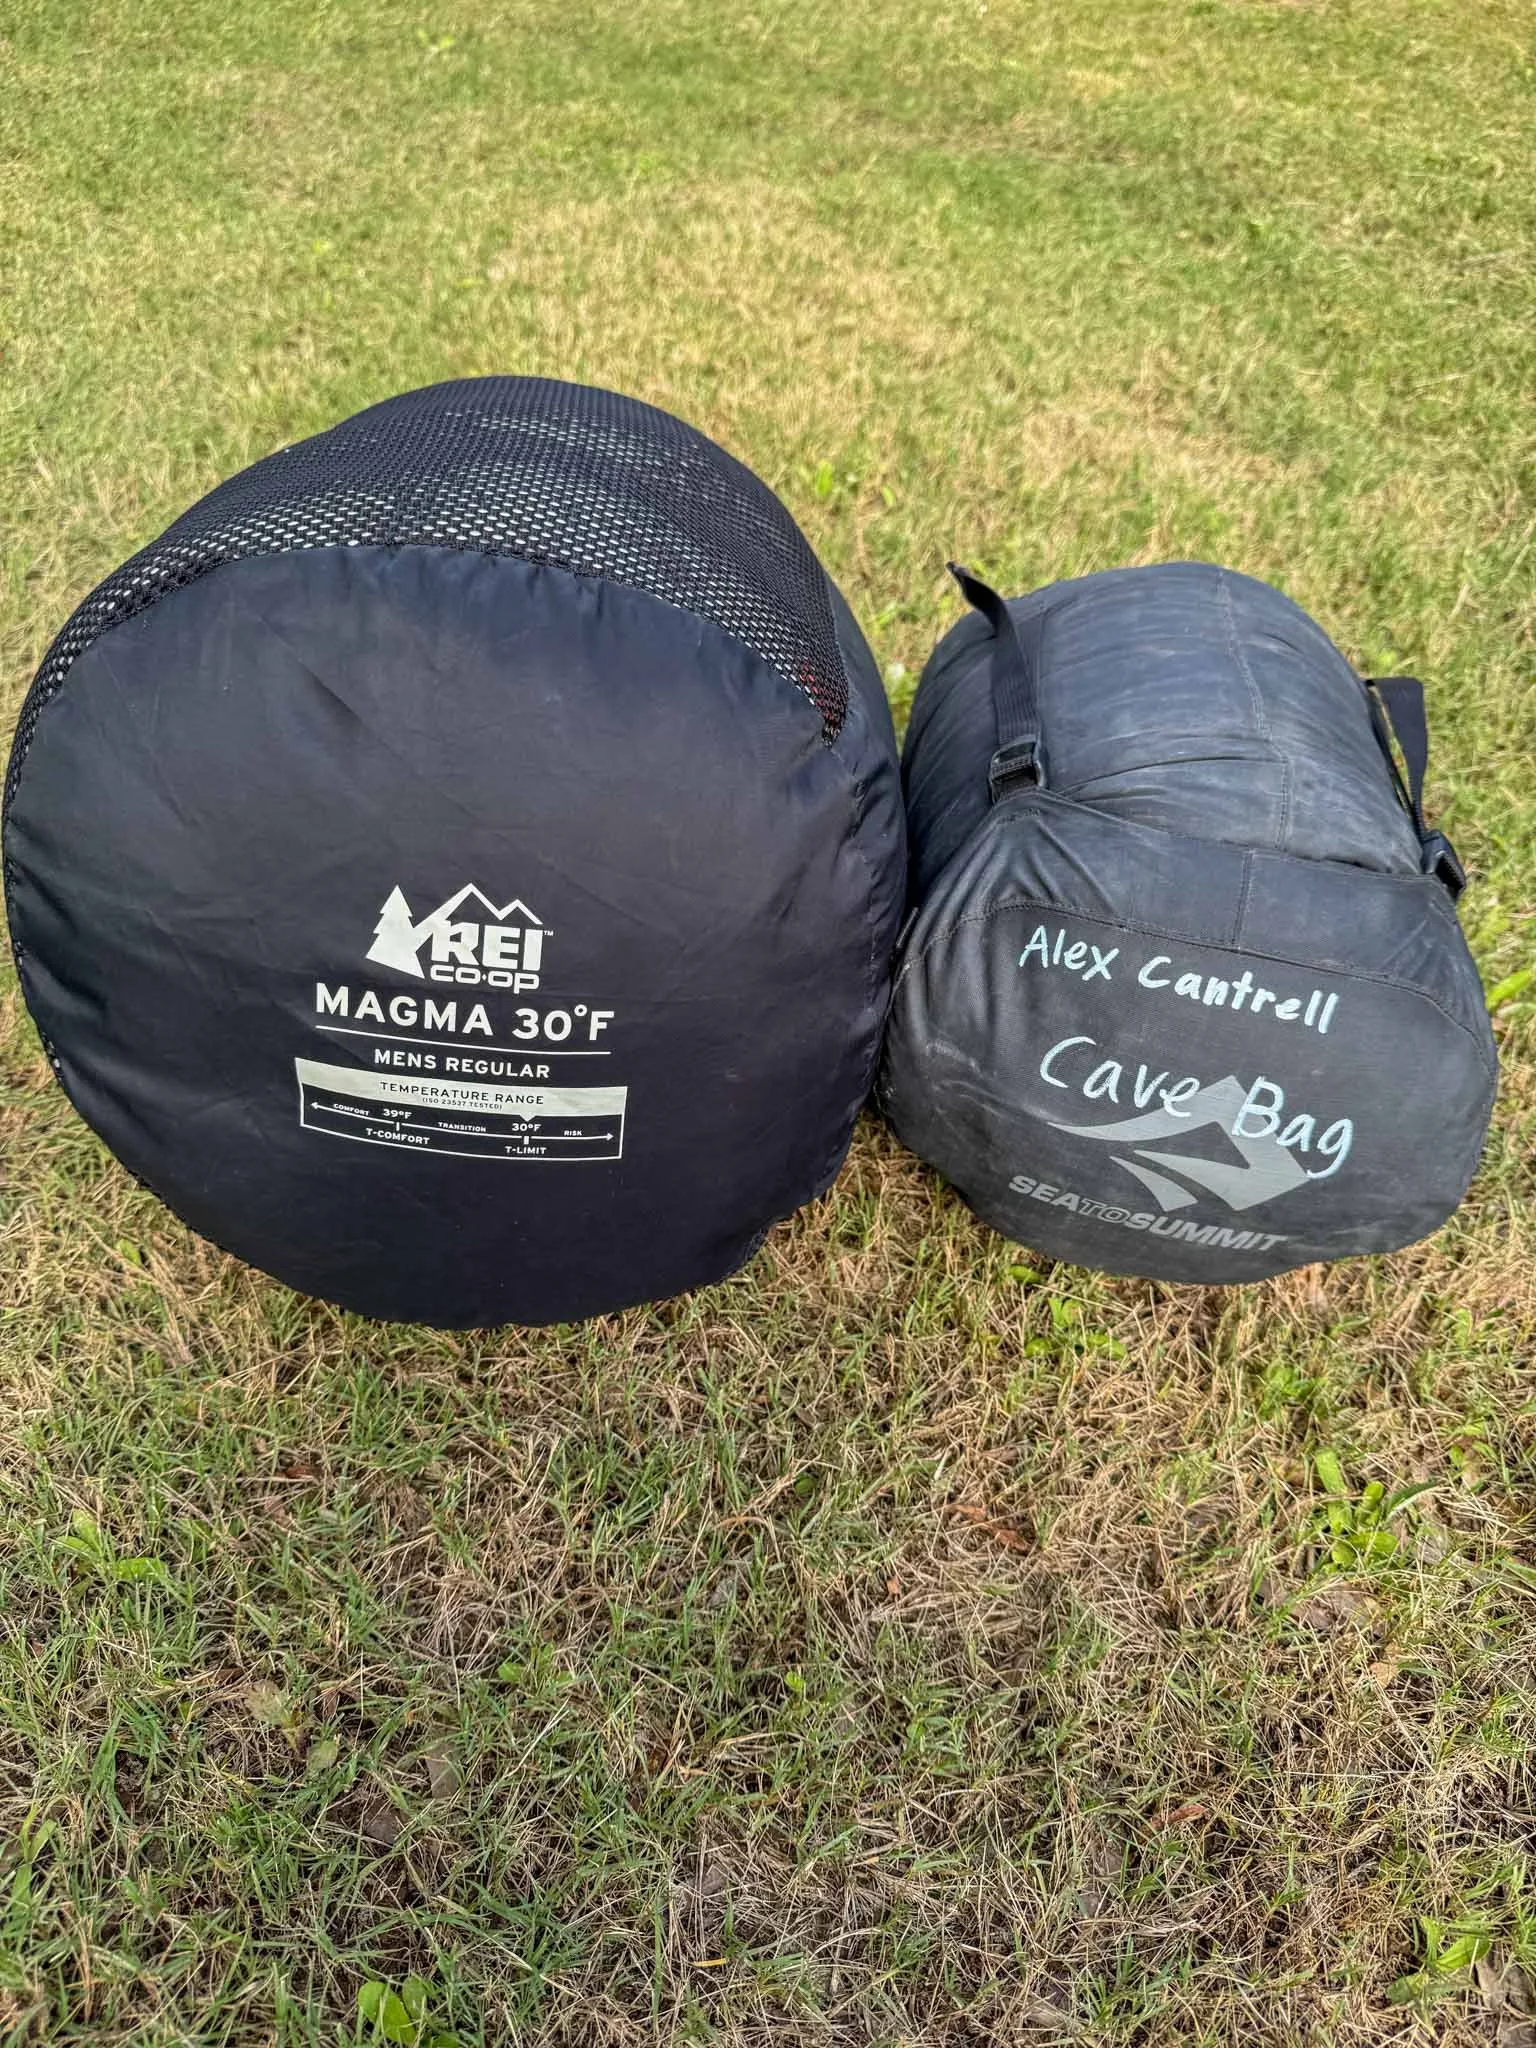
Usually, I use the REI Magma 30, a compact down bag that’s insanely light, warm, and packs down tiny. It’s perfect for three-season camping, and I always pair it with a liner to keep it clean and boost warmth a bit. For cave trips or colder nights, though, I switch things up.
My go-to for underground is the Mountain Hardware Bozeman 0° — synthetic, warm even when wet, and tough enough to get dirty without regret. It’s bulkier than the Magma, but for cave camp or cold cowboy camping, it’s a solid, budget-friendly option that holds its own in rough conditions.
A small luxury that makes a big difference after a long day.
pillows
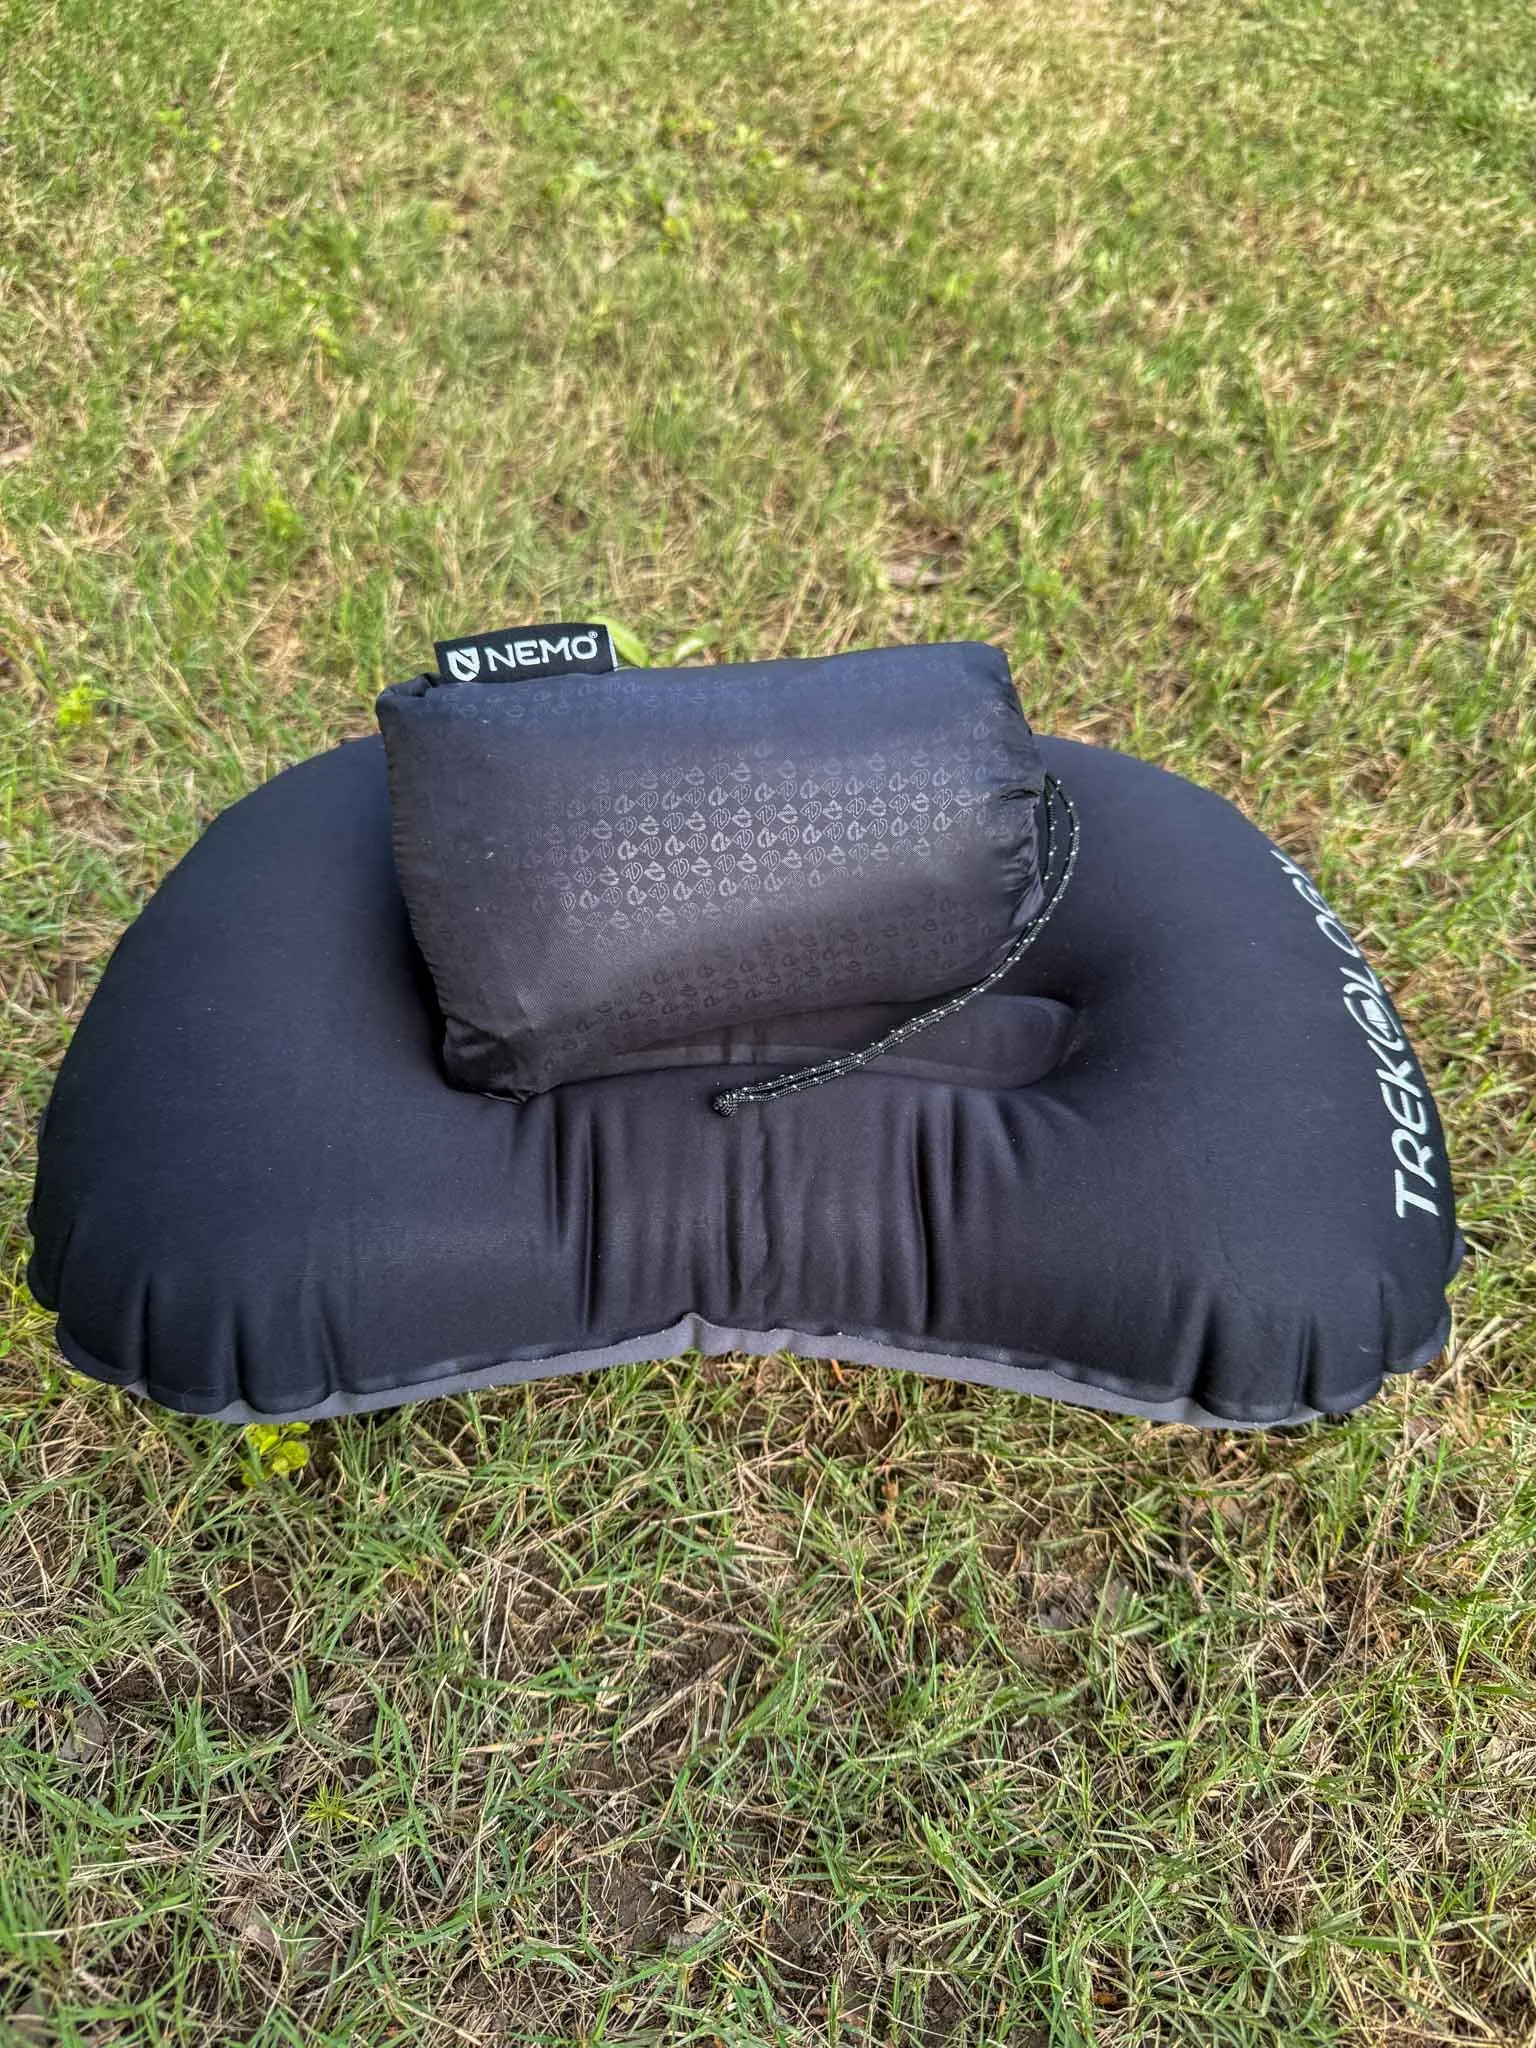
When space is tight, I still reach for the Trekology Ultralight. It’s super compact, inflates with a single breath, and gets the job done on shorter or lighter trips. It’s nothing fancy, but for the size and weight, it’s a solid pillow to keep in your kit.
That said, I’ve fully converted to the NEMO Fillo when I’ve got the room. It’s an inflatable pillow with a thin foam layer on top — and it’s a game changer. It’s about four to five times the packed size of the Trekology, but the comfort is worth every bit of space. If I can bring it, I do. I miss it when I don’t.
Camp Kitchen
From ramen bombs to rehydrated meals, cookware is how you turn boiling water into fuel
COOkware

When it comes to cookware, I’ve been running the Sea to Summit X-Set 21, and while they don’t make it anymore, their whole line is still super solid. It’s compact, lightweight, and has held up on trips where every ounce counts. Honestly though, depending on how minimalist I’m feeling, I’ve also just cooked straight inside a JetBoil — not the most glamorous setup, but it works when you’re just trying to refuel and move on.
At the end of the day, you don’t need a full kitchen setup — you just need something that works and doesn’t add a ton of bulk. Sea to Summit is great for backpack-style cooking, and if you’re trying to go ultralight, JetBoils and titanium setups can cover both heating and cooking in one.
The bare minimum lifeline. Whether it’s a stream or a seep, filter it or forget it.
Water
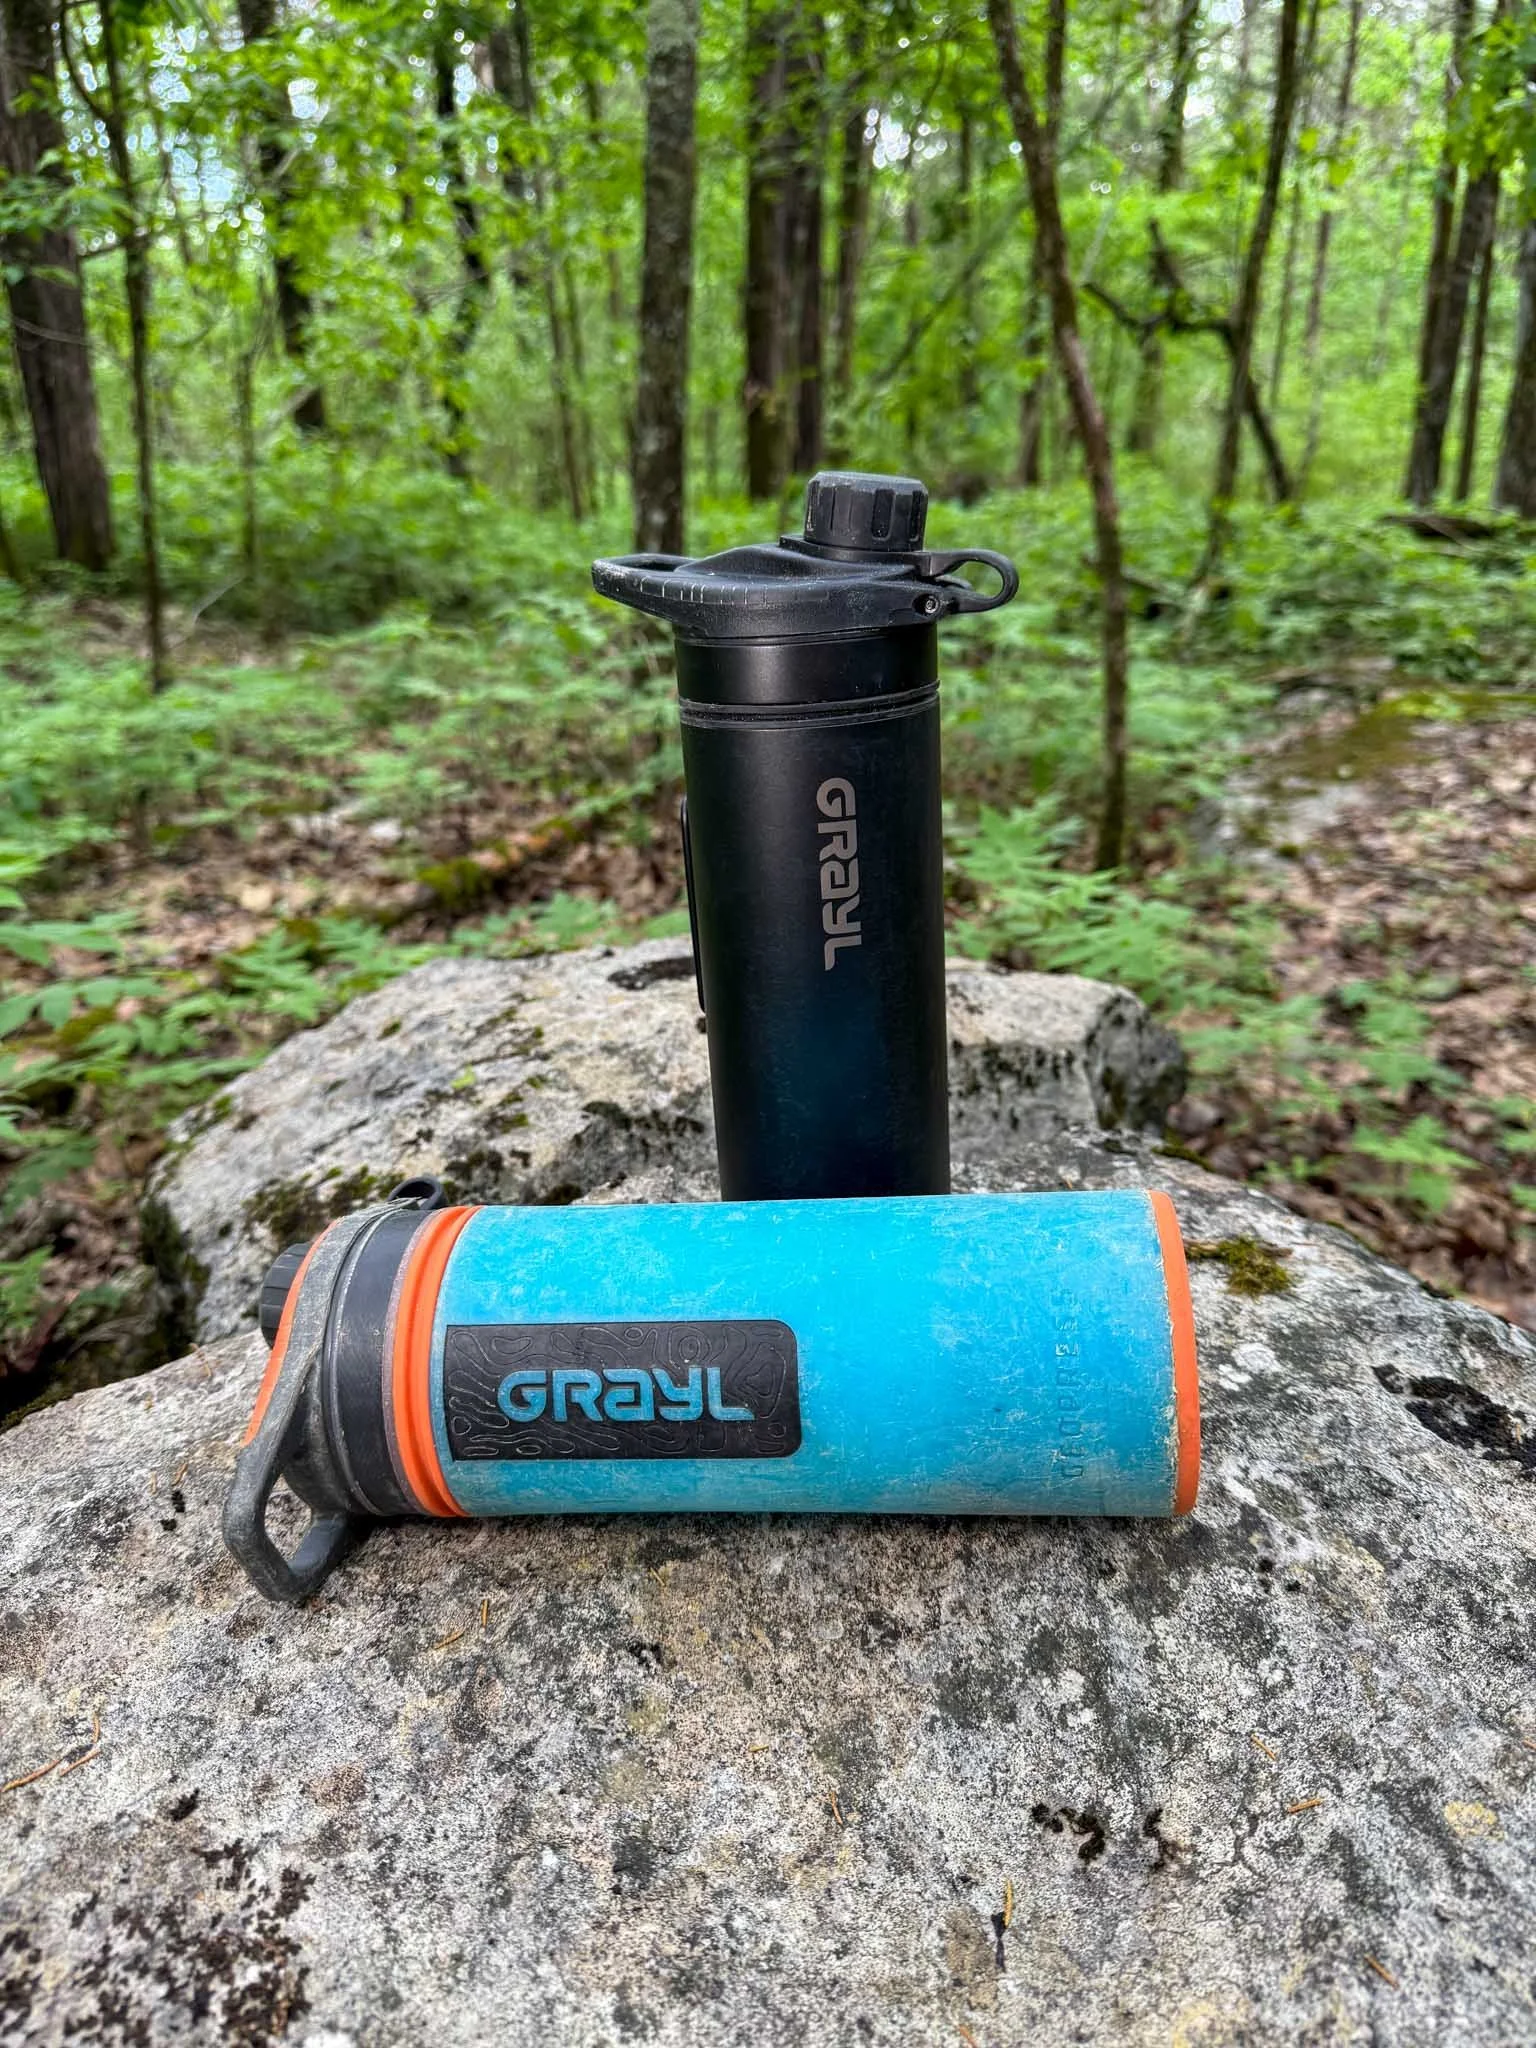
Clean water is non-negotiable — whether you’re boiling up a meal, rehydrating after a long push, or just trying to stay functional at camp. I use the GRAYL Ti Geopress, which I’ve had out on a few trips now, and I’m already obsessed with it. It’s lightweight, rugged, and pulls double-duty as both a filter and a cook pot, which makes it perfect for camp setups where every piece of gear has to earn its place. Above or below ground, it’s been one of my favorite upgrades this year.
It works as a bottle, a purifier, and a minimalist cooking setup all in one. Pair it with a small stove and you’ve got everything you need for tea, dehydrated meals, or clean water on the fly — no extra pots or filter pumps needed. Simple, efficient, and built like a tank.
Your pocket-sized kitchen. Fire up a JetBoil, Pocket Rocket, or whatever gets the meal hot and morale higher.
Stoves
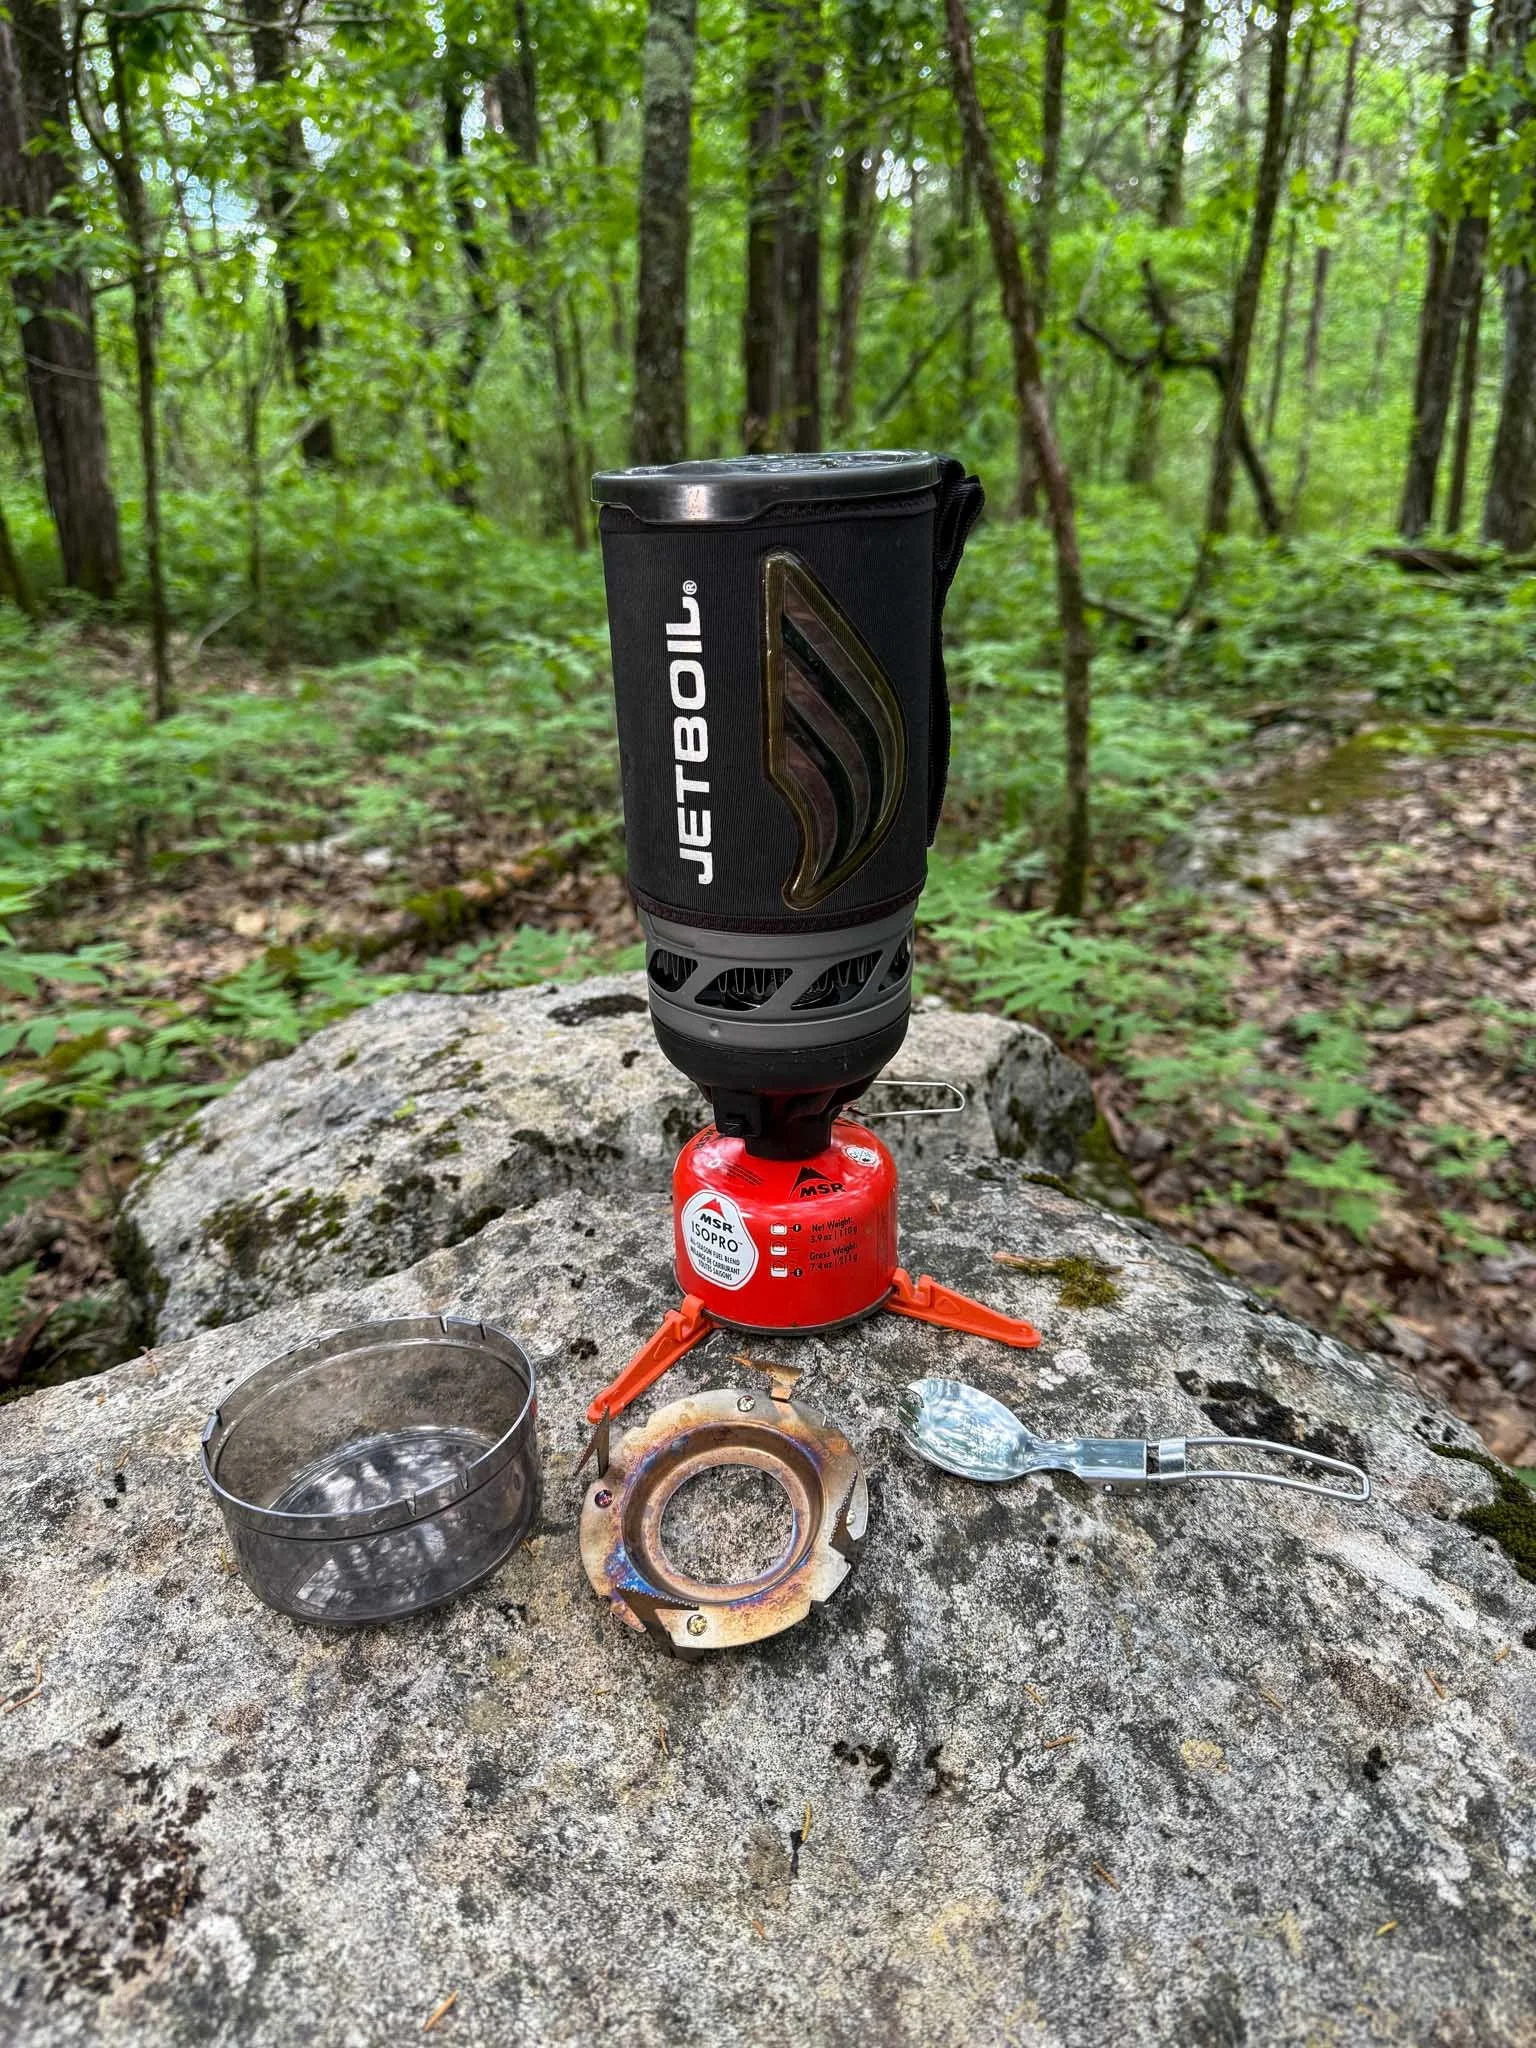
For most of my trips, I use the JetBoil Flash — it’s dead simple, super fast, and has a heat indicator that tells you when your water’s boiling, which is a small thing that ends up being super helpful. It’s great for camp meals, cave camps, or just getting tea going fast when you’re groggy, wet, and need something warm in your system.
For more casual trips or lightweight setups, I also like using a Pocket Rocket, especially paired with the Grayl Ti. Whether I’m boiling water for tea, dehydrated meals, or just getting warm underground, it’s hard to beat that combo. The Pocket Rocket is small, easy to set up, and just gets the job done without overthinking it.
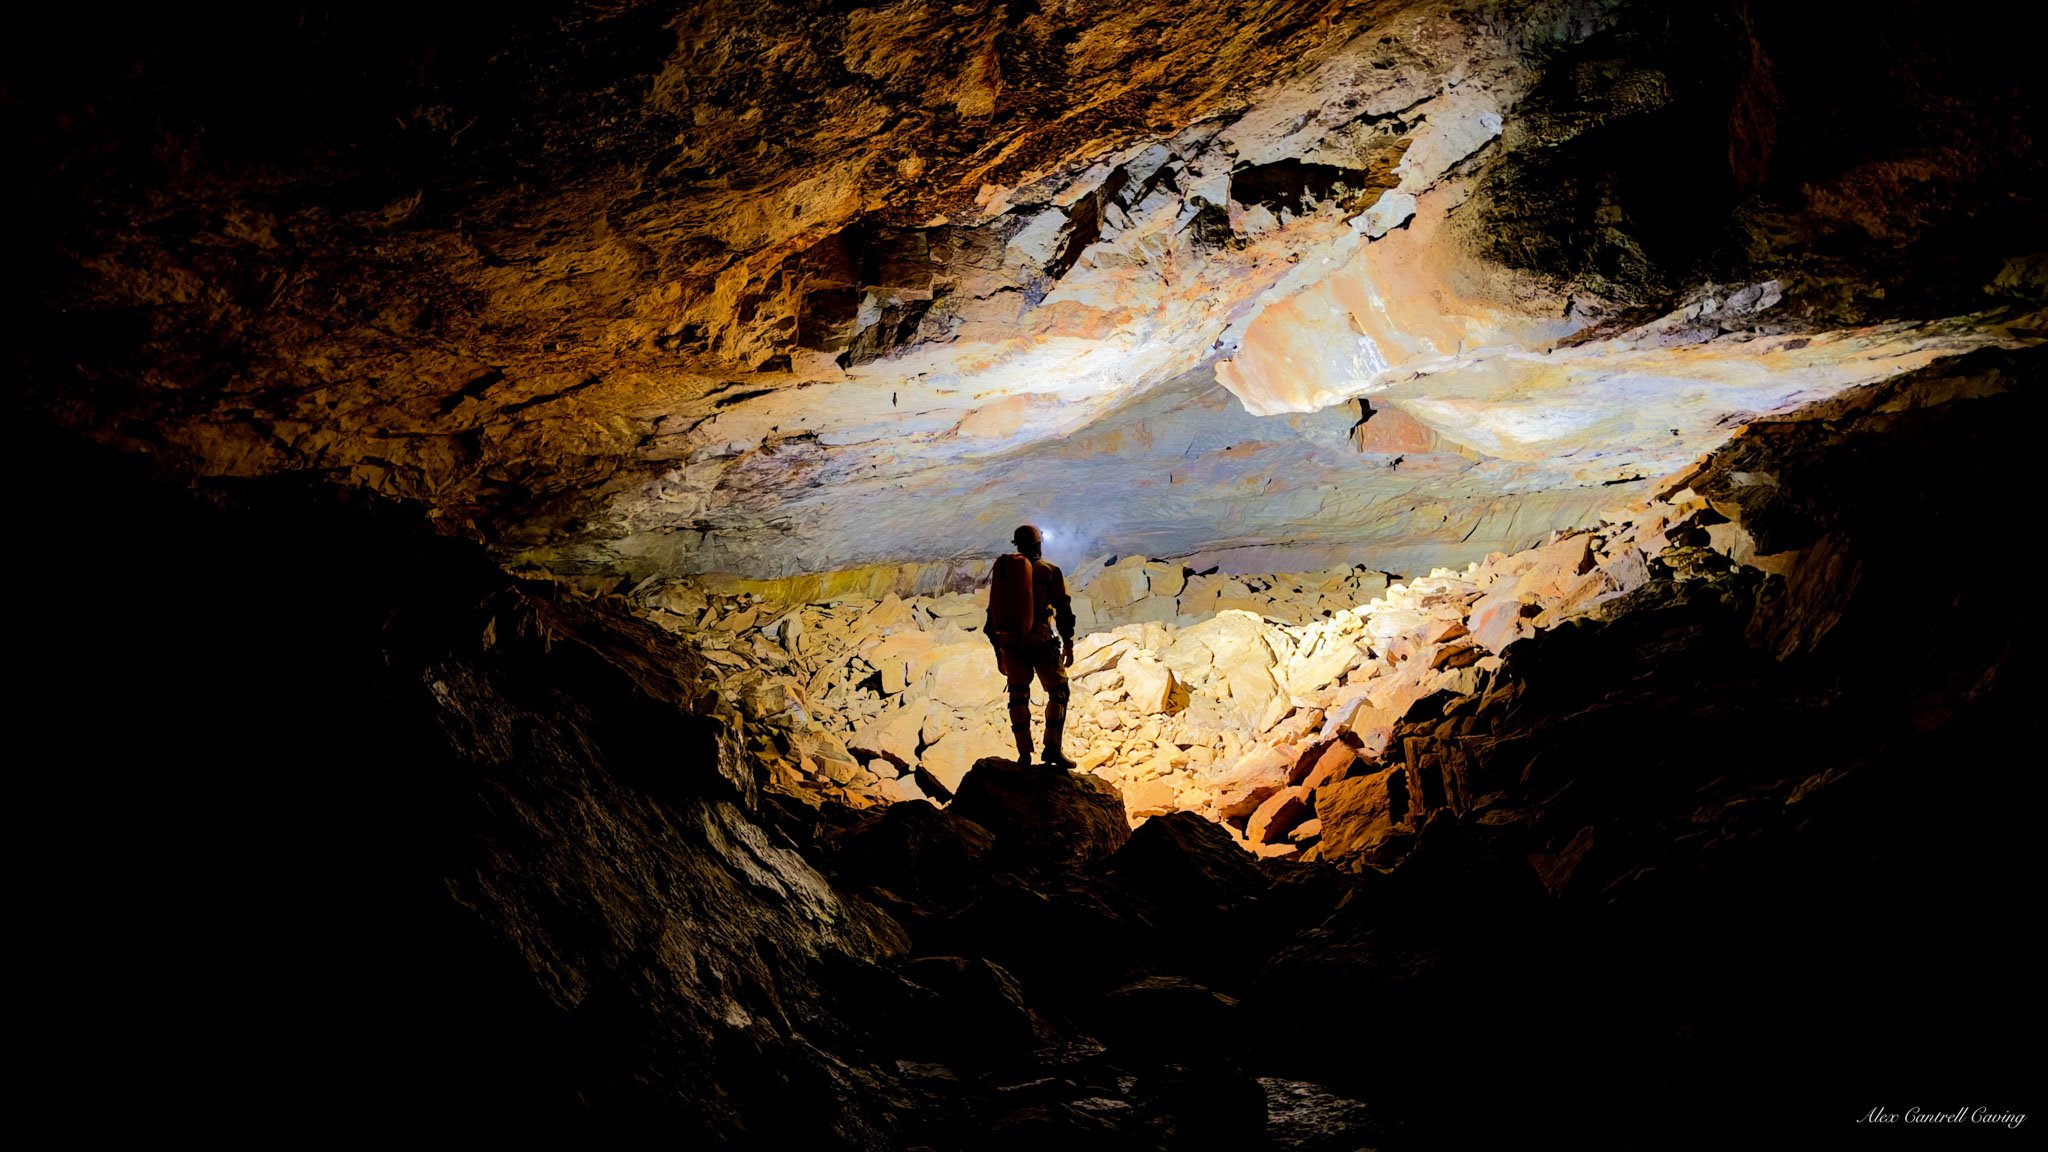
The Underground
This is where the real adventure begins
Your most essential piece of cave gear. Protects your head, mounts your lights, and keeps you in the game when the ceiling says otherwise.
Helmets
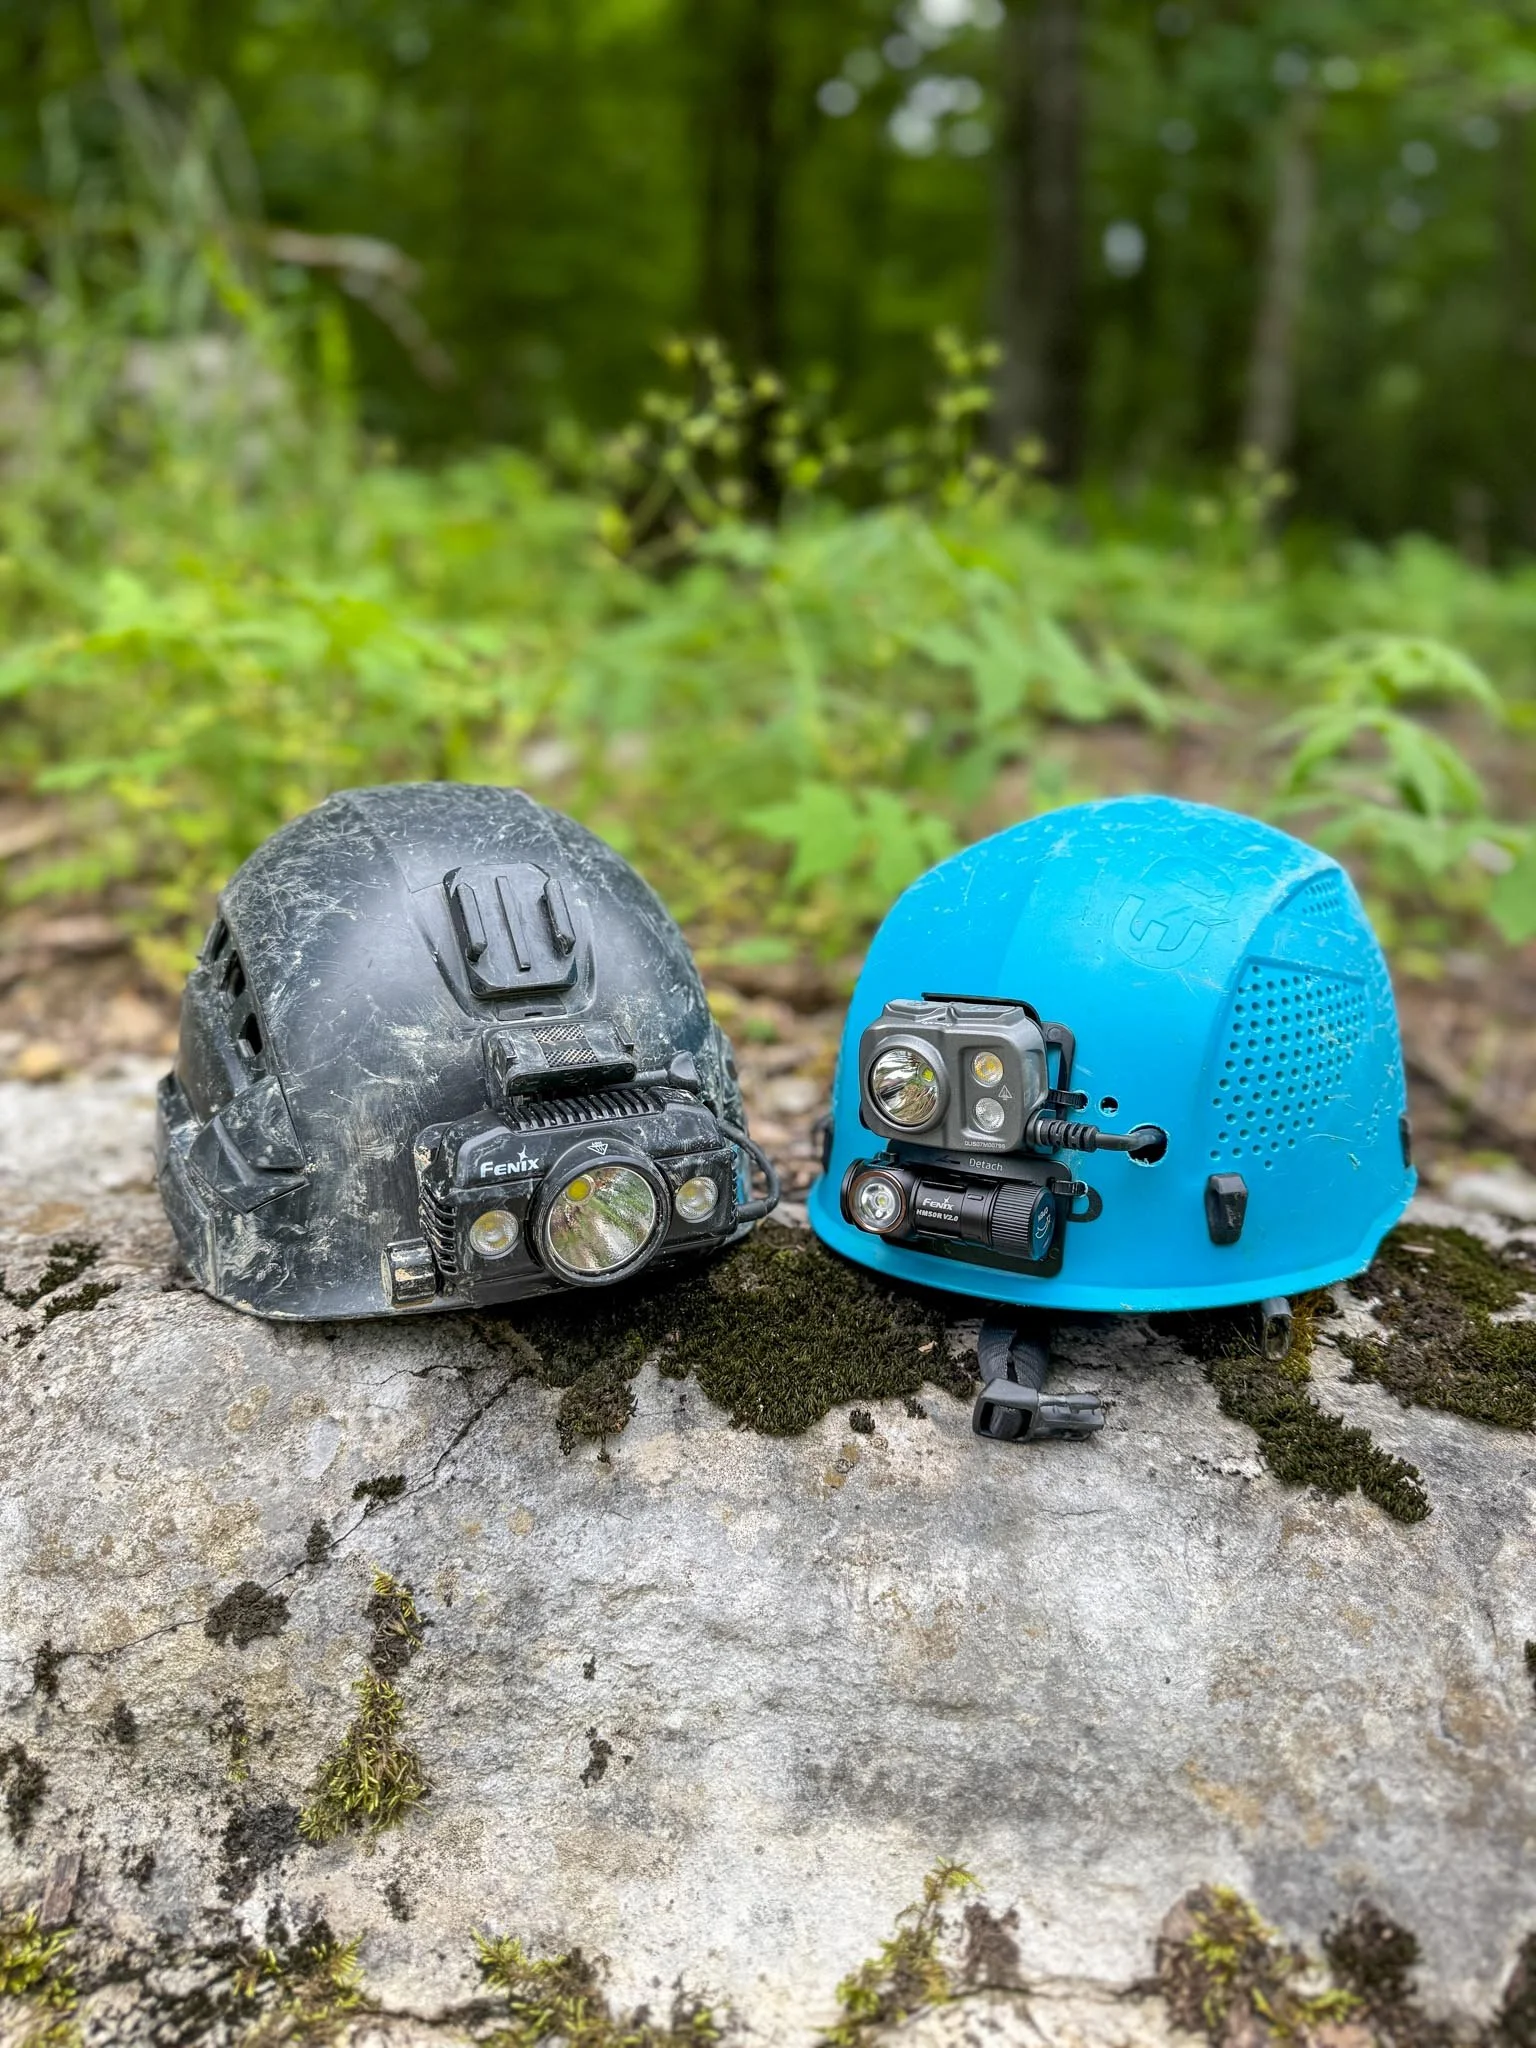
When I’m not recording, I usually wear the EDELRID Ultralight III— it’s super compact, lightweight, and fits close to the head, which makes it perfect for tight squeezes. It doesn’t have a full suspension system like some heavier helmets, but that’s part of what keeps it low-profile. It’s got just enough support, and it’s one of the most comfortable helmets I’ve worn for fast-moving trips.
For most other trips — especially if I’m filming — I run a Petzl Vertex Vent. I’ve used it for years, it’s my go-to when I want full coverage and comfort. It’s bulkier, but the suspension system cushions hits way better, and it’s just solid all around for longer days underground. Between the two, I’ve got all my bases covered. If you’re looking for solid, reliable helmets to start with, I’d confidently recommend either one.
Your eyes underground — this is how you bring the daylight with you. You can’t move an inch without it.
Lights
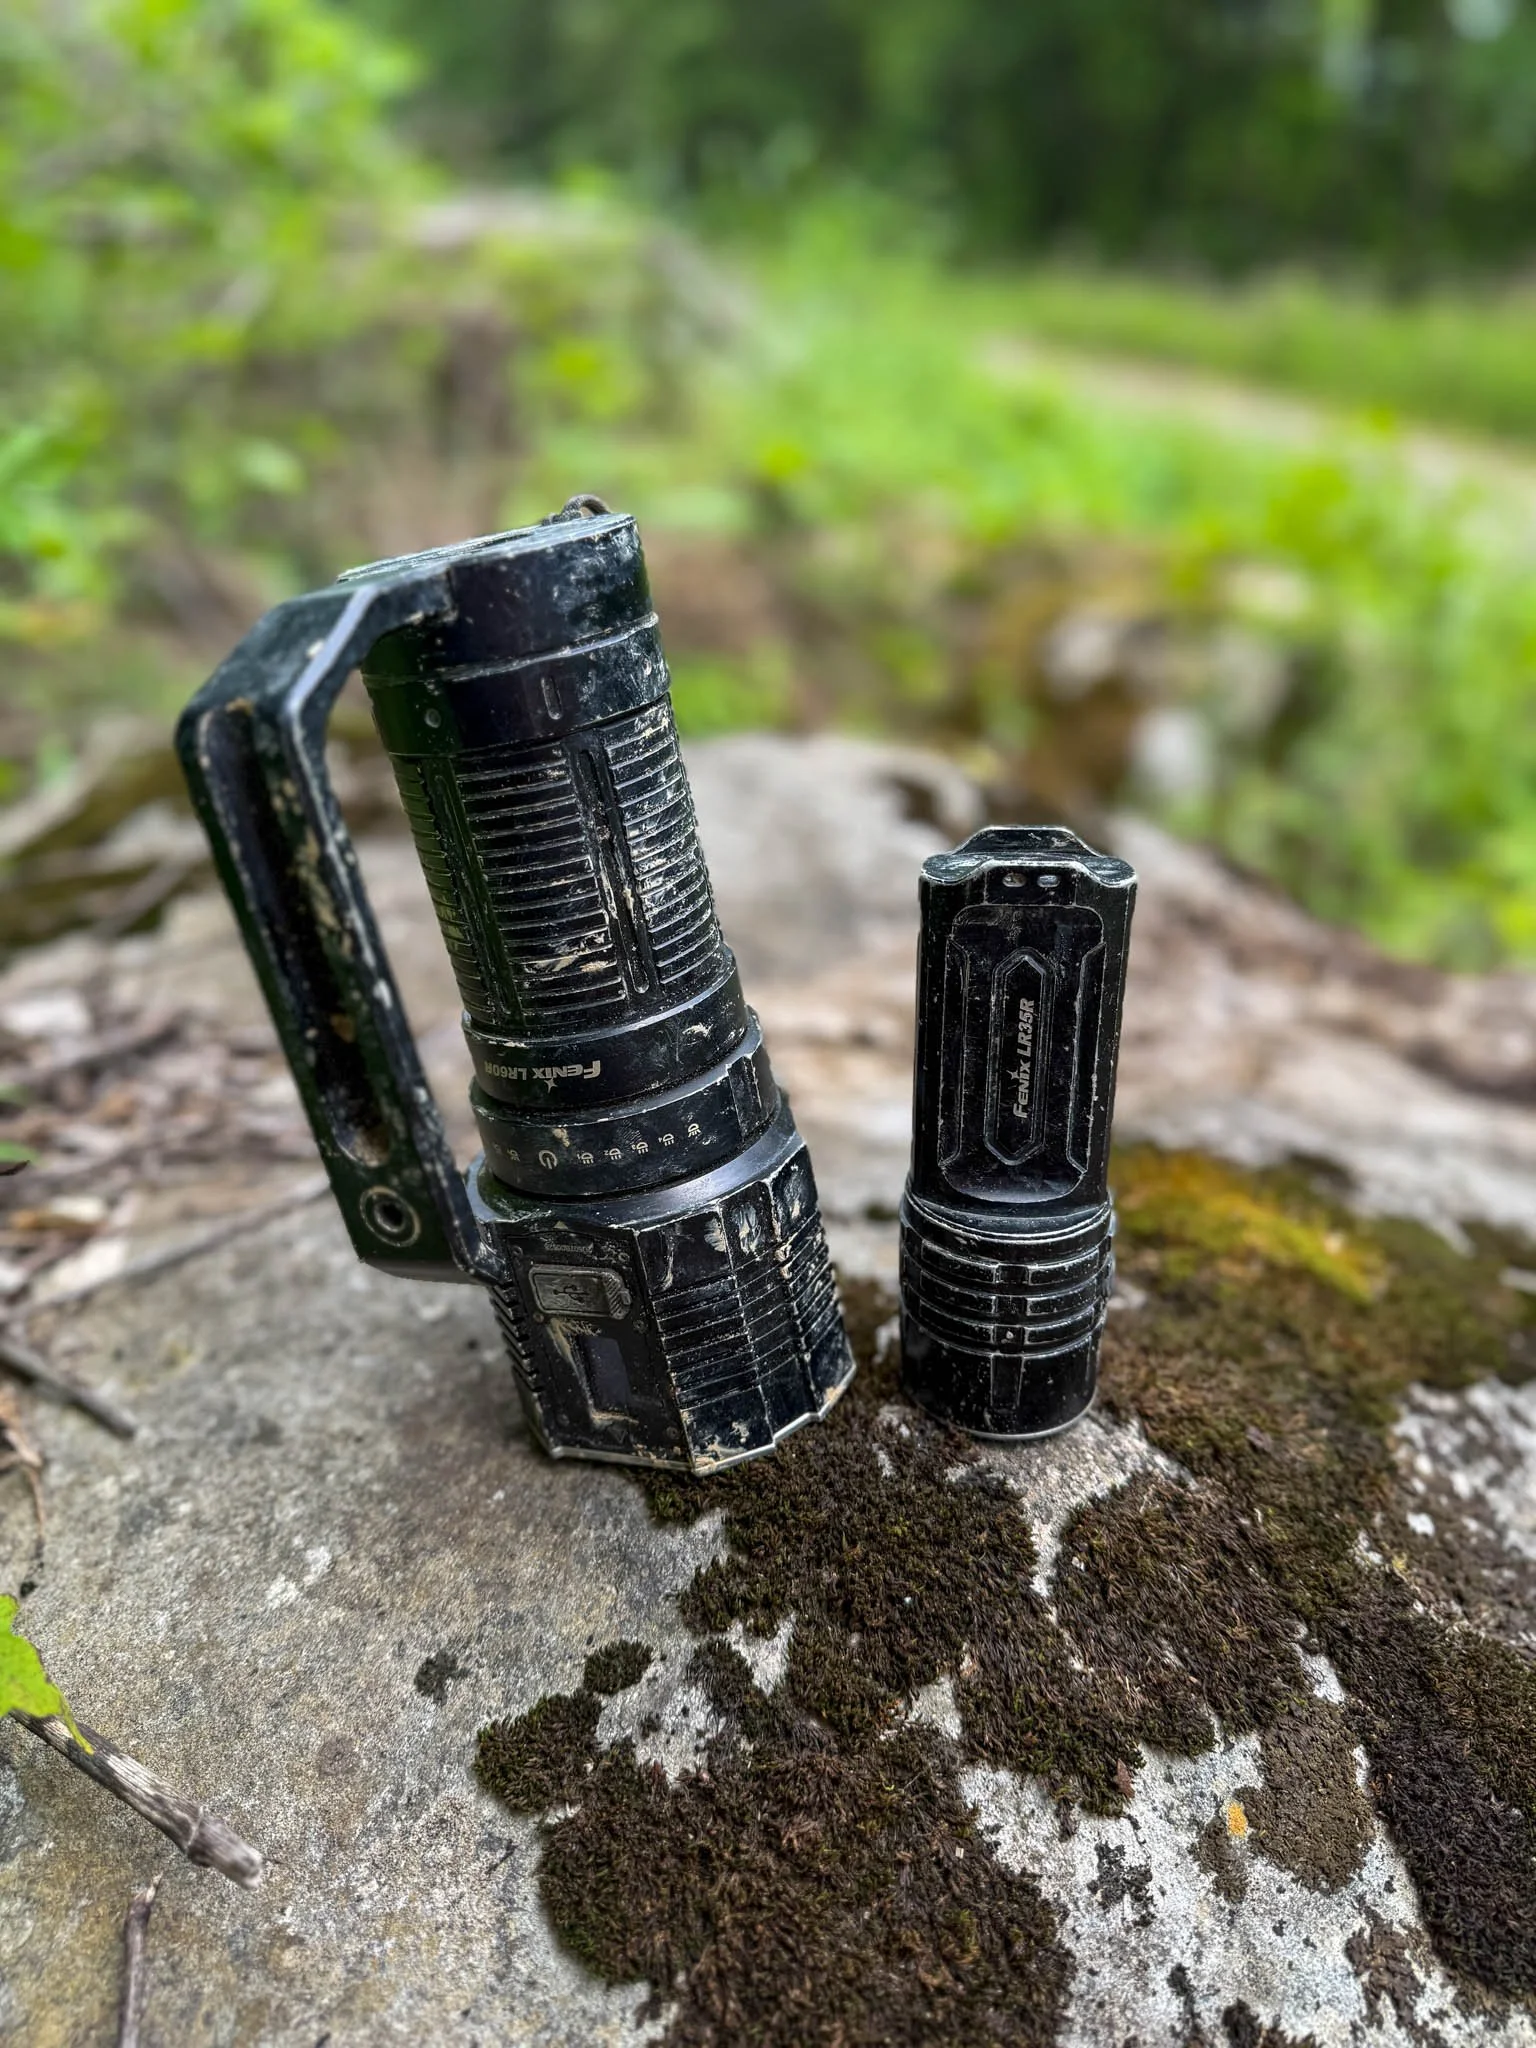
I’ve been using Fenix lights for years—long before I ever worked with them. For filming underground, my go-to is the HP30R V2—powerful, reliable, and easy to mount, making it ideal for both video and exploration. On my expedition helmet, I now run the HP25R V2 paired with the compact HM50R V2—both super durable and expedition-proven. When I’m just focused on the trip itself—hiking out late, digging, surveying, or just exploring—the HM65R is still absolutely solid. It’s lightweight, extremely bright for its size, and fits snug on the helmet. For handhelds, I love the LR35R—a compact beast pushing 10,000 lumens that fits in your palm. But if I’m headed into massive rooms or dropping a big pit, the LR60R is my pick. It blasts 21,000 lumens and lights up space like it’s noon. If you’re looking for light setups that can handle real expedition abuse, Fenix has been my trusted choice.
Under Suits
For cold caves, a fleece suit is your cozy armor. It adds critical warmth without bulk, especially on long trips.
Fleece SUit
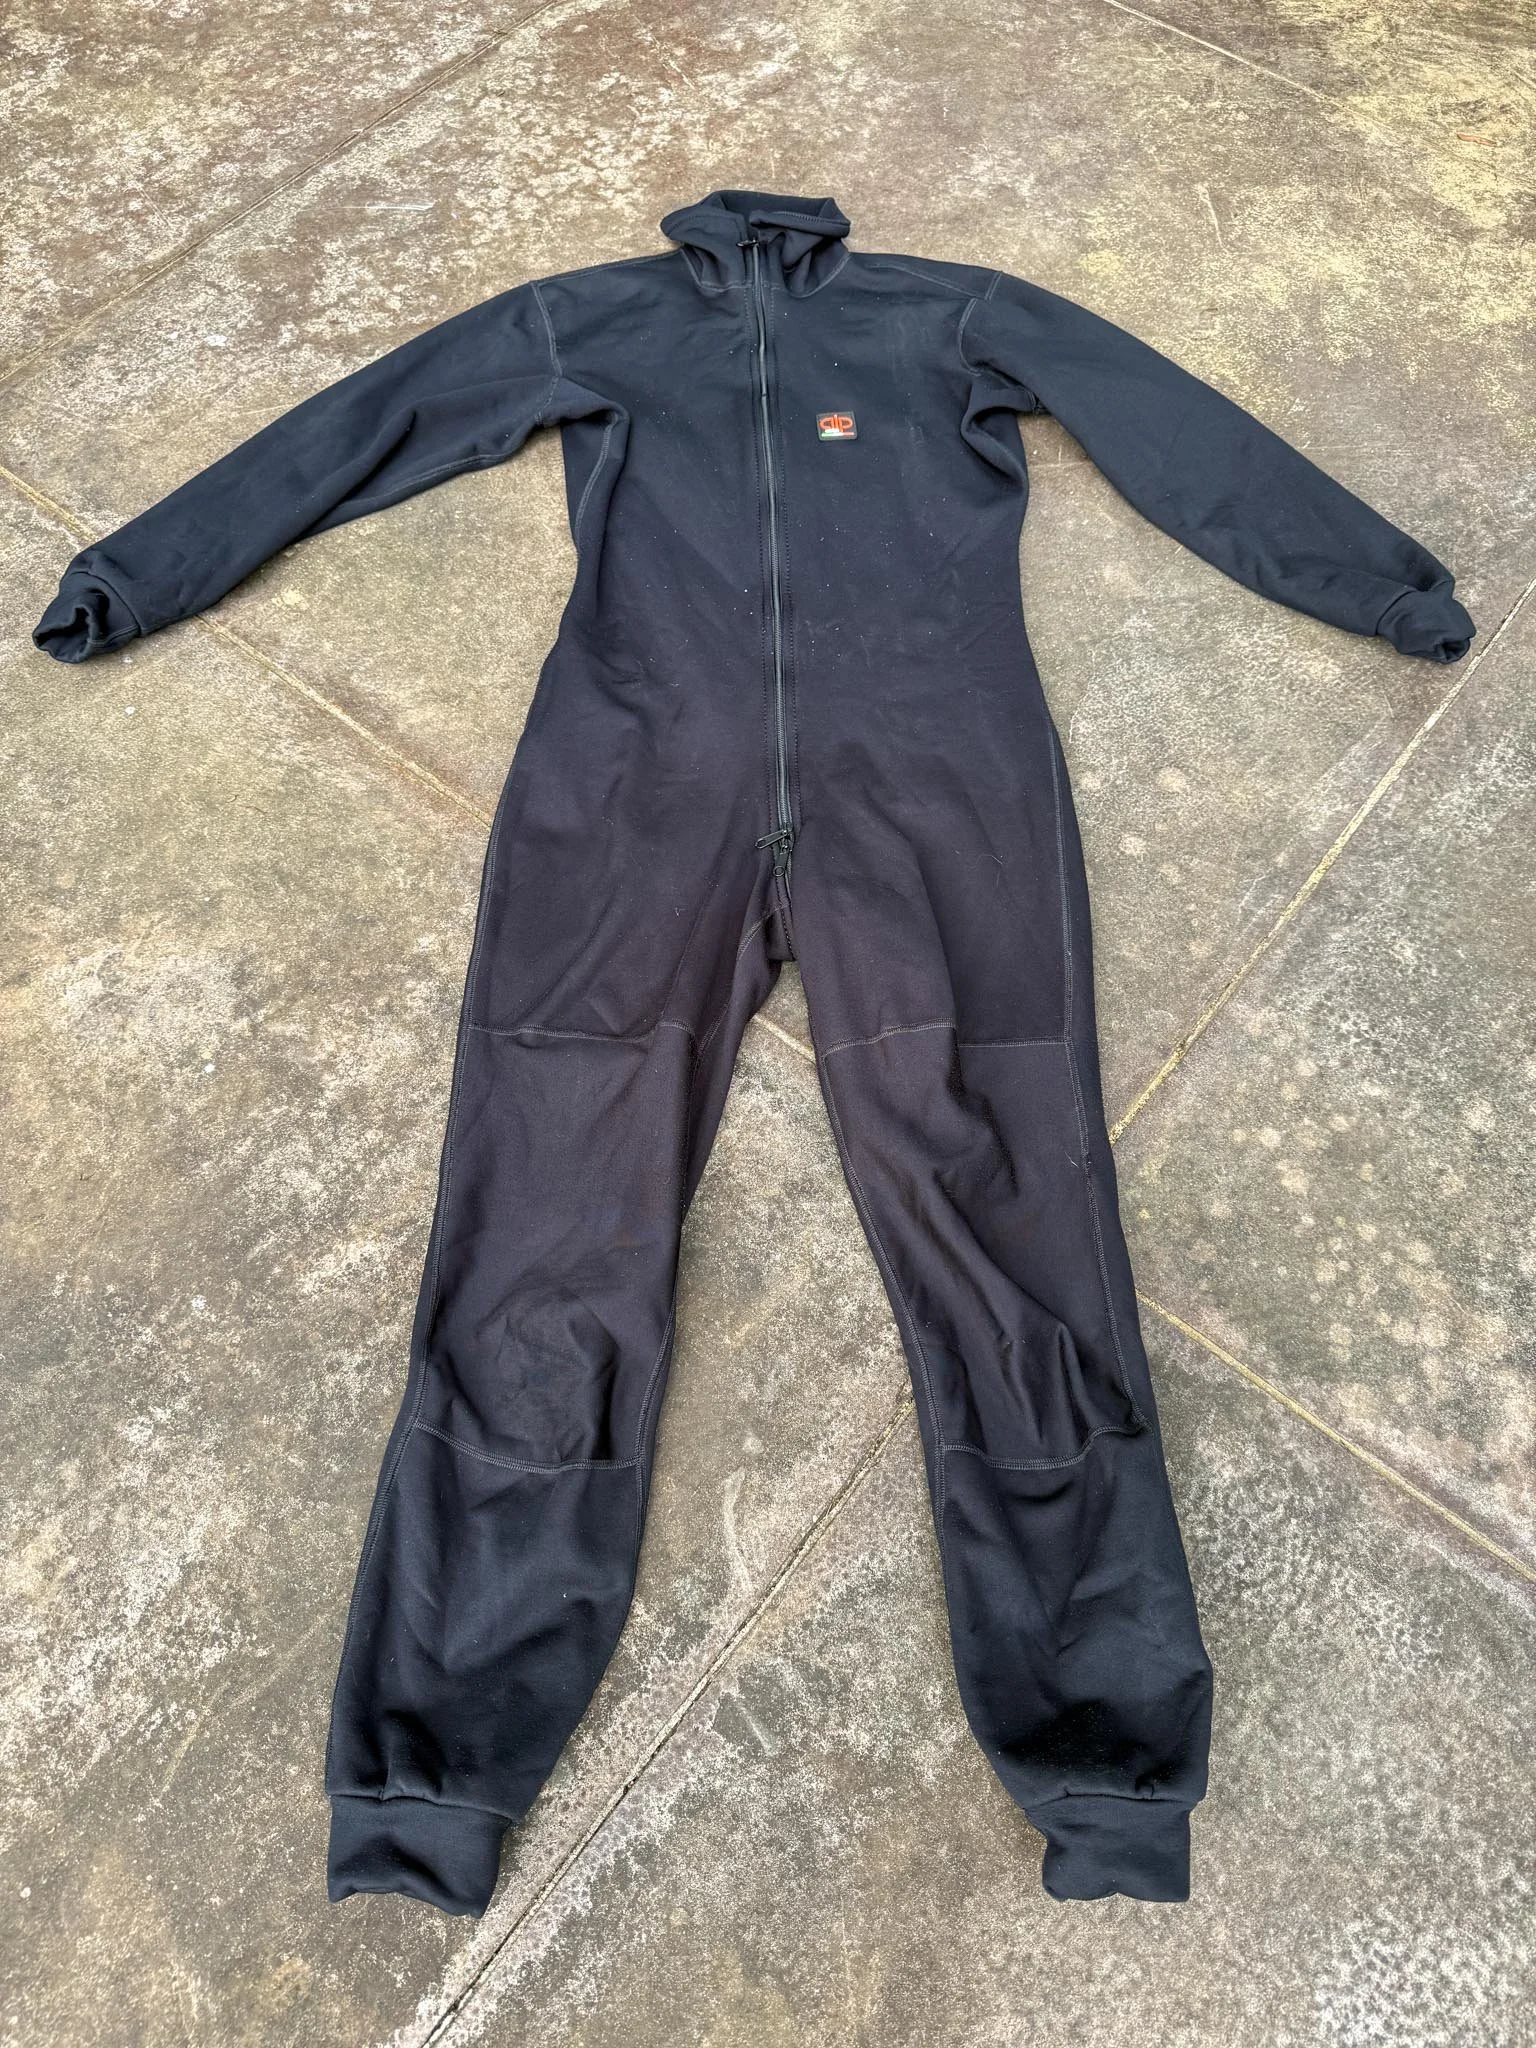
I use a full-body fleece suit from Alps Design that’s super warm, soft, and perfect for cold cave systems. It zips all the way down the front, which makes bathroom breaks easy without having to fully undress — a small but seriously helpful feature.
I’ll usually pair it with a base layer if it’s extra cold, but sometimes I wear it solo under a cave suit. It traps heat well without feeling bulky, and it’s comfortable enough to sleep in if you’re stuck underground for a long haul. For cold caves, this is what I reach for.
A 3mm wetsuit is the go-to for TAG caves with extended water exposure. Keeps you warm when you’re soaked.
Wet Suit

For wet caves, I run a cheap 3mm wetsuit from Amazon — nothing fancy, just something that holds in heat and won’t make you sad when it gets trashed. Most have a front zipper that makes getting in and out easier, and it helps with quick bathroom breaks, too.
In colder water or longer exposures, a 3/4/5mm wetsuit adds warmth but can feel bulky. I usually throw a cave suit over it to reduce abrasion and add durability. If you’re going to be wet for a while, especially in TAG, a wetsuit makes all the difference.
Rarely needed, but absolutely essential in freezing, prolonged submersion.
Dry Suit
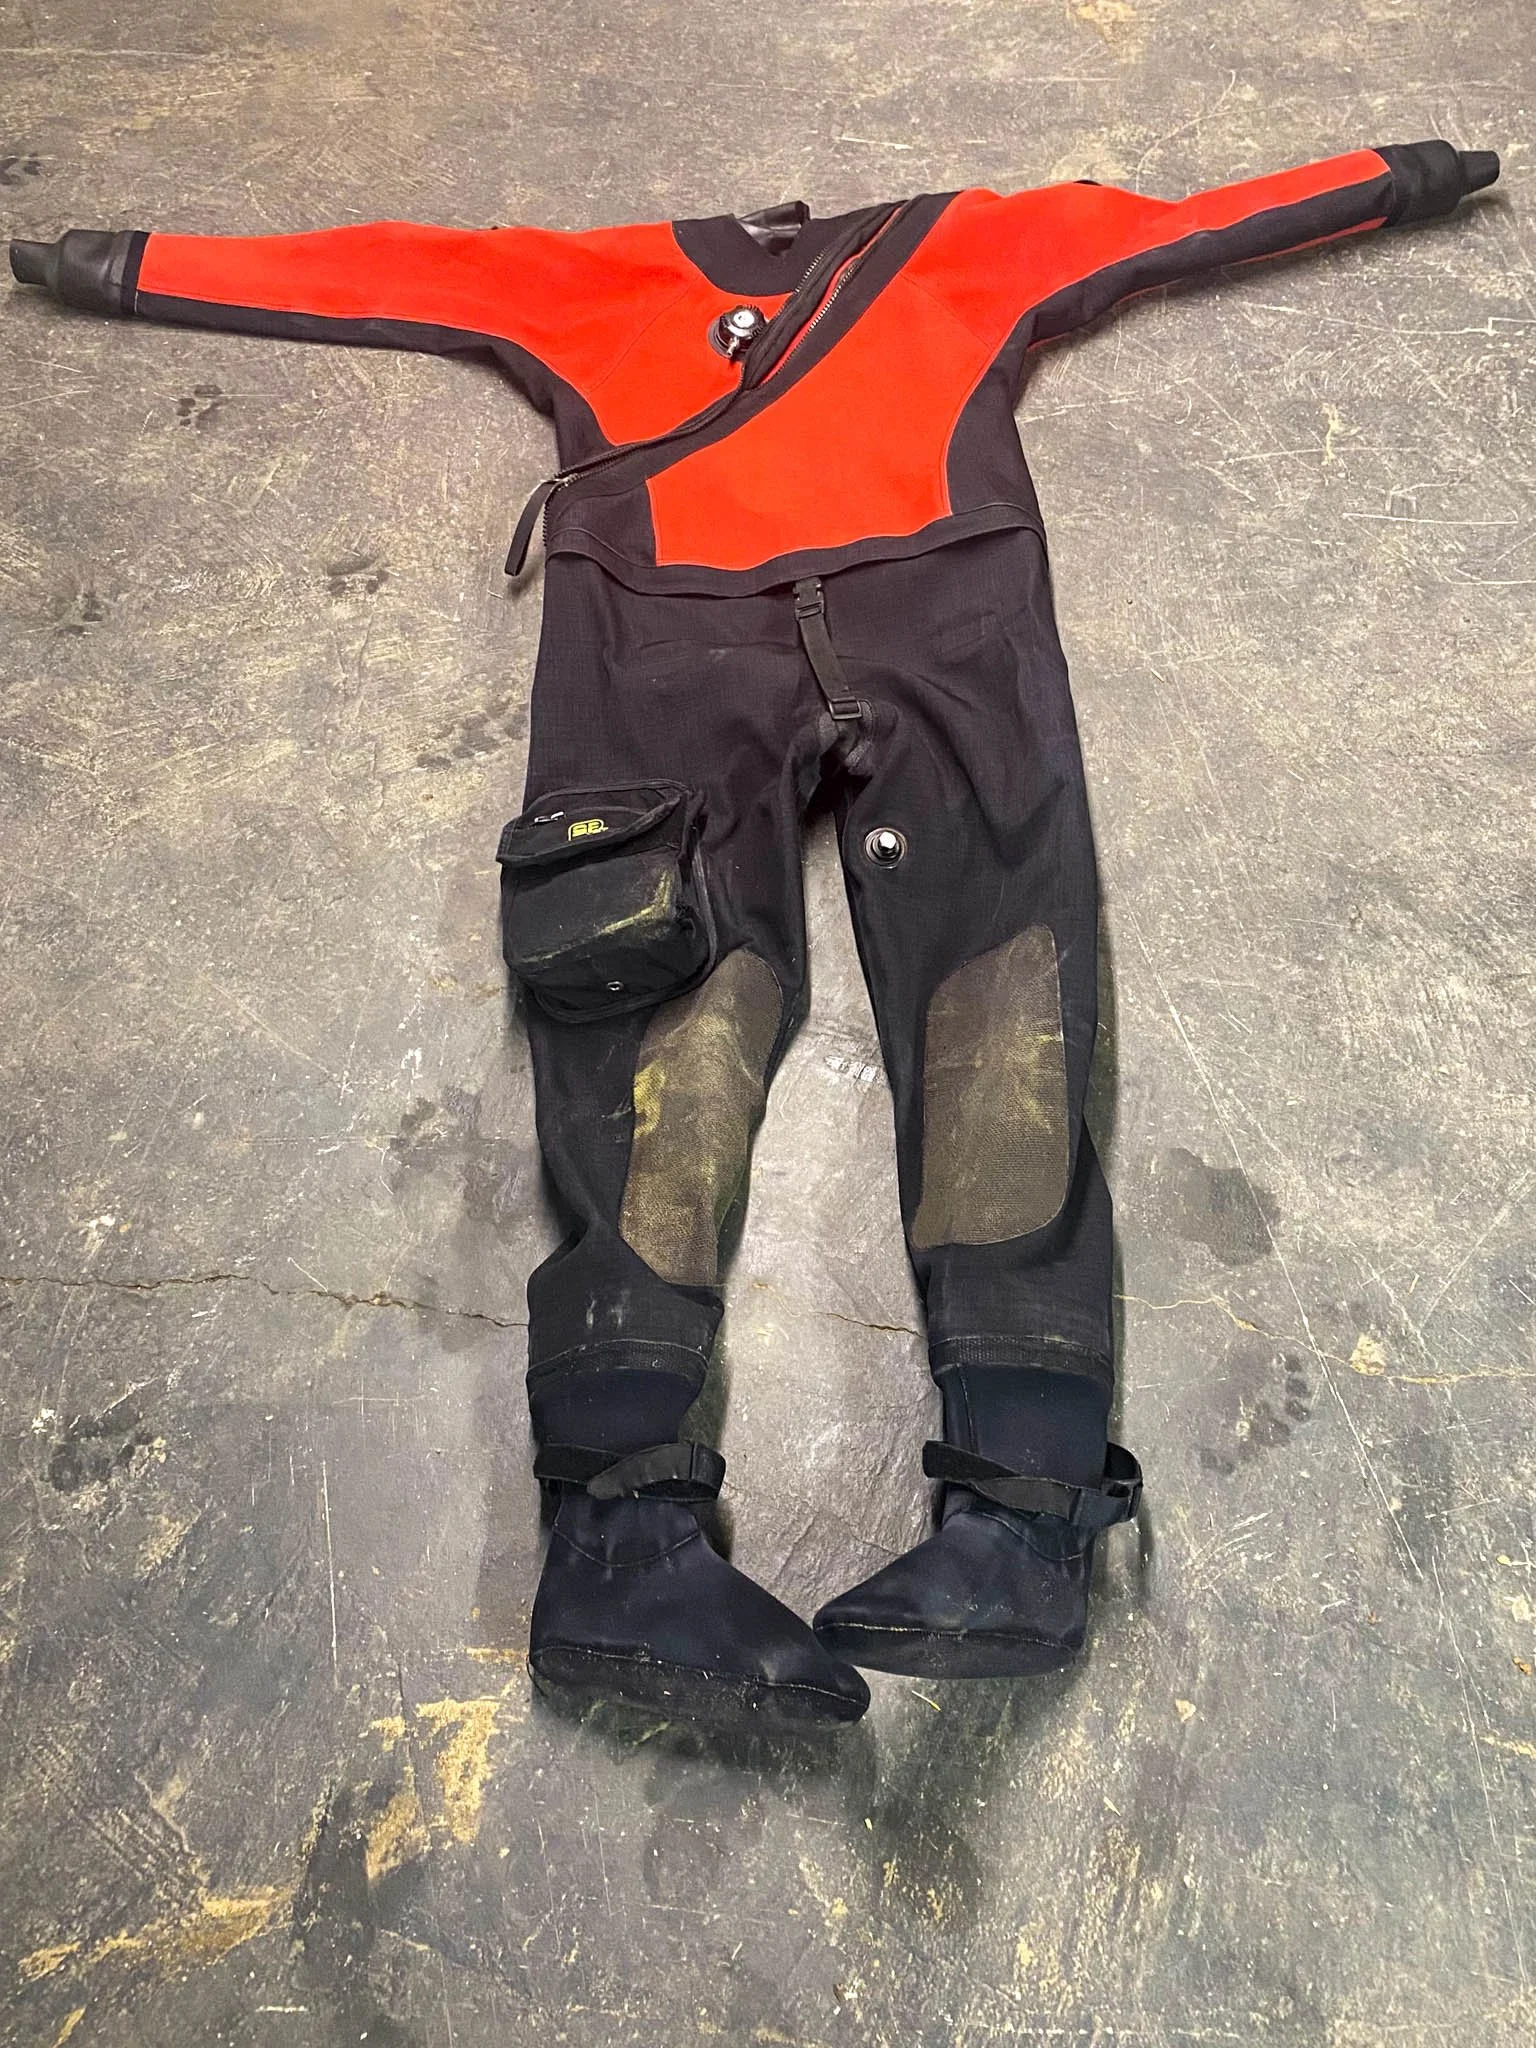
Dry suits are for extreme conditions where the water is freezing and you’re stuck in it for a long time. They’re sealed, insulated, and designed to keep every drop out — something even thicker wetsuits just can’t do.
They’re expensive and bulky, so I only recommend one if you really need it. Wearing a cave suit over the top helps protect it from sharp rock and punctures. It’s not something most cavers will need, but when it’s cold enough, nothing else compares.
Cave Suits
The go-to suit for most cavers. Rugged, durable, and built for abrasion — perfect for gnarly crawls and sharp rock.
COrdura
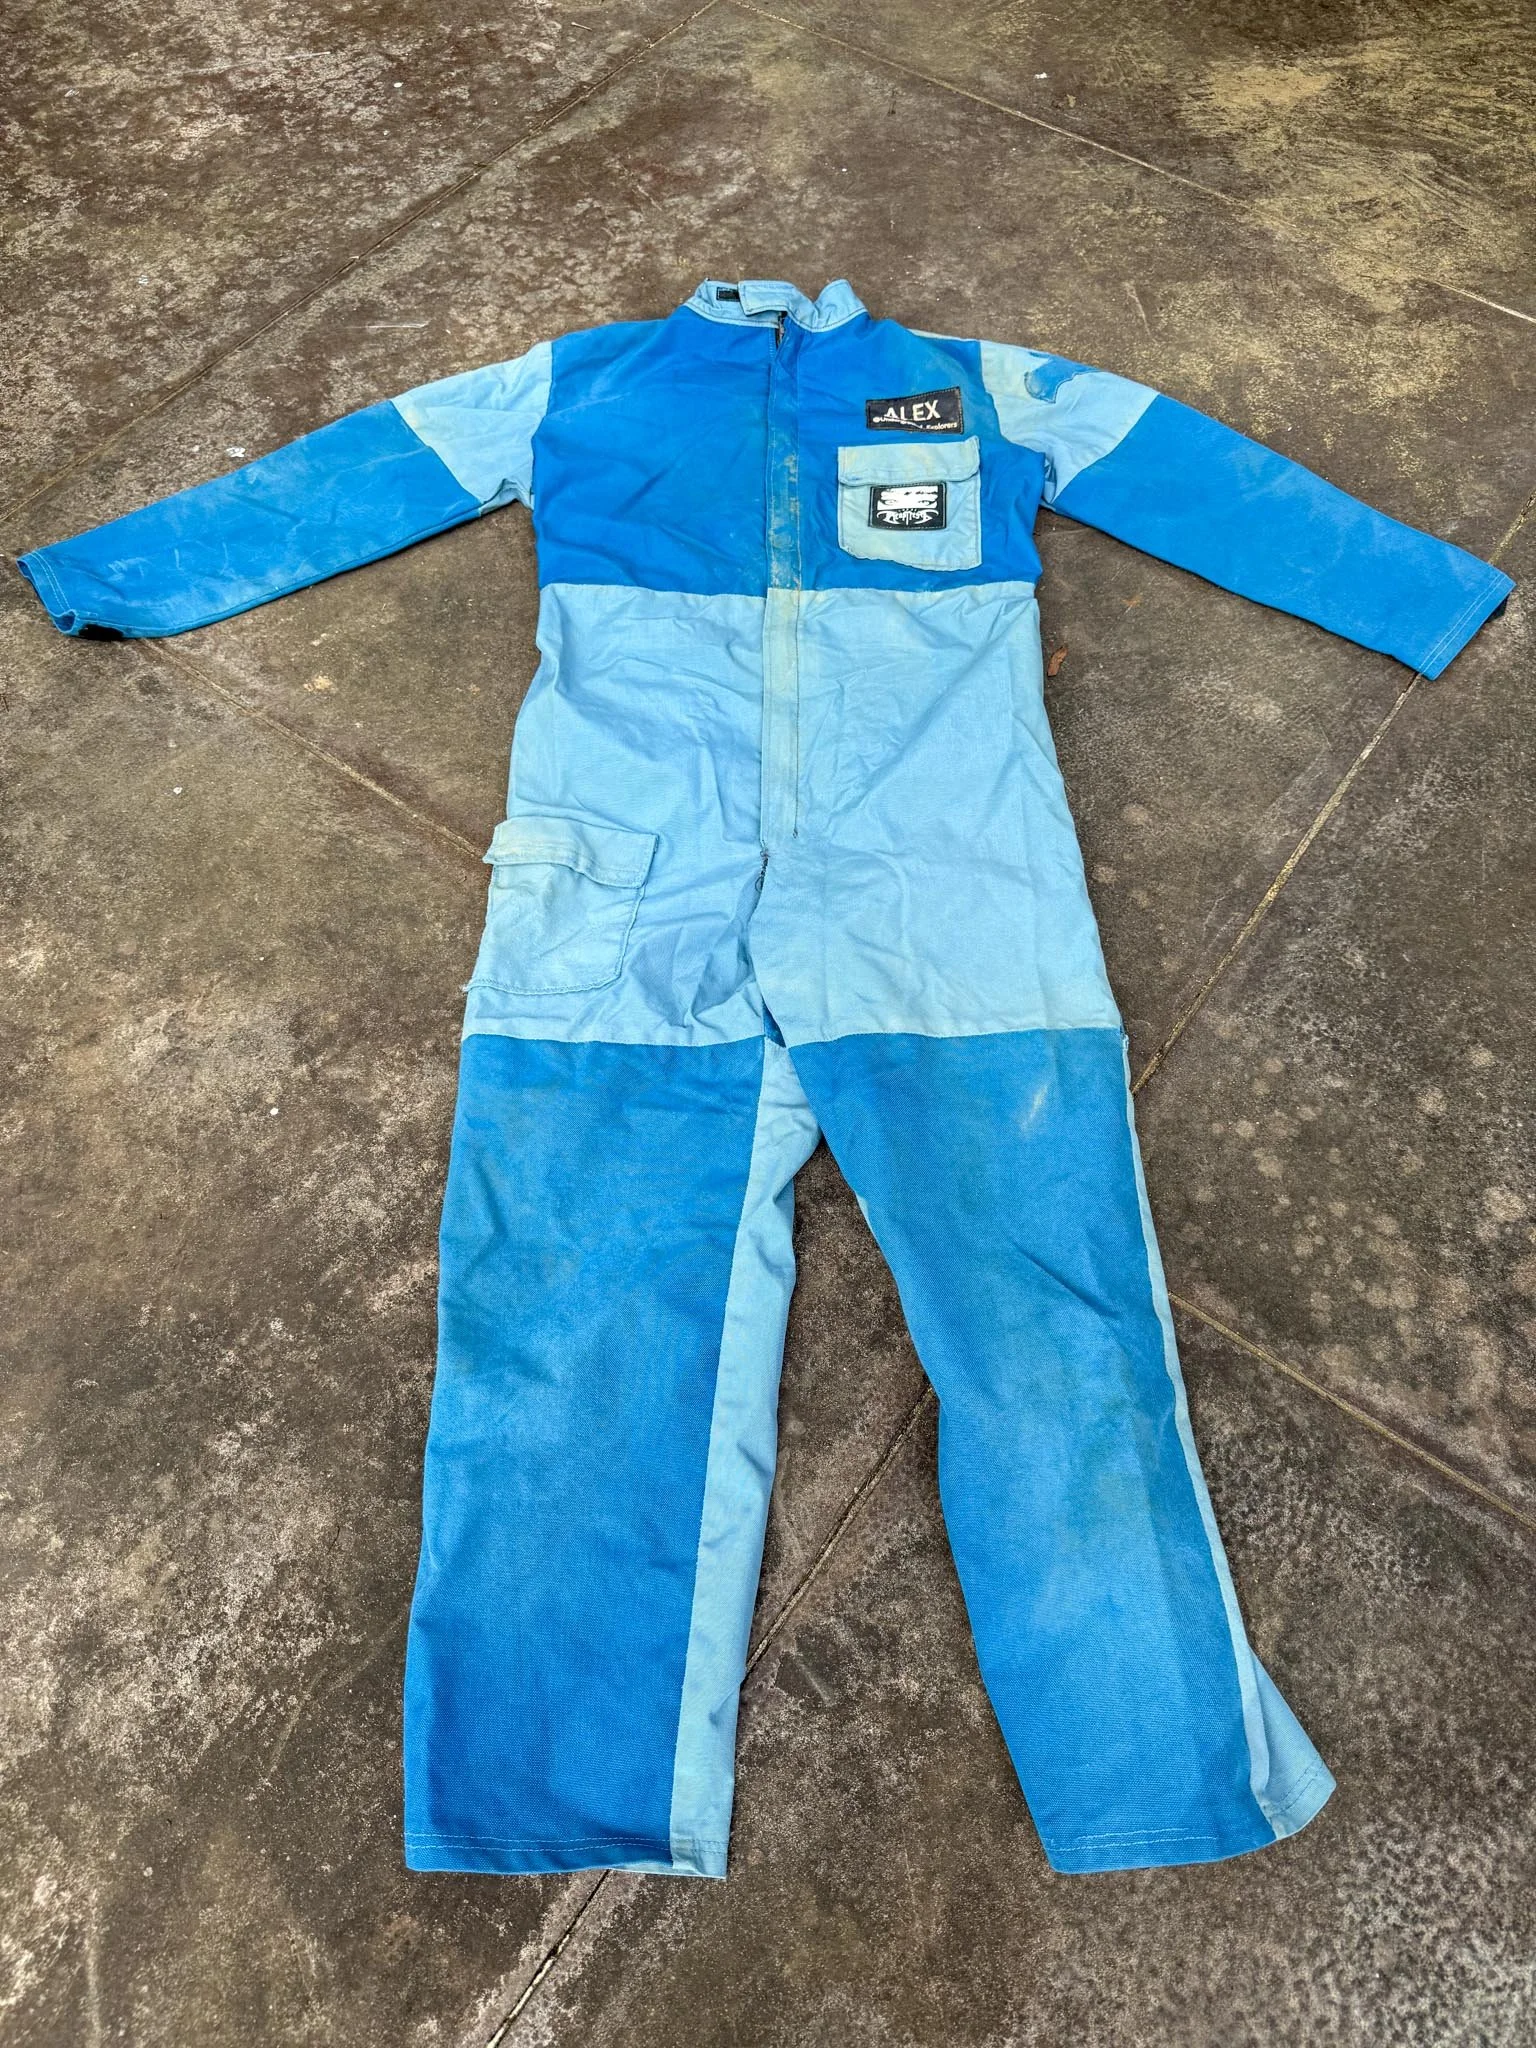
Cordura suits are the standard in caving — abrasion-resistant, lightweight, and built to last. You’ll find cavers wearing them just about everywhere because they hold up through tough crawls, sharp rock, and repeated use.
I like to support the caving community, so I had a custom Cordura suit made by Sophireaptress, who creates high-quality, handmade suits with options for added pockets and embroidery. It’s been one of my favorite pieces of gear — durable, reliable, and personal.
Great for staying clean in wet, muddy caves. Not as tough as Cordura, but solid when keeping your layers dry matters most.
PVC
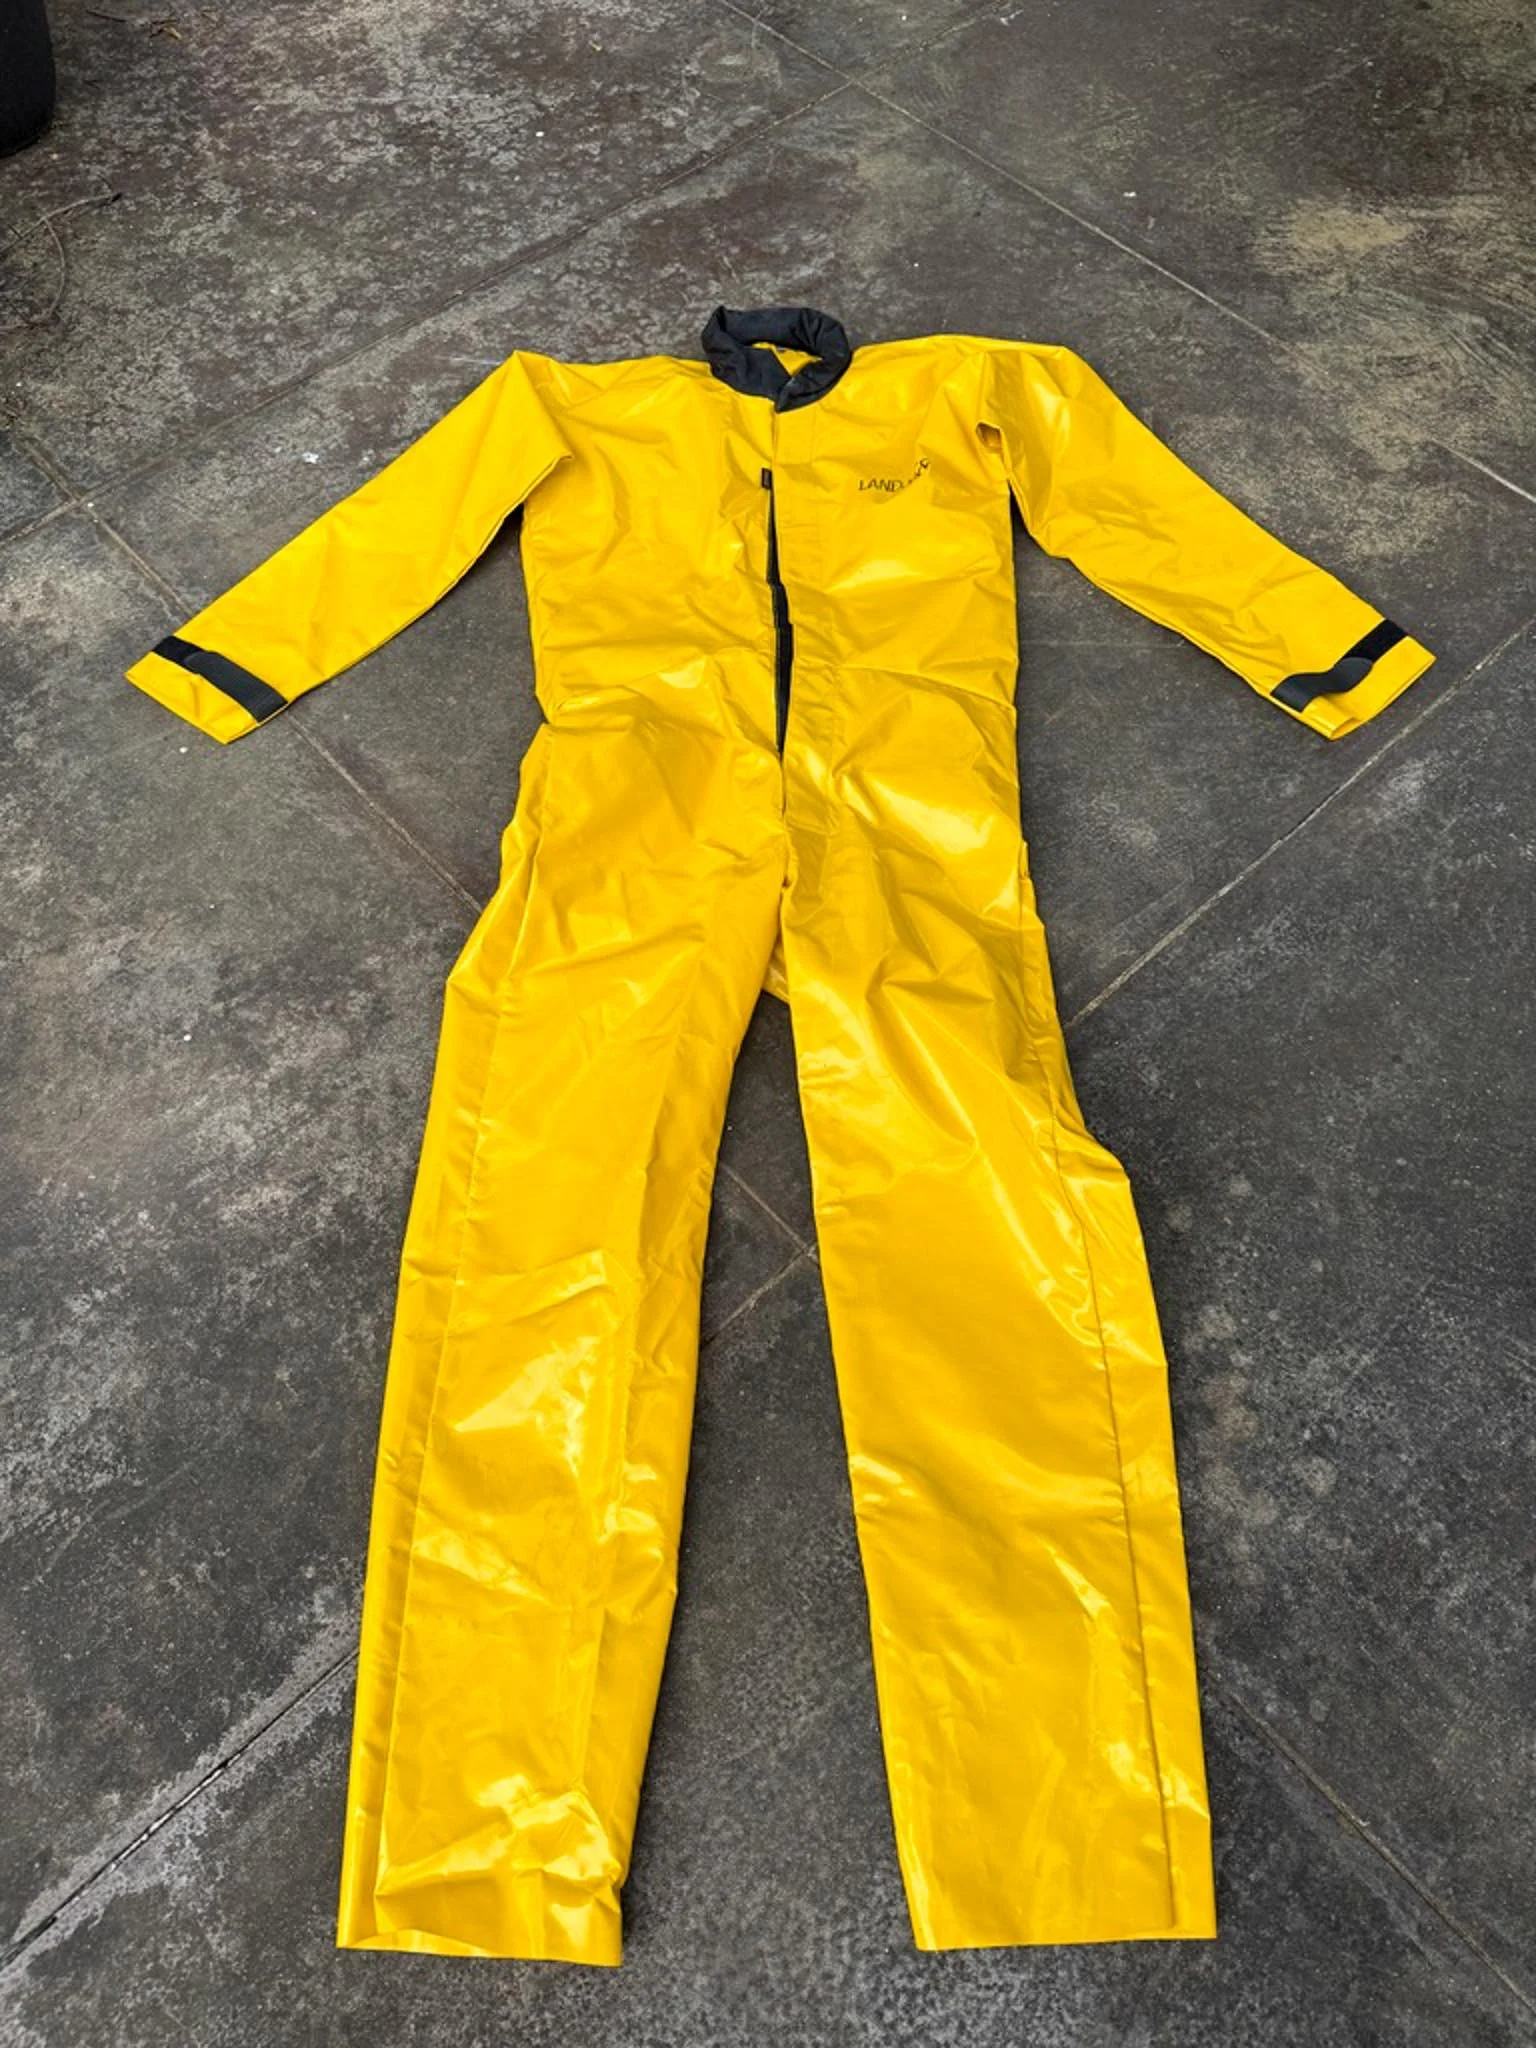
PVC suits are great for mud-heavy caves where staying dry and clean is more important than abrasion resistance. They shed water and mud easily but can trap condensation if you’re wearing warm under layers.
I use a Landjoff PVC suit when I know I’ll be dealing with extended water exposure or nonstop mud. It’s not something I wear on every trip, but for the right cave, it makes the experience way more manageable.
A “hybrid” of Cordura and PVC — flexible, durable, and sheds mud well. Comes in thin or thick options depending on cave temp.
Nylon
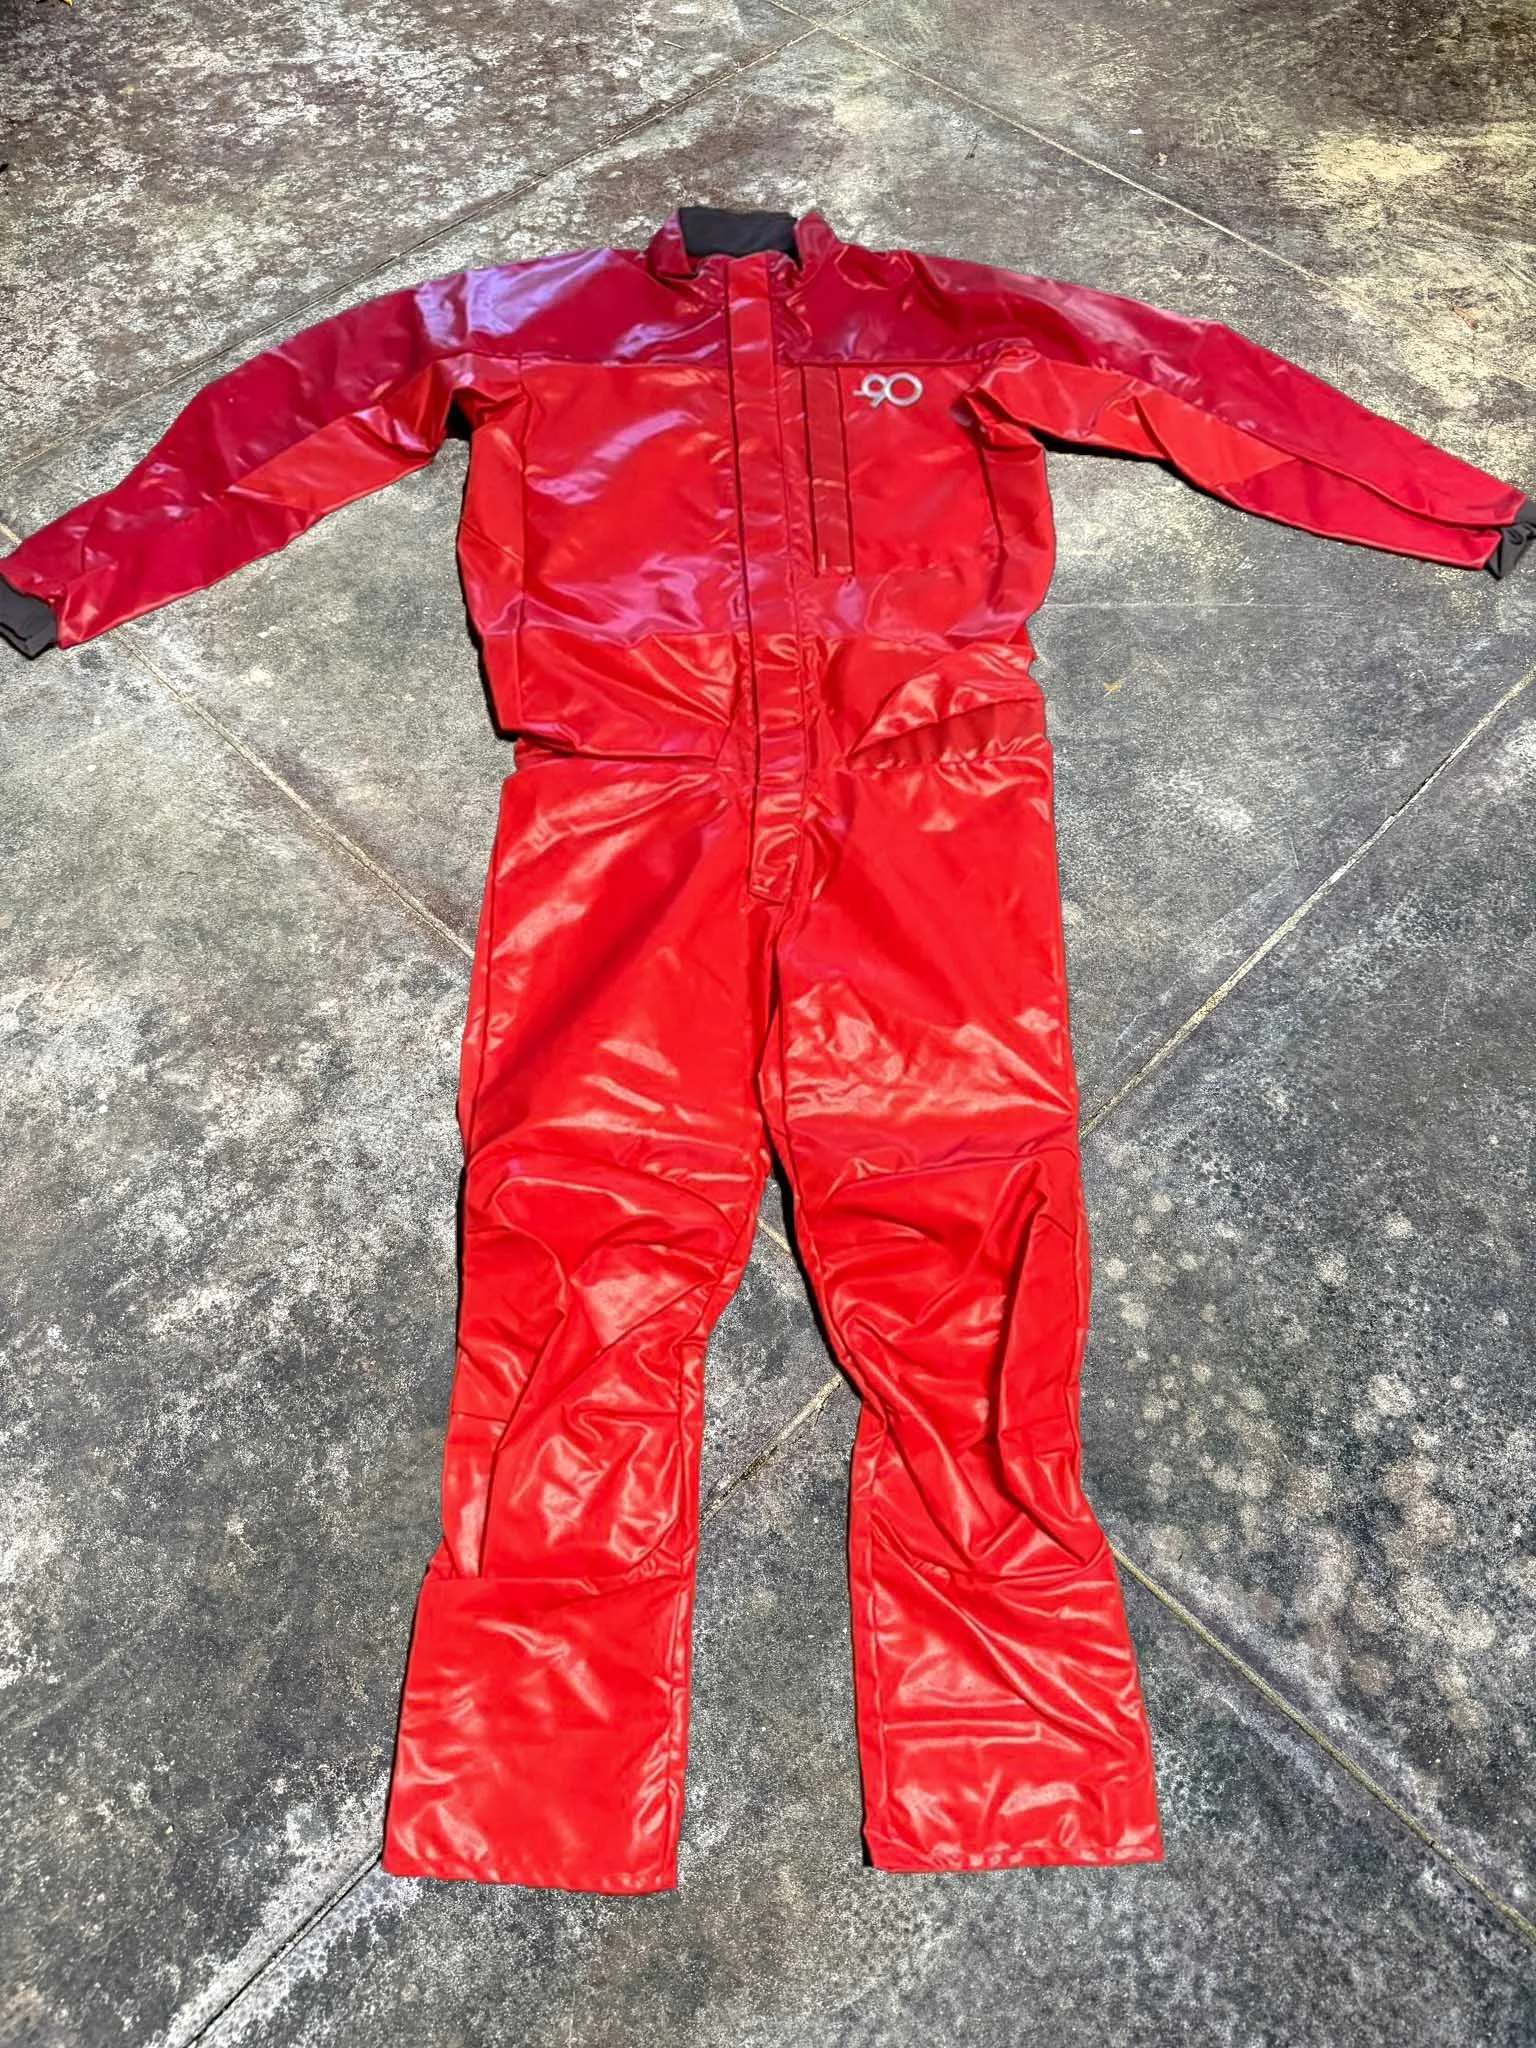
Nylon suits blend the toughness of Cordura with the mud-shedding ability of PVC, making them a flexible and versatile choice. They’re silicone-coated to prevent mud from clogging the fabric and come in lighter or heavier builds depending on the cave environment.
Minus 90 is a standout in this category, they make high-performance nylon suits used in some of the coldest, wettest expedition conditions in North America. If you’re looking for a modern upgrade, nylon is worth a serious look.
Your boots take a beating — whether it’s ankle-deep mud, sharp rock, or long crawls. It’s important to choose the right pair for you.
Cave Boots
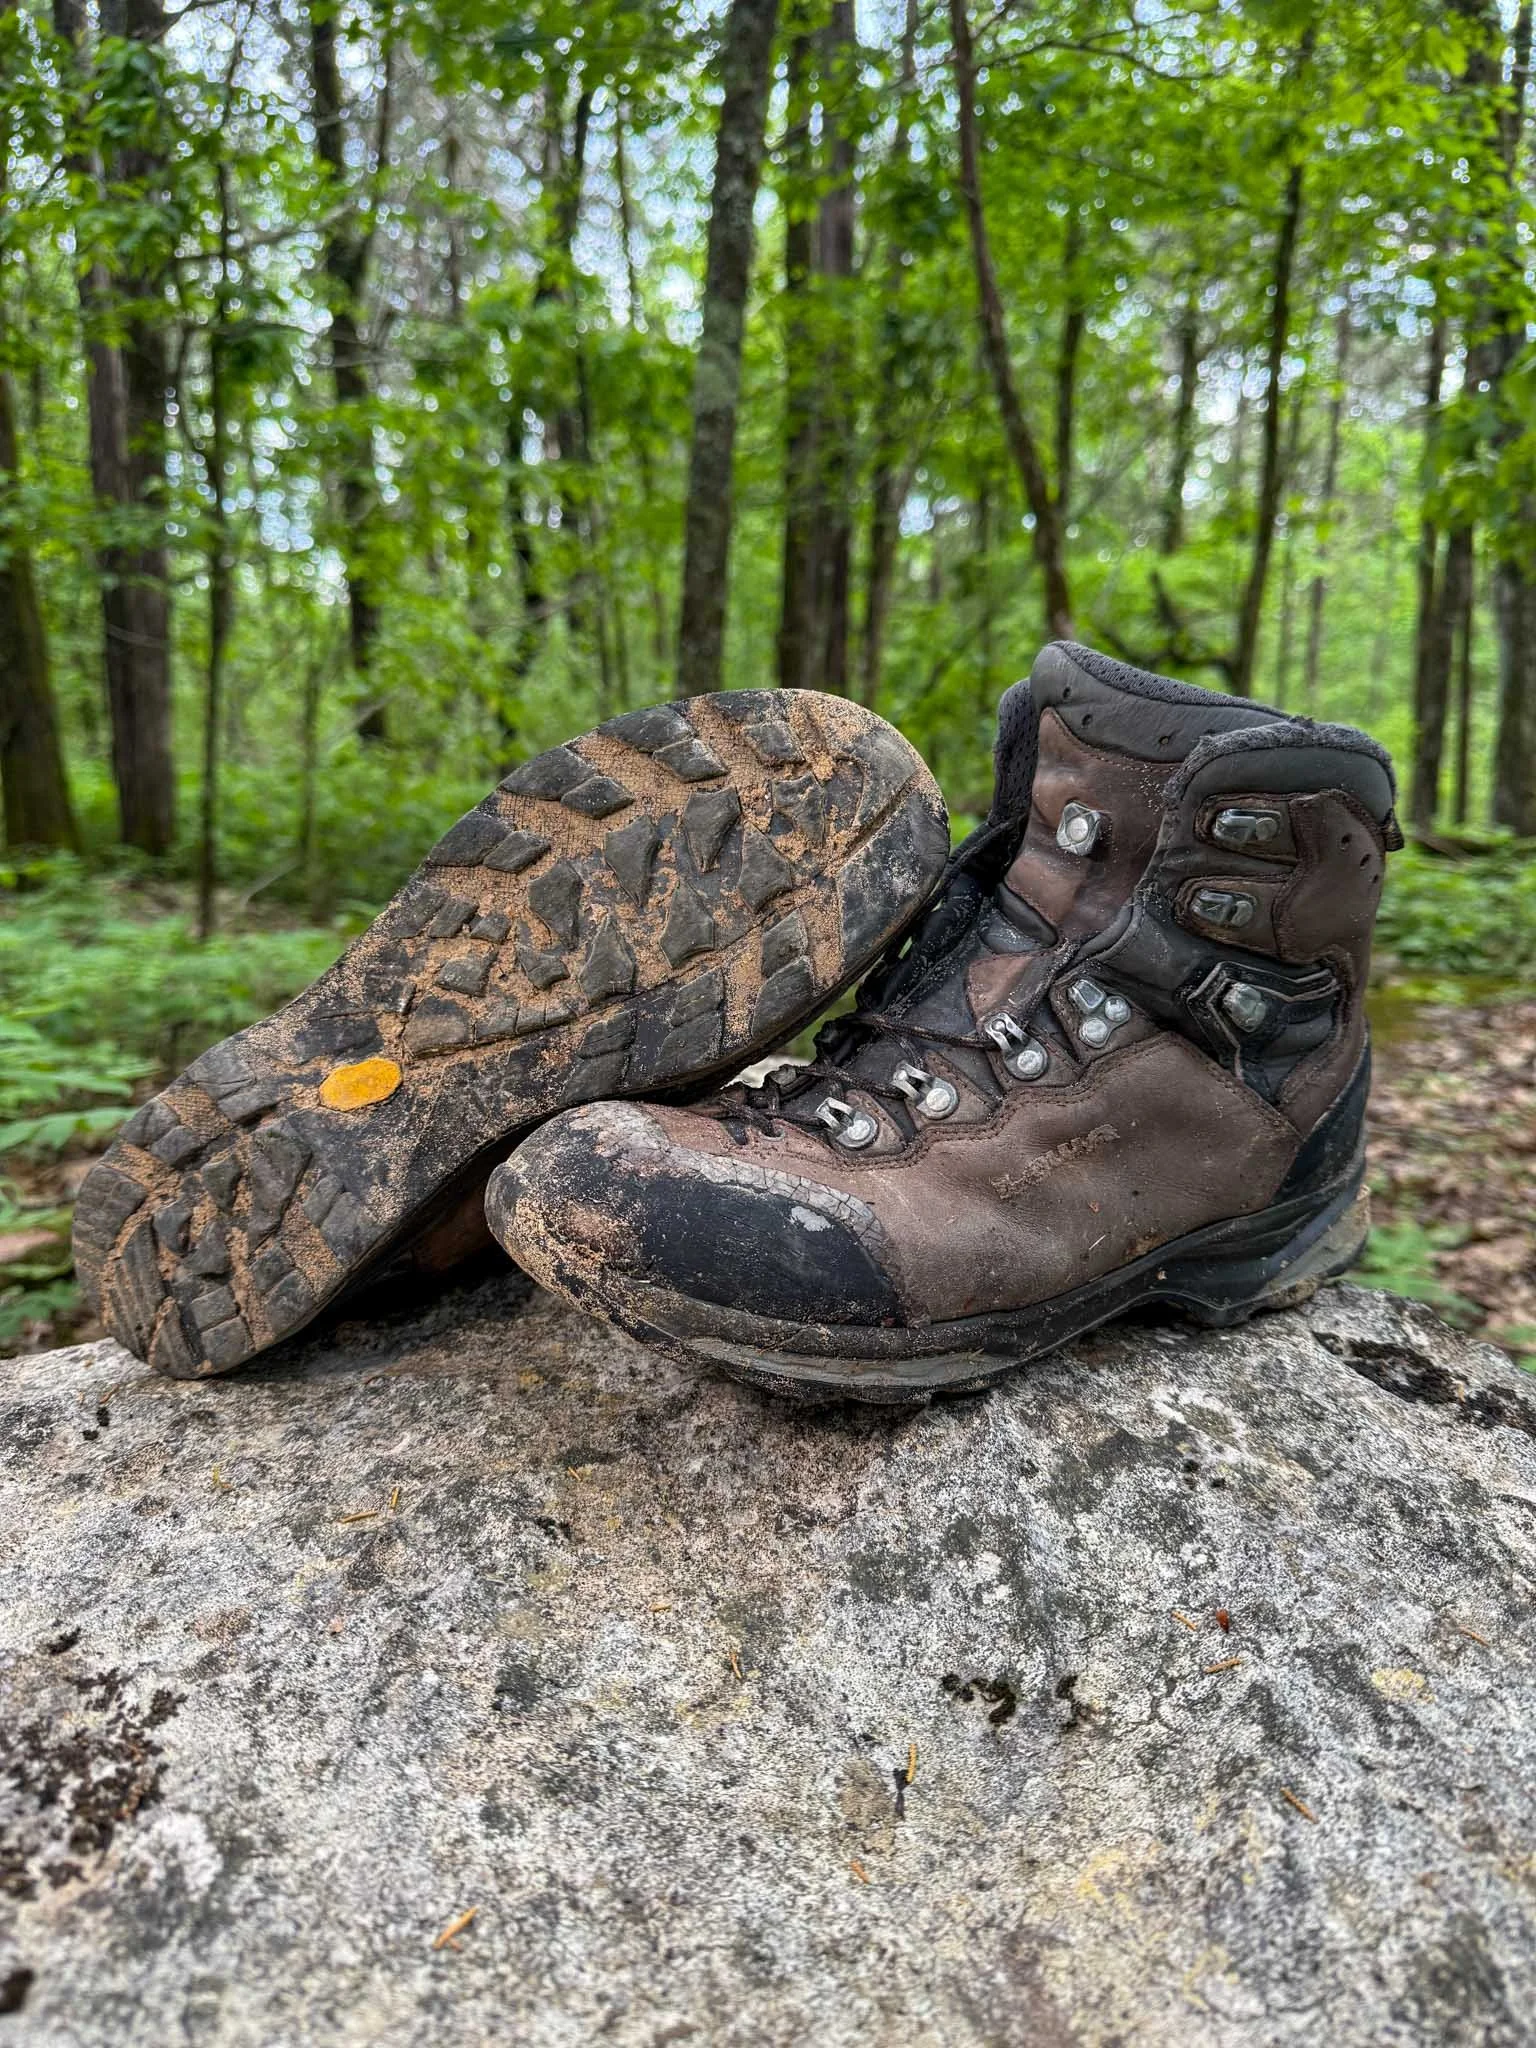
Some cavers swear by wellies — tall, rubber boots that are waterproof, cheap, and easy to replace. They’re solid for mud-heavy caves and shallow water, but they don’t offer much ankle support or a snug fit, and once water gets inside, they tend to stay wet. Others just use the oldest pair of tennis shoes they own.
I personally prefer a good mountaineering boot, and lately I’ve been using a pair from Lowa that I’ve really enjoyed. They’re supportive, have great grip, and fit tight around the foot, which makes them feel way more secure during climbs, crawls, and longer caves. Some pairs are waterproof, but at the end of the day, your feet will probably get wet anyway — so I’d rather have a boot that holds up and performs when it counts.
These save your joints from bruises, cuts, and all the wear that comes with crawling for hours.
Knee and elbow pads
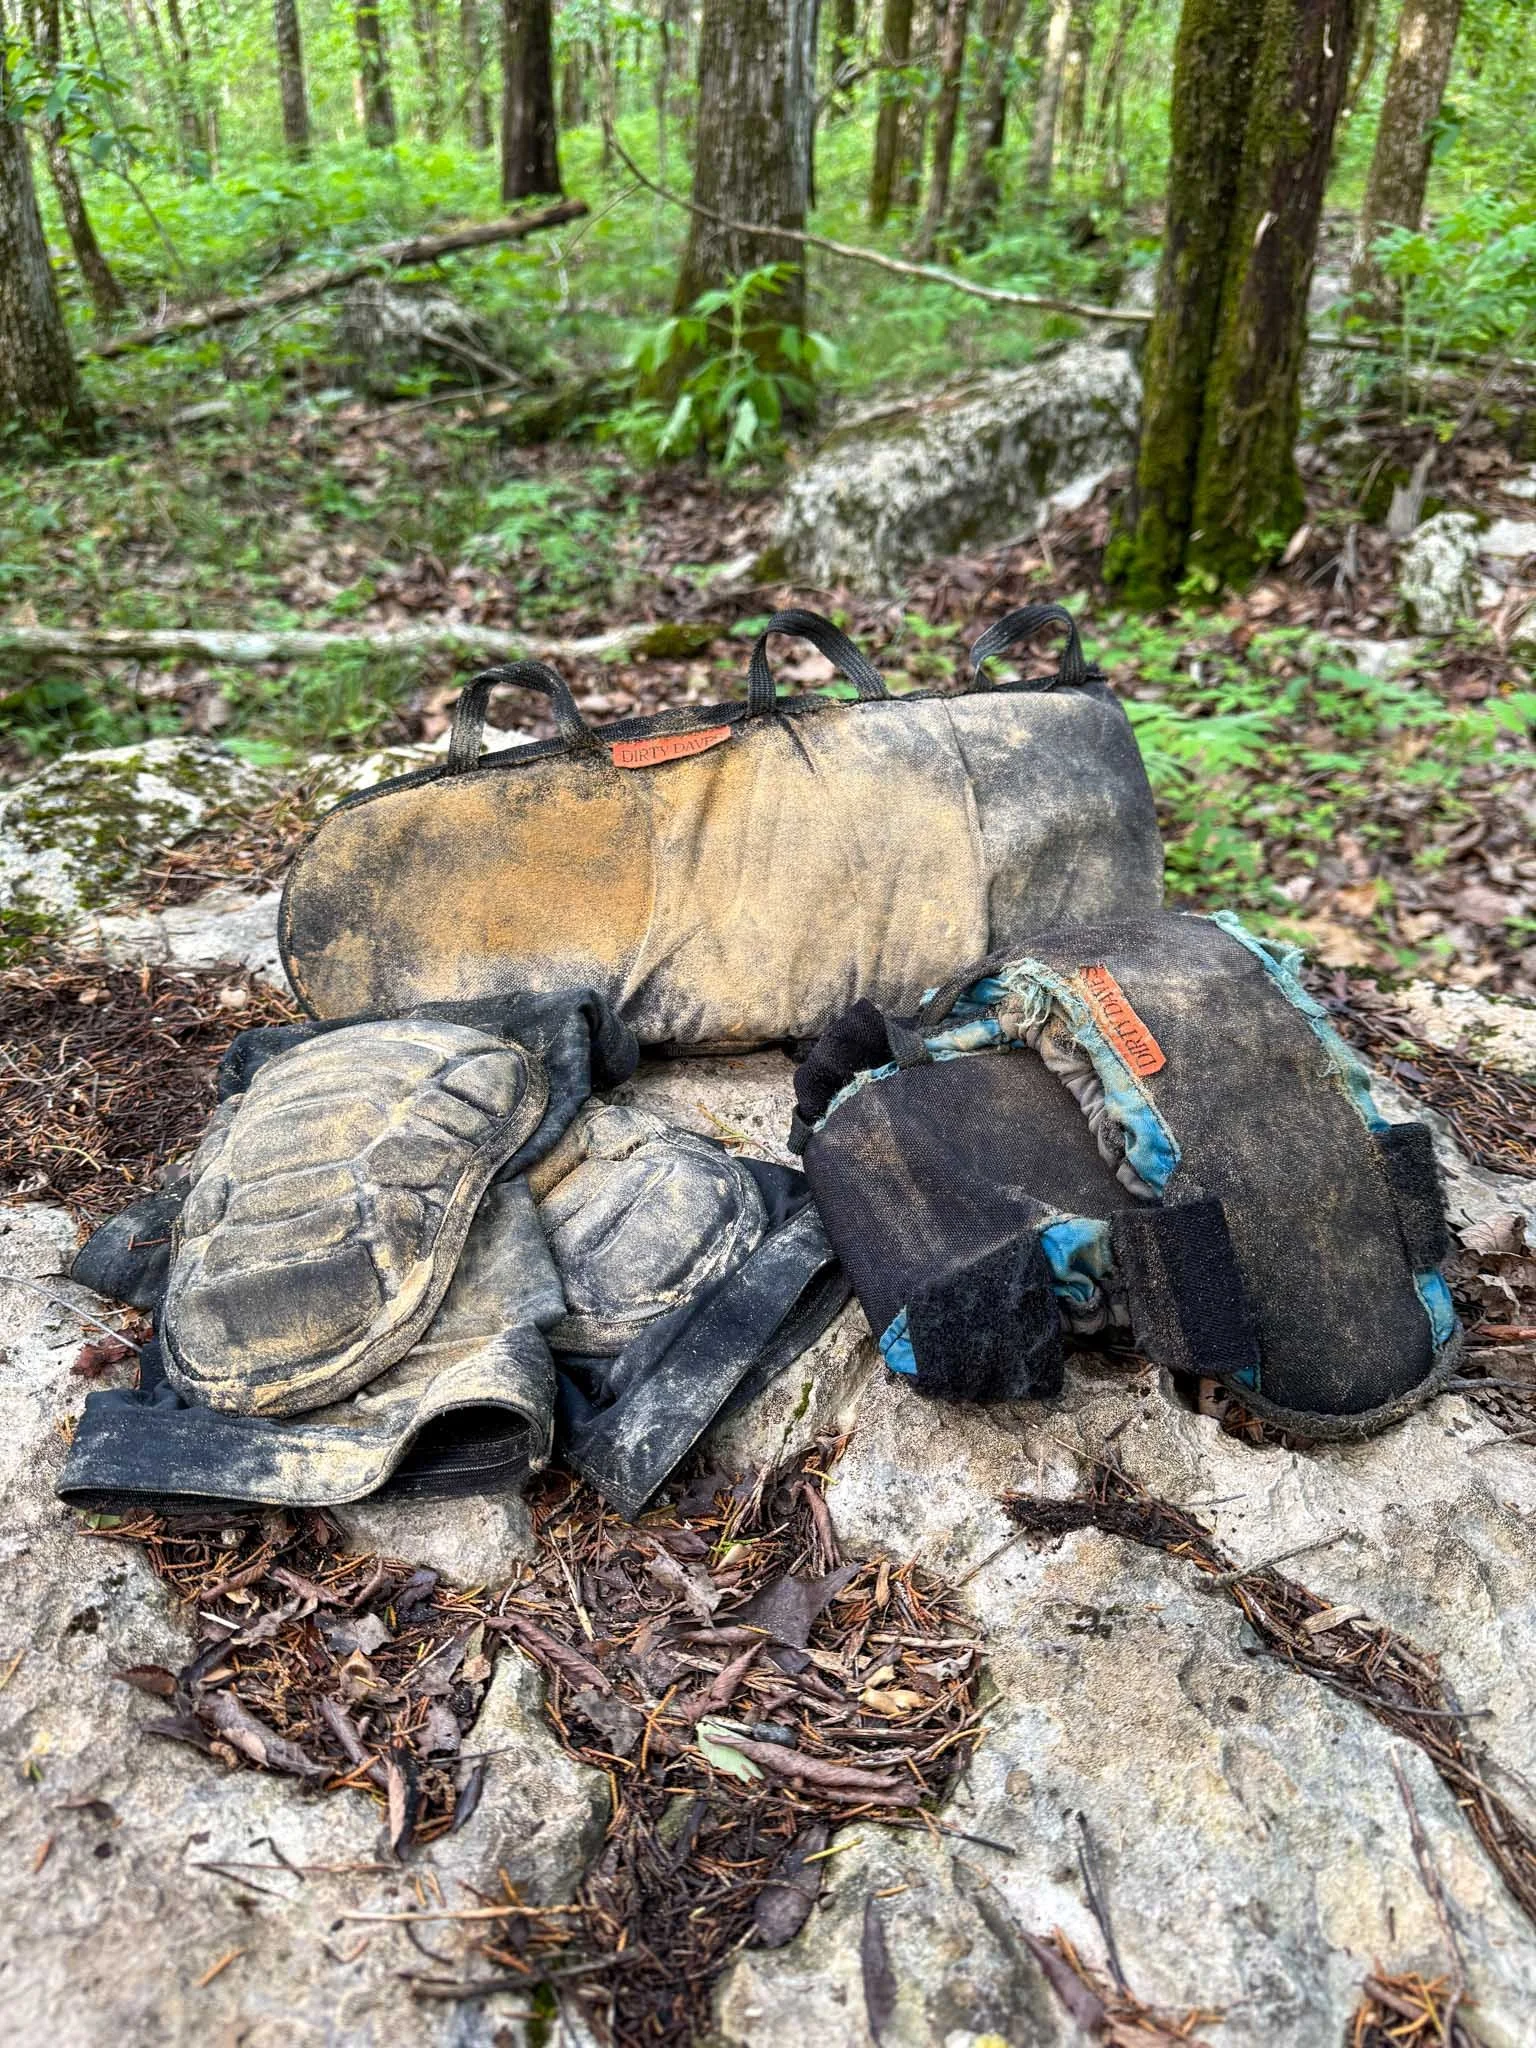
For a long time I used Dirty Daves, and they’re decent if you’re not caving super frequently. But if you’re going caving 3–4 times a week like I do, they tend to break down fast. Their elbow pads hold up a bit better, but I usually skip those if I’m wearing a wetsuit or something that already gives some padding.
Lately I’ve switched to a pair of Klein slide-on knee pads, and they’ve worked surprisingly well. I wear them under my cave suit, or sometimes over my pants and they stay put without shifting. For elbows, I’ve been eyeing volleyball pads, which I’ve heard great things about for long, crawly trips. Simple, padded, and just enough to take the sting out of rough passage.
Cave Bags
Whether it’s a casual trip or an expedition push, having the right bag makes a big difference underground.
Cave Packs

For big trips, I use a Landjoff pack — it’s thick, PVC-coated, and takes a beating without falling apart. While it’s not fully waterproof, it’s perfect for keeping your essentials protected when paired with dry bags or hard cases inside.
For sport trips or surveys, a Swago bag is my go-to. It’s fully waterproof, comes in multiple sizes, and is great for personal loads or lighter outings. Both bags are made by cavers, for cavers, and they’ve earned their spot on my back.
Internal bags make sure your essentials survive whatever the cave throws at you.
Internal bags
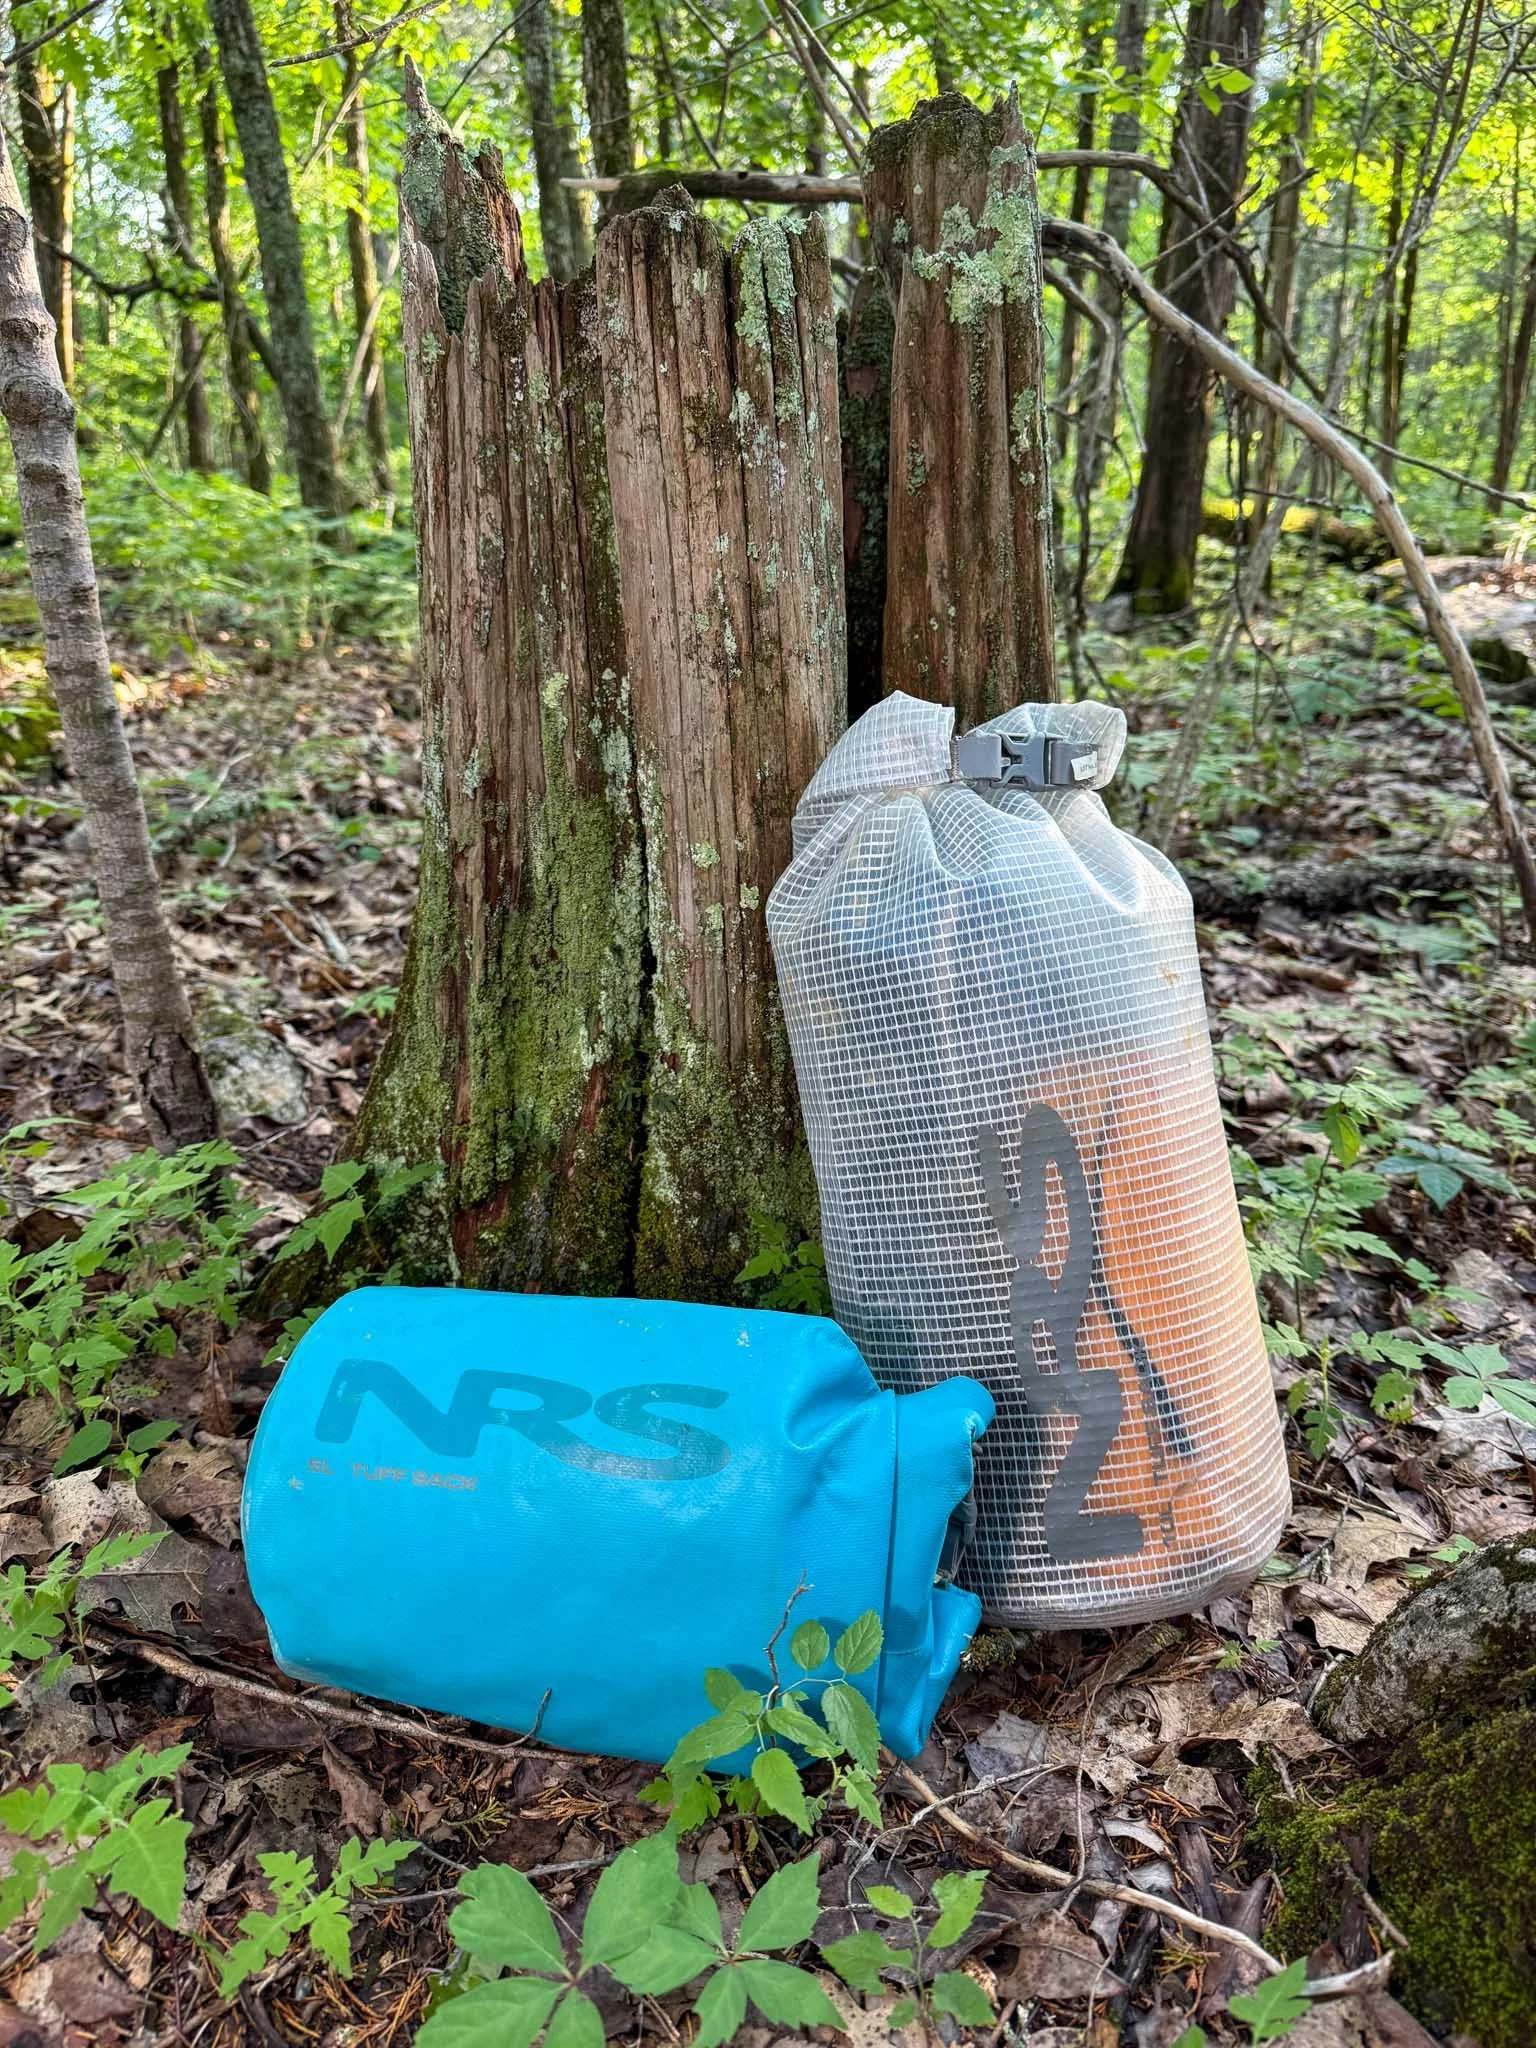
Inside my pack, I usually use NRS dry bags to keep my gear dry. They’re light, durable, and fit well inside Landjoff or Swago packs without adding bulk.
For more sensitive gear — like camera batteries or electronics — I’ll throw in a Pelican case or small dry box. Internal storage is worth every bit of protection.
For when everything goes wrong. A small kit that can keep a bad situation from getting worse.
THe “OH sh*t kit”

I keep my Oh Sh*t Kit packed in a Nalgene bottle filled with emergency supplies I hope I never need. Inside is a little bit of everything: extra food, electrolytes, a garbage bag “TAG wetsuit”, candles, a lighter, a thermal blanket, a poncho, hot hands/toes, glow sticks, spare batteries, and an extra headlamp. It’s lightweight, compact, and built for worst-case scenarios — like getting soaked, cold, or stuck longer than expected.
If you’re freezing, you can light candles, wrap up in the garbage bag or poncho, and trap the heat around your body with your head sticking out. It’s not pretty, but it works. Everyone should carry one — it can buy you time, warmth, and peace of mind. Bonus tip: wrap the bottle in duct tape a few times for some last resort gear repair tape.

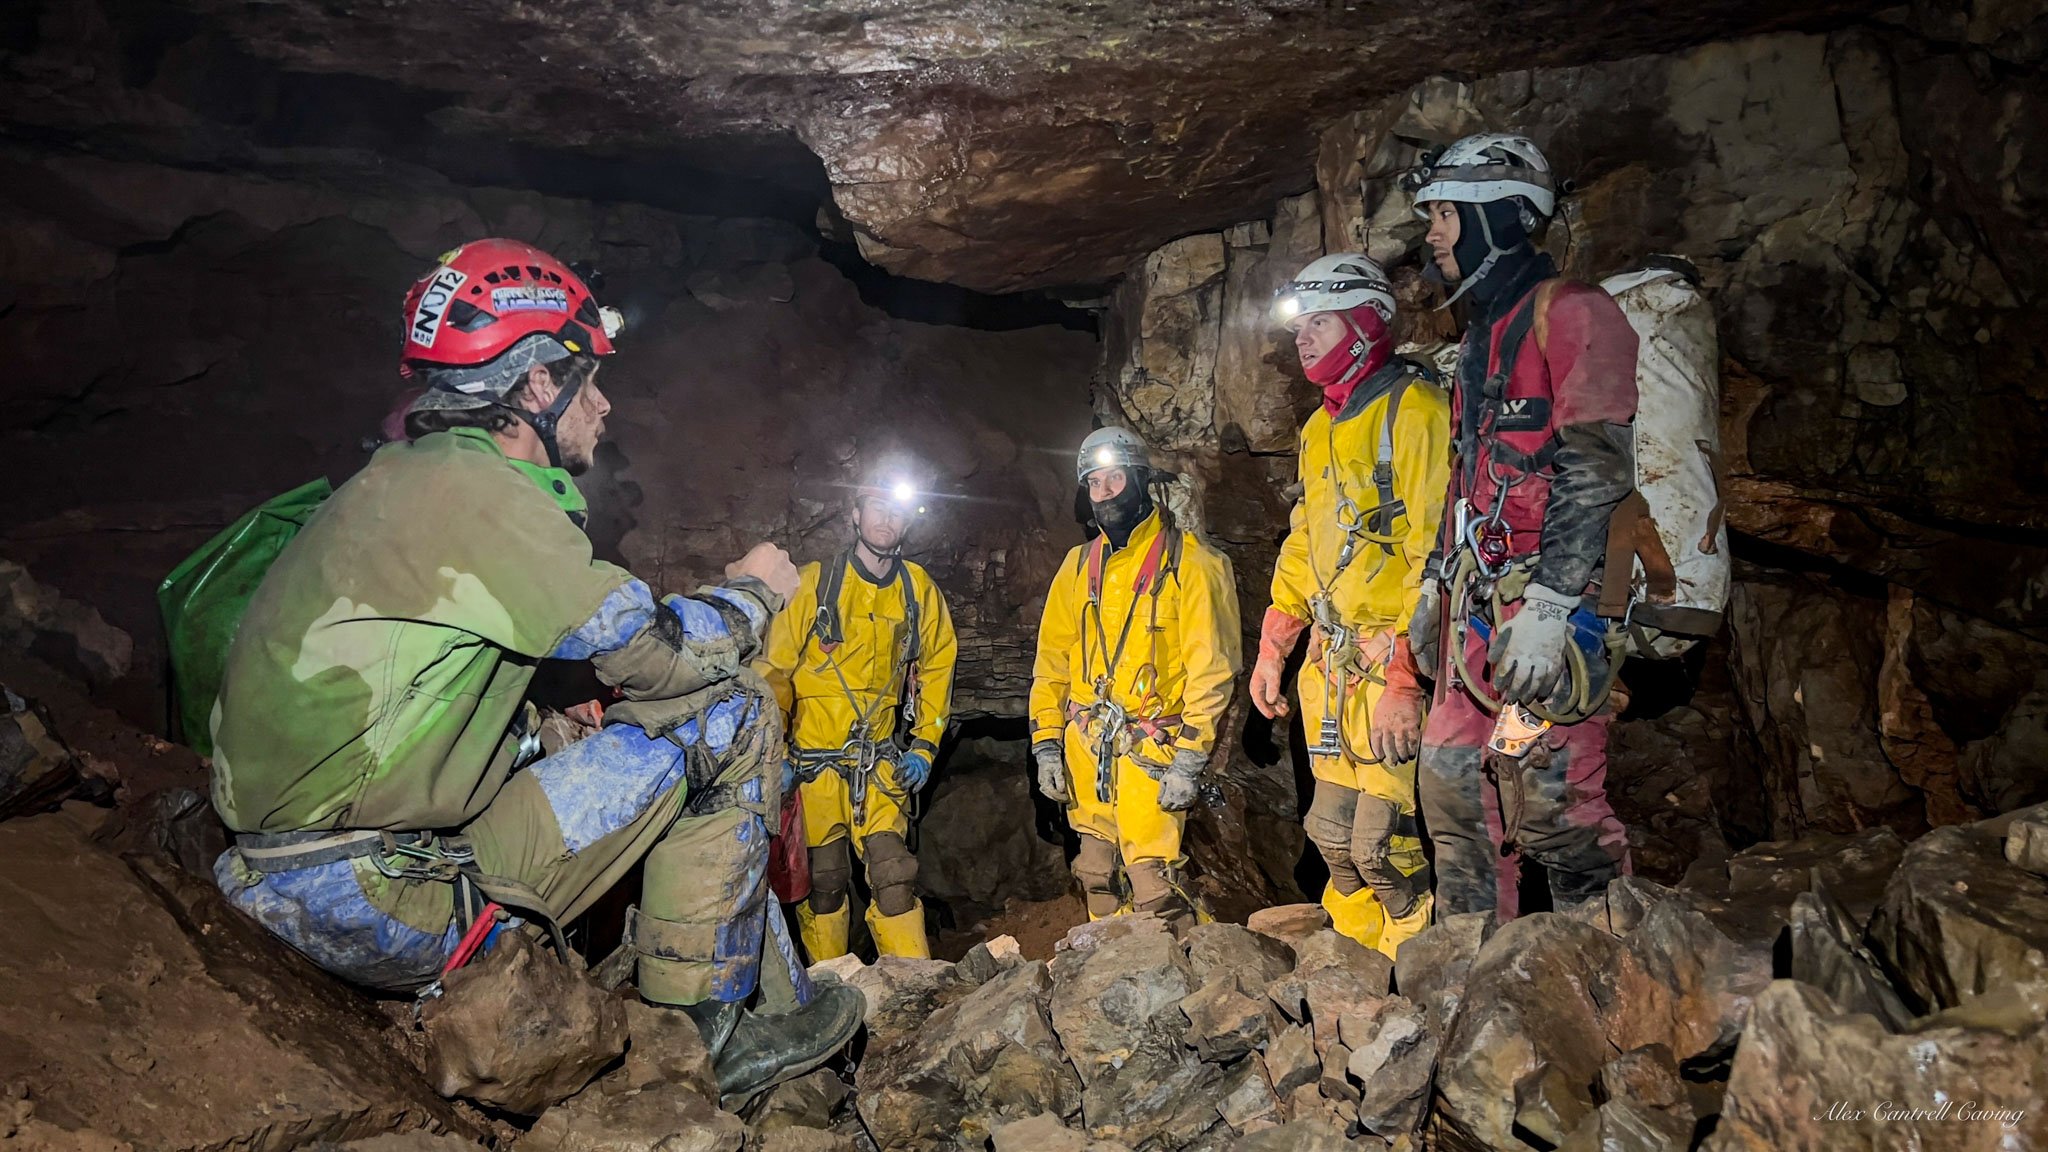
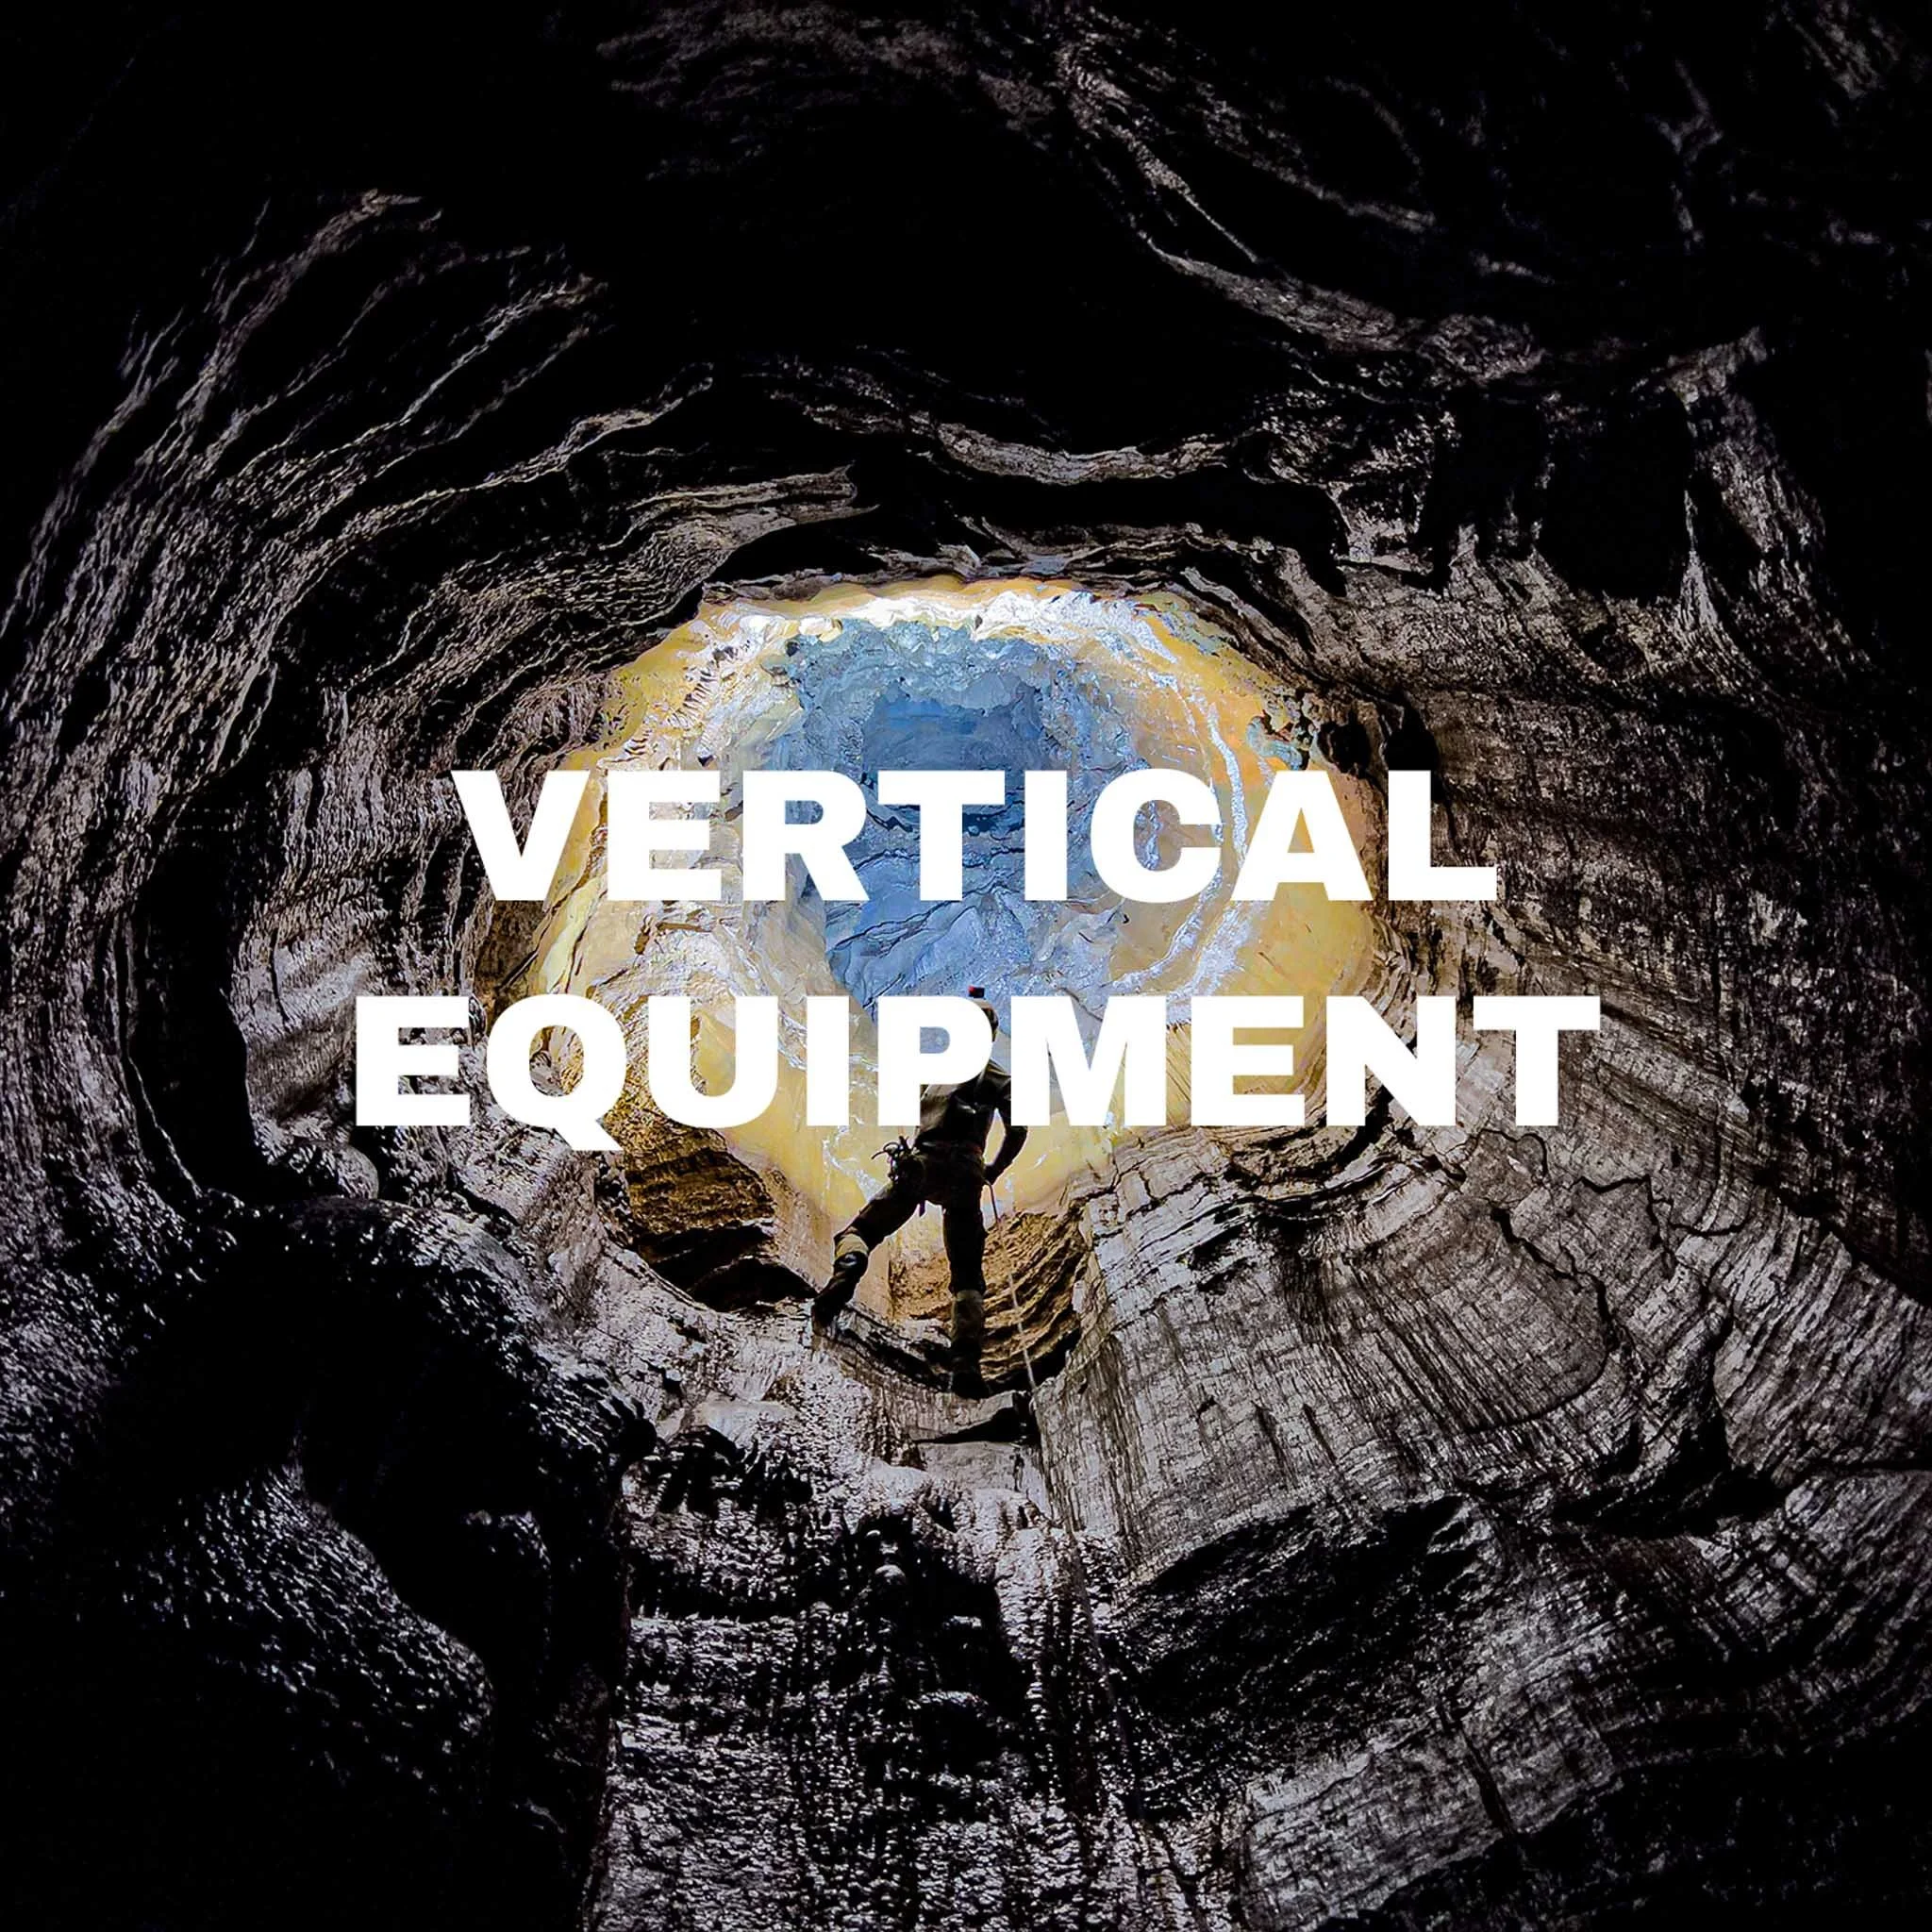
When you need to go deeper
Vertical equipment
Climbing
systems
Your climbing system is your lifeline underground — it’s how you ascend out of pits, cross traverses, and move through vertical cave systems. Whether you’re hauling out of a 100-foot drop or inching along a tensioned traverse line, your vertical rig is what keeps you progressing. There’s no universal “best” system — each setup has its pros, cons, and ideal use cases depending on cave conditions, rigging style, and personal preference. For a deep dive into vertical techniques and system breakdowns, check out fellow caver Derek Bristol’s channel or for the gear list breakdown visit Bennett Lee’s Website.
The most commonly used system worldwide — simple, compact, and efficient for tight caves and rebelays. It uses a chest ascender, hand ascender, and a foot loop, keeping you low and close to the rope. - I personally pair mine with a Petzl Pantin foot ascender to make a frog runner — it adds power and efficiency for flying up vertical drops.
FROG
A classic U.S.-style setup using a hand ascender with a foot loop and a separate tethered foot ascender or QAS. It’s modular and minimal, great for long, free-hanging pitches, but can be tiring and isn’t ideal for rebelays or tight passage.
TeXAS
A hybrid between Frog and Rope Walker, using a floating hand ascender with a foot loop attached to the chest ascender. It gives upright climbing efficiency while staying compact and manageable in tighter caves. Good middle ground for varied terrain.
Mitchell
Built for clean, uninterrupted vertical shafts. This system uses foot and knee ascenders to allow near-upright walking up the rope — extremely efficient for big climbs but bulky and less suited for complex rigging or rebelays.
Rope Walker
Harnesses
The core of every vertical system.
Seat harness
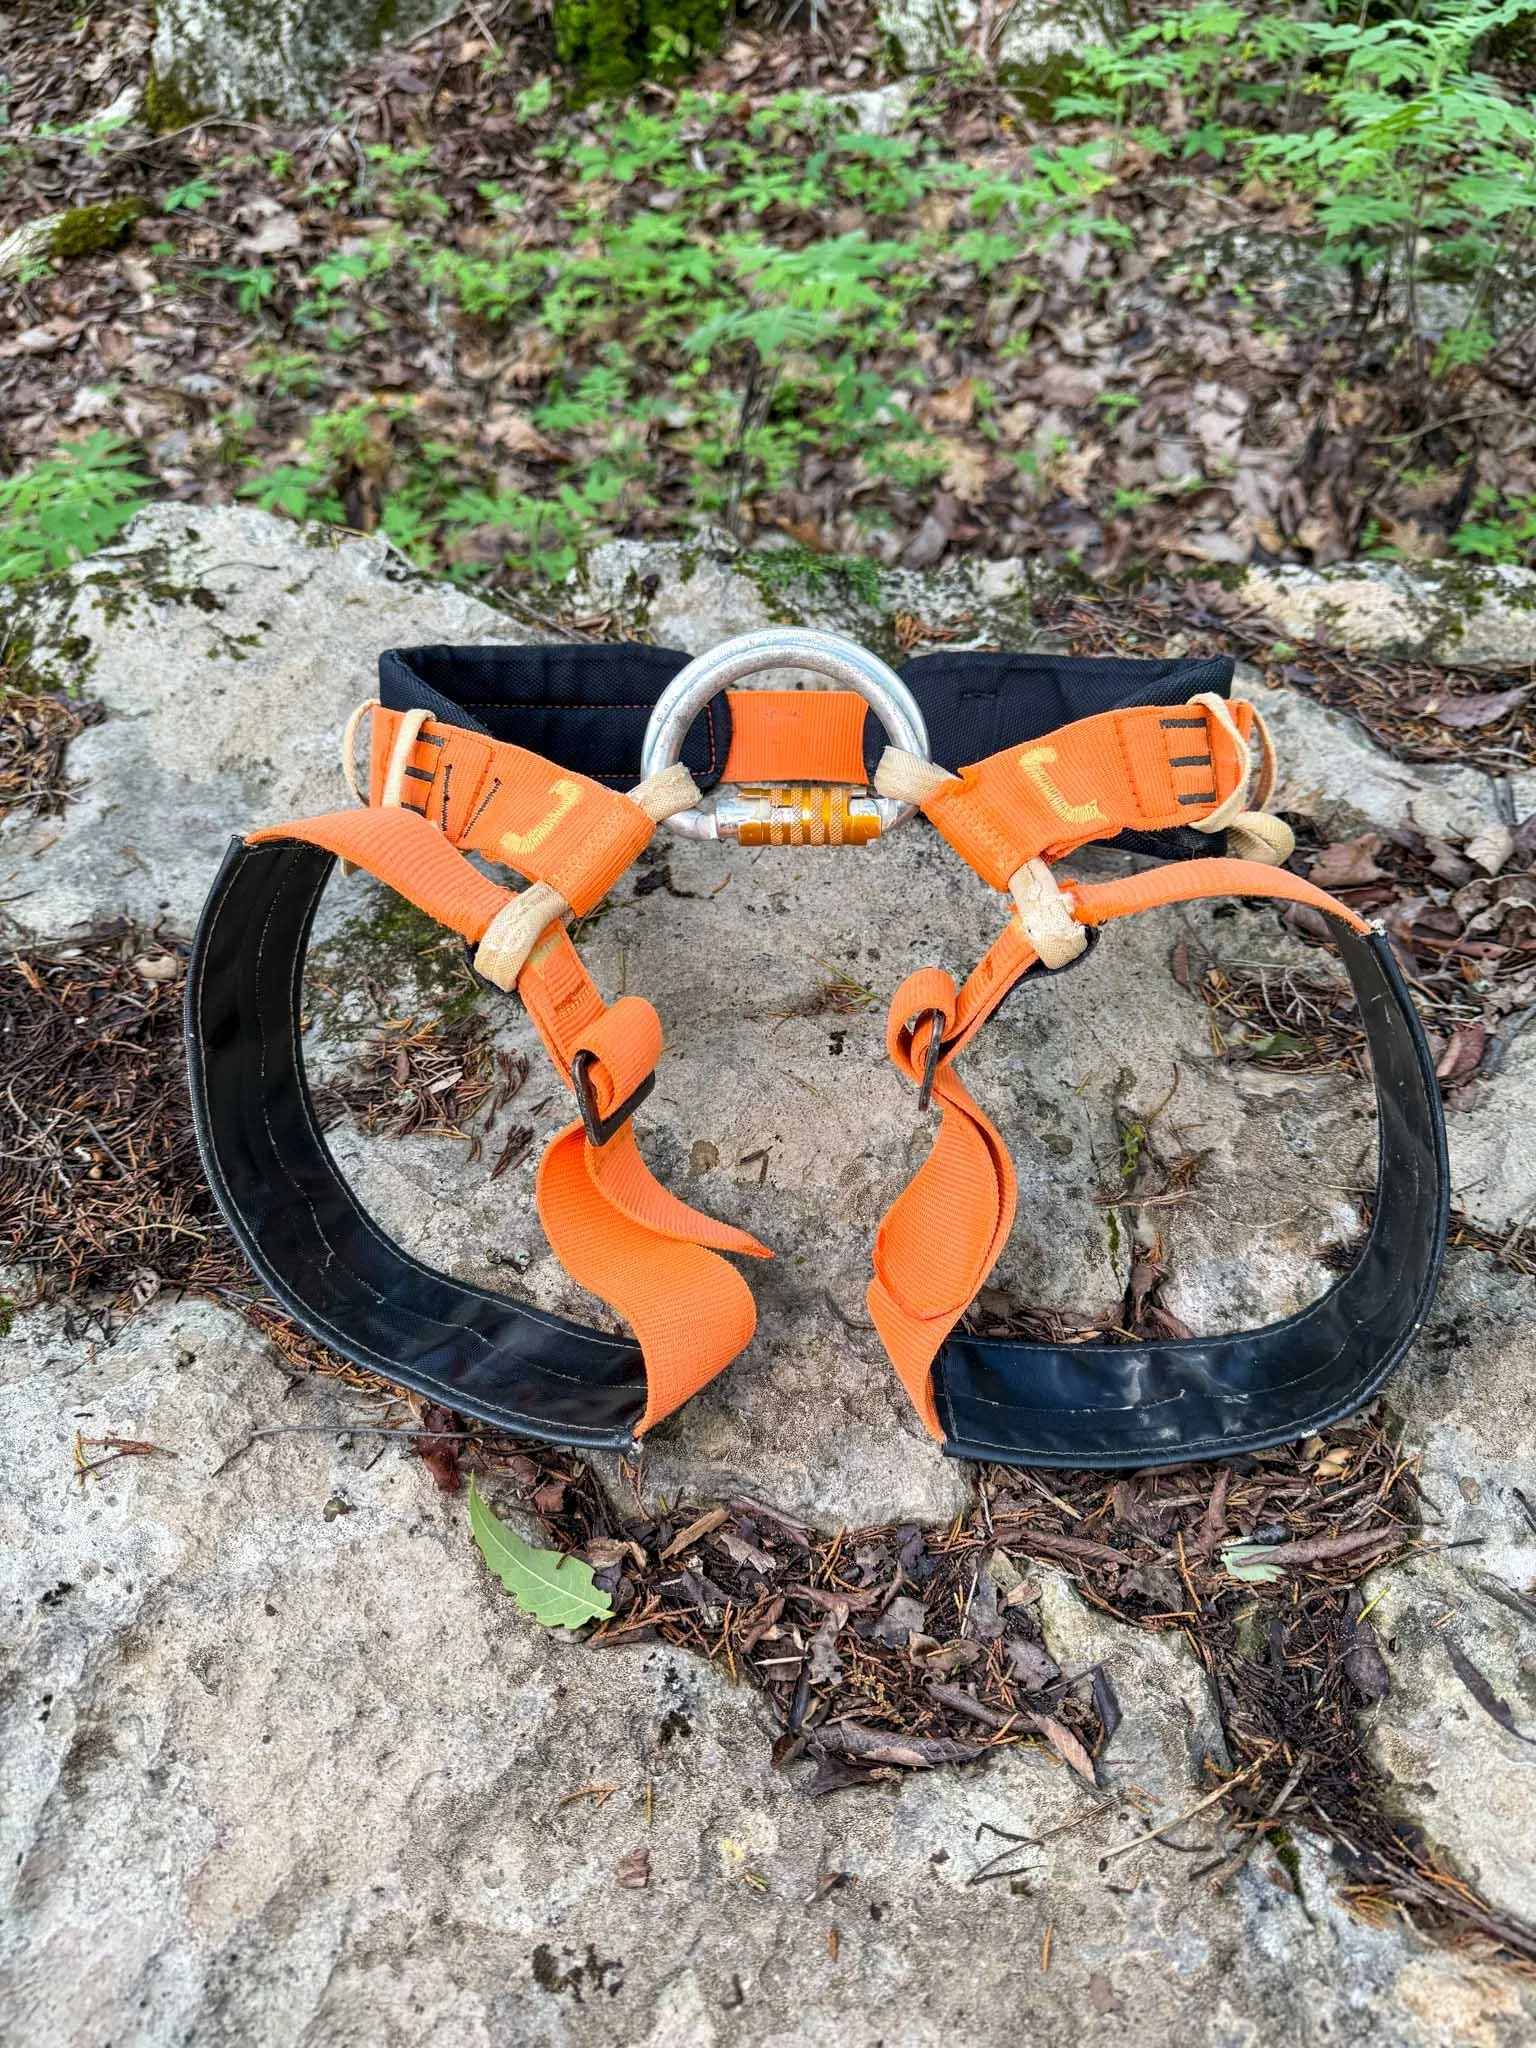
There are a lot of solid cave harness options out there. I currently use the Petzl Aven, and it’s been my favorite so far — super durable, well-padded, and reliable on rugged trips. That said, you must use a D-link carabiner (tri-lock or screw-lock only) to properly secure a cave harness. It’s the central point for your system, and nothing else should be used.
The Superavanti is a lighter version of the Aven with less padding — more compact, but less comfortable for long trips. The MTDE Amazonia 2 is another great option: comfortable and budget-friendly, though a bit bulkier. All of these are cave-specific and built for tough conditions. Your choice depends on fit, durability, and what feels right when you’re hanging from it.
Holds your chest ascender in place while climbing.
CHest harness

Chest harnesses aren’t load-bearing — they’re just there to keep your chest ascender upright while you climb. I used to use the Petzl Torse, which is as simple as it gets: one strap, no padding, and ultra-lightweight. It works fine, but on long climbs like Fantastic, it dug into my shoulders and left me pretty raw.
Now I use the MTDE Garma, and it’s been a game changer. It’s padded, super adjustable, and has chest loops for attaching accessories. It’s bulkier than a basic strap or bungee, but the comfort is worth it for long vertical days. You can get by with just a bungee, but if you want durability and comfort, the MTDE Garma is the one to use.
Ascenders
Clips to the rope and gives you upward pull — usually holds your foot loop.
Hand Ascenders
I currently use the Petzl Ascension, which has been the standard for years and works well across most rope diameters. It’s reliable, durable, and performs great in both dry and wet conditions. I’ve also tried the Kong Futura, which feels smoother on thinner ropes but less versatile overall.
There are tons of options on the market, but Petzl’s handled ascender tends to be the most common choice for a reason. It’s simple, proven, and just works in nearly every cave scenario I’ve been in.
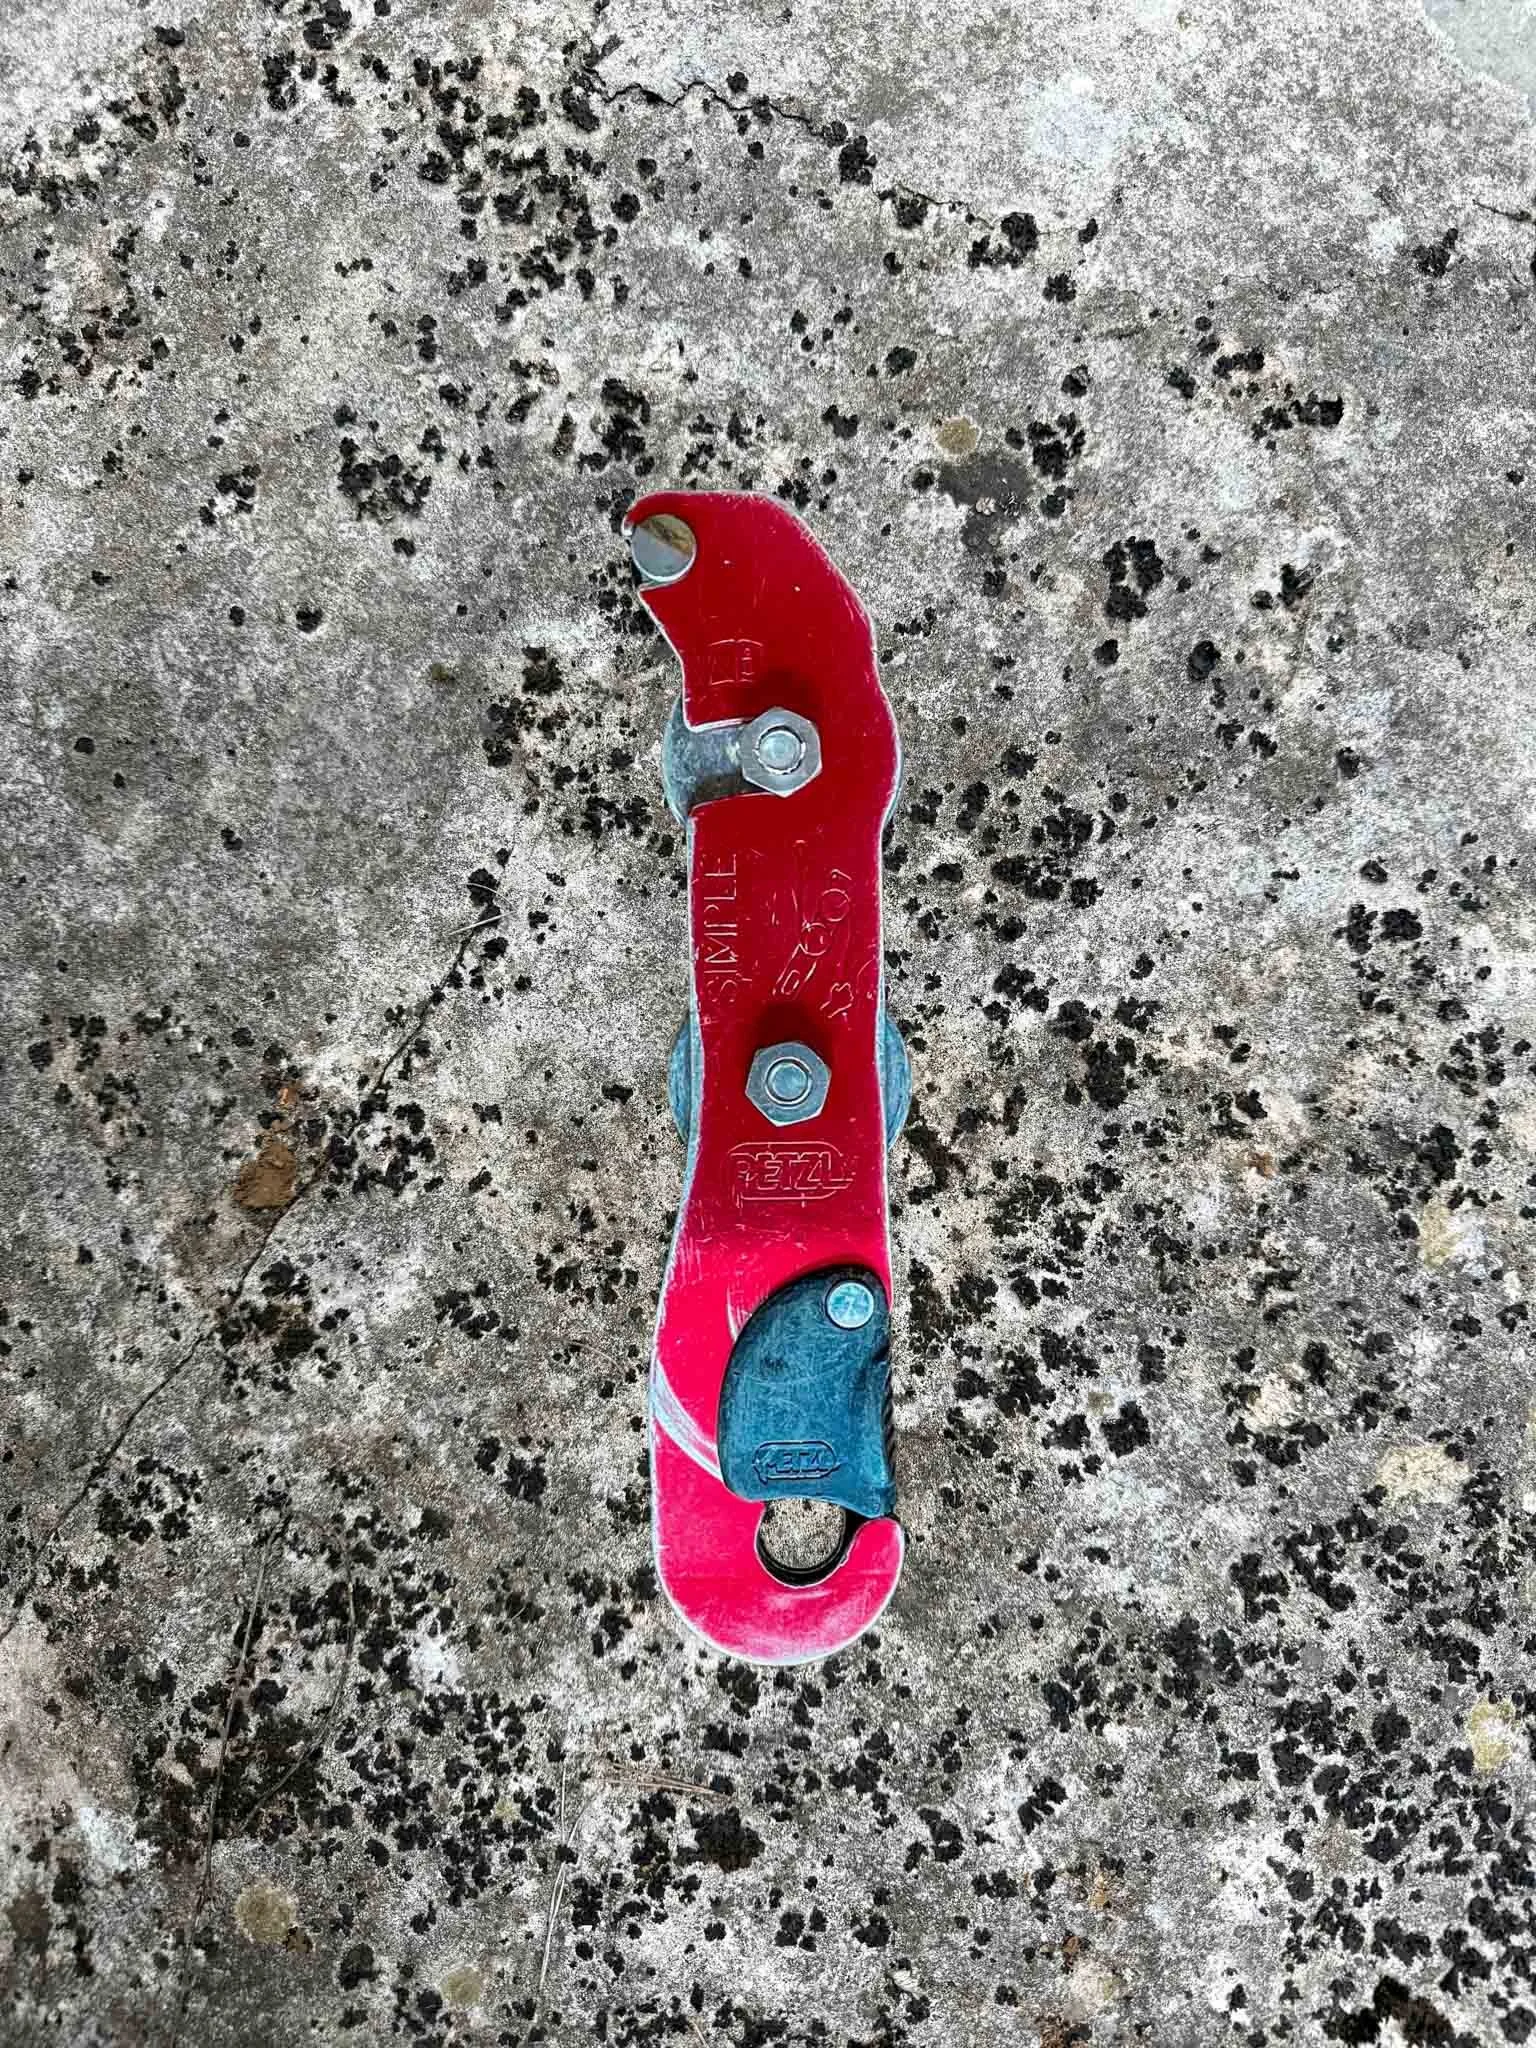
Your main capture point while climbing; keeps you upright and takes most of the load.
CHest Ascenders
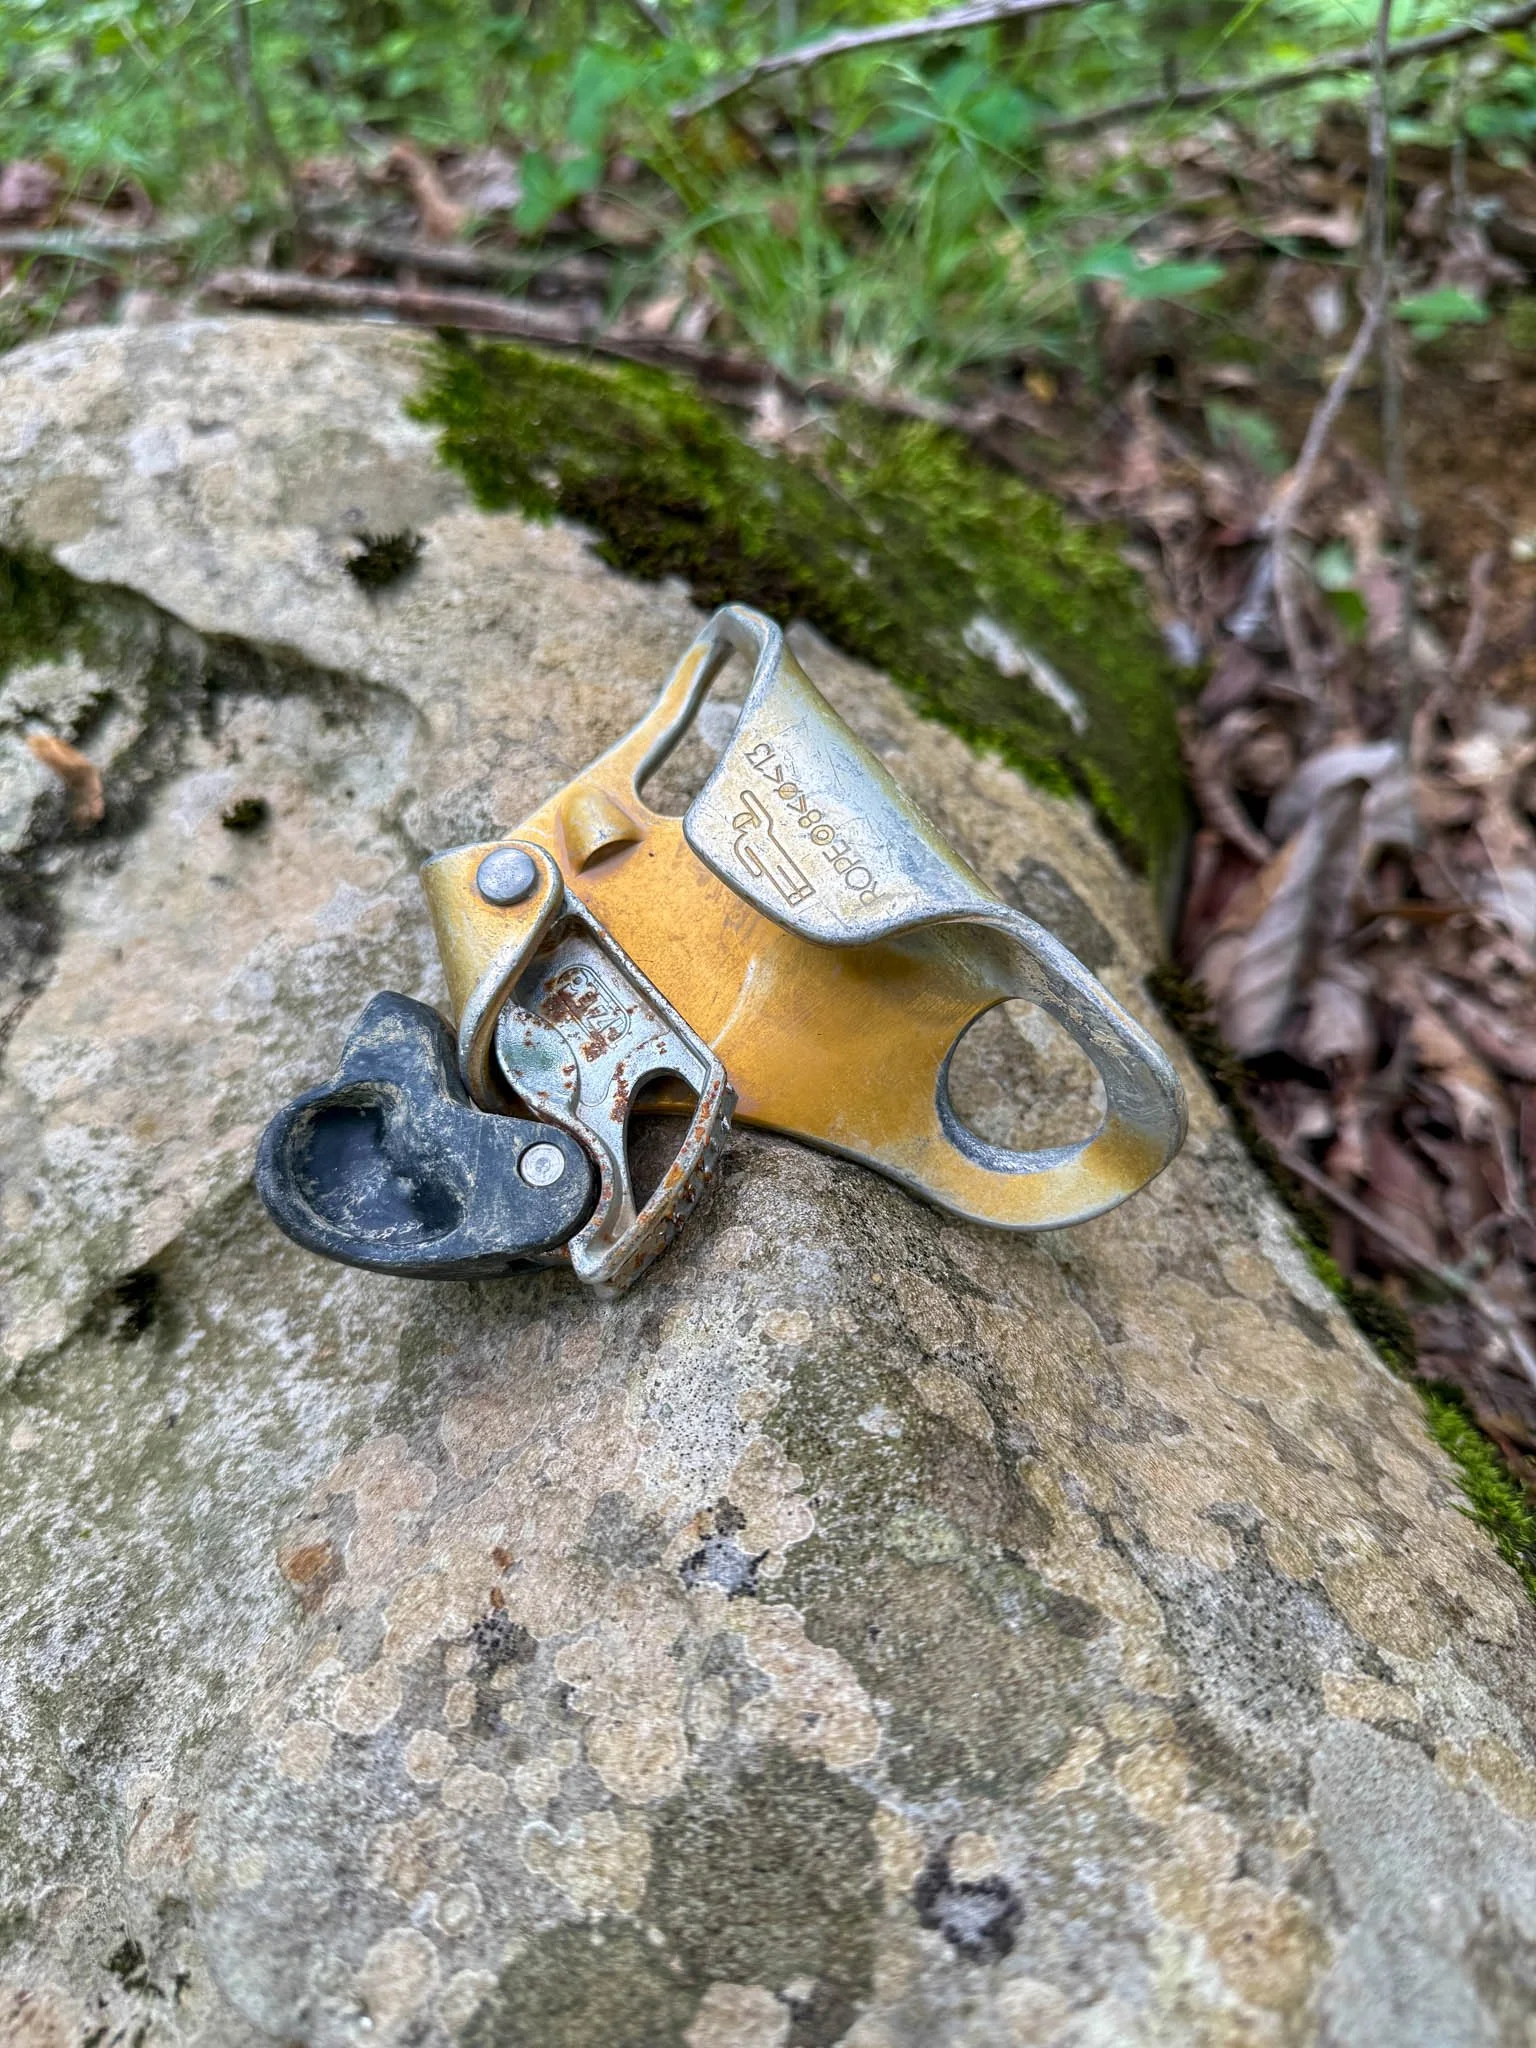
I currently use the Petzl Croll L, which has been the most efficient for my style of climbing. It handles thicker ropes really well, especially in muddy conditions, and gives a smoother, more consistent experience than some of the smaller or lighter models.
I’ve also used the Croll S and Kong chest ascenders, which are both great for thinner ropes but can feel a bit less stable on larger diameters. There are plenty of options on the market — it just depends on your rope size, conditions, and personal preference.
Boosts rope climbing efficiency by keeping your body aligned and reducing strain on your arms.
Foot ascenders
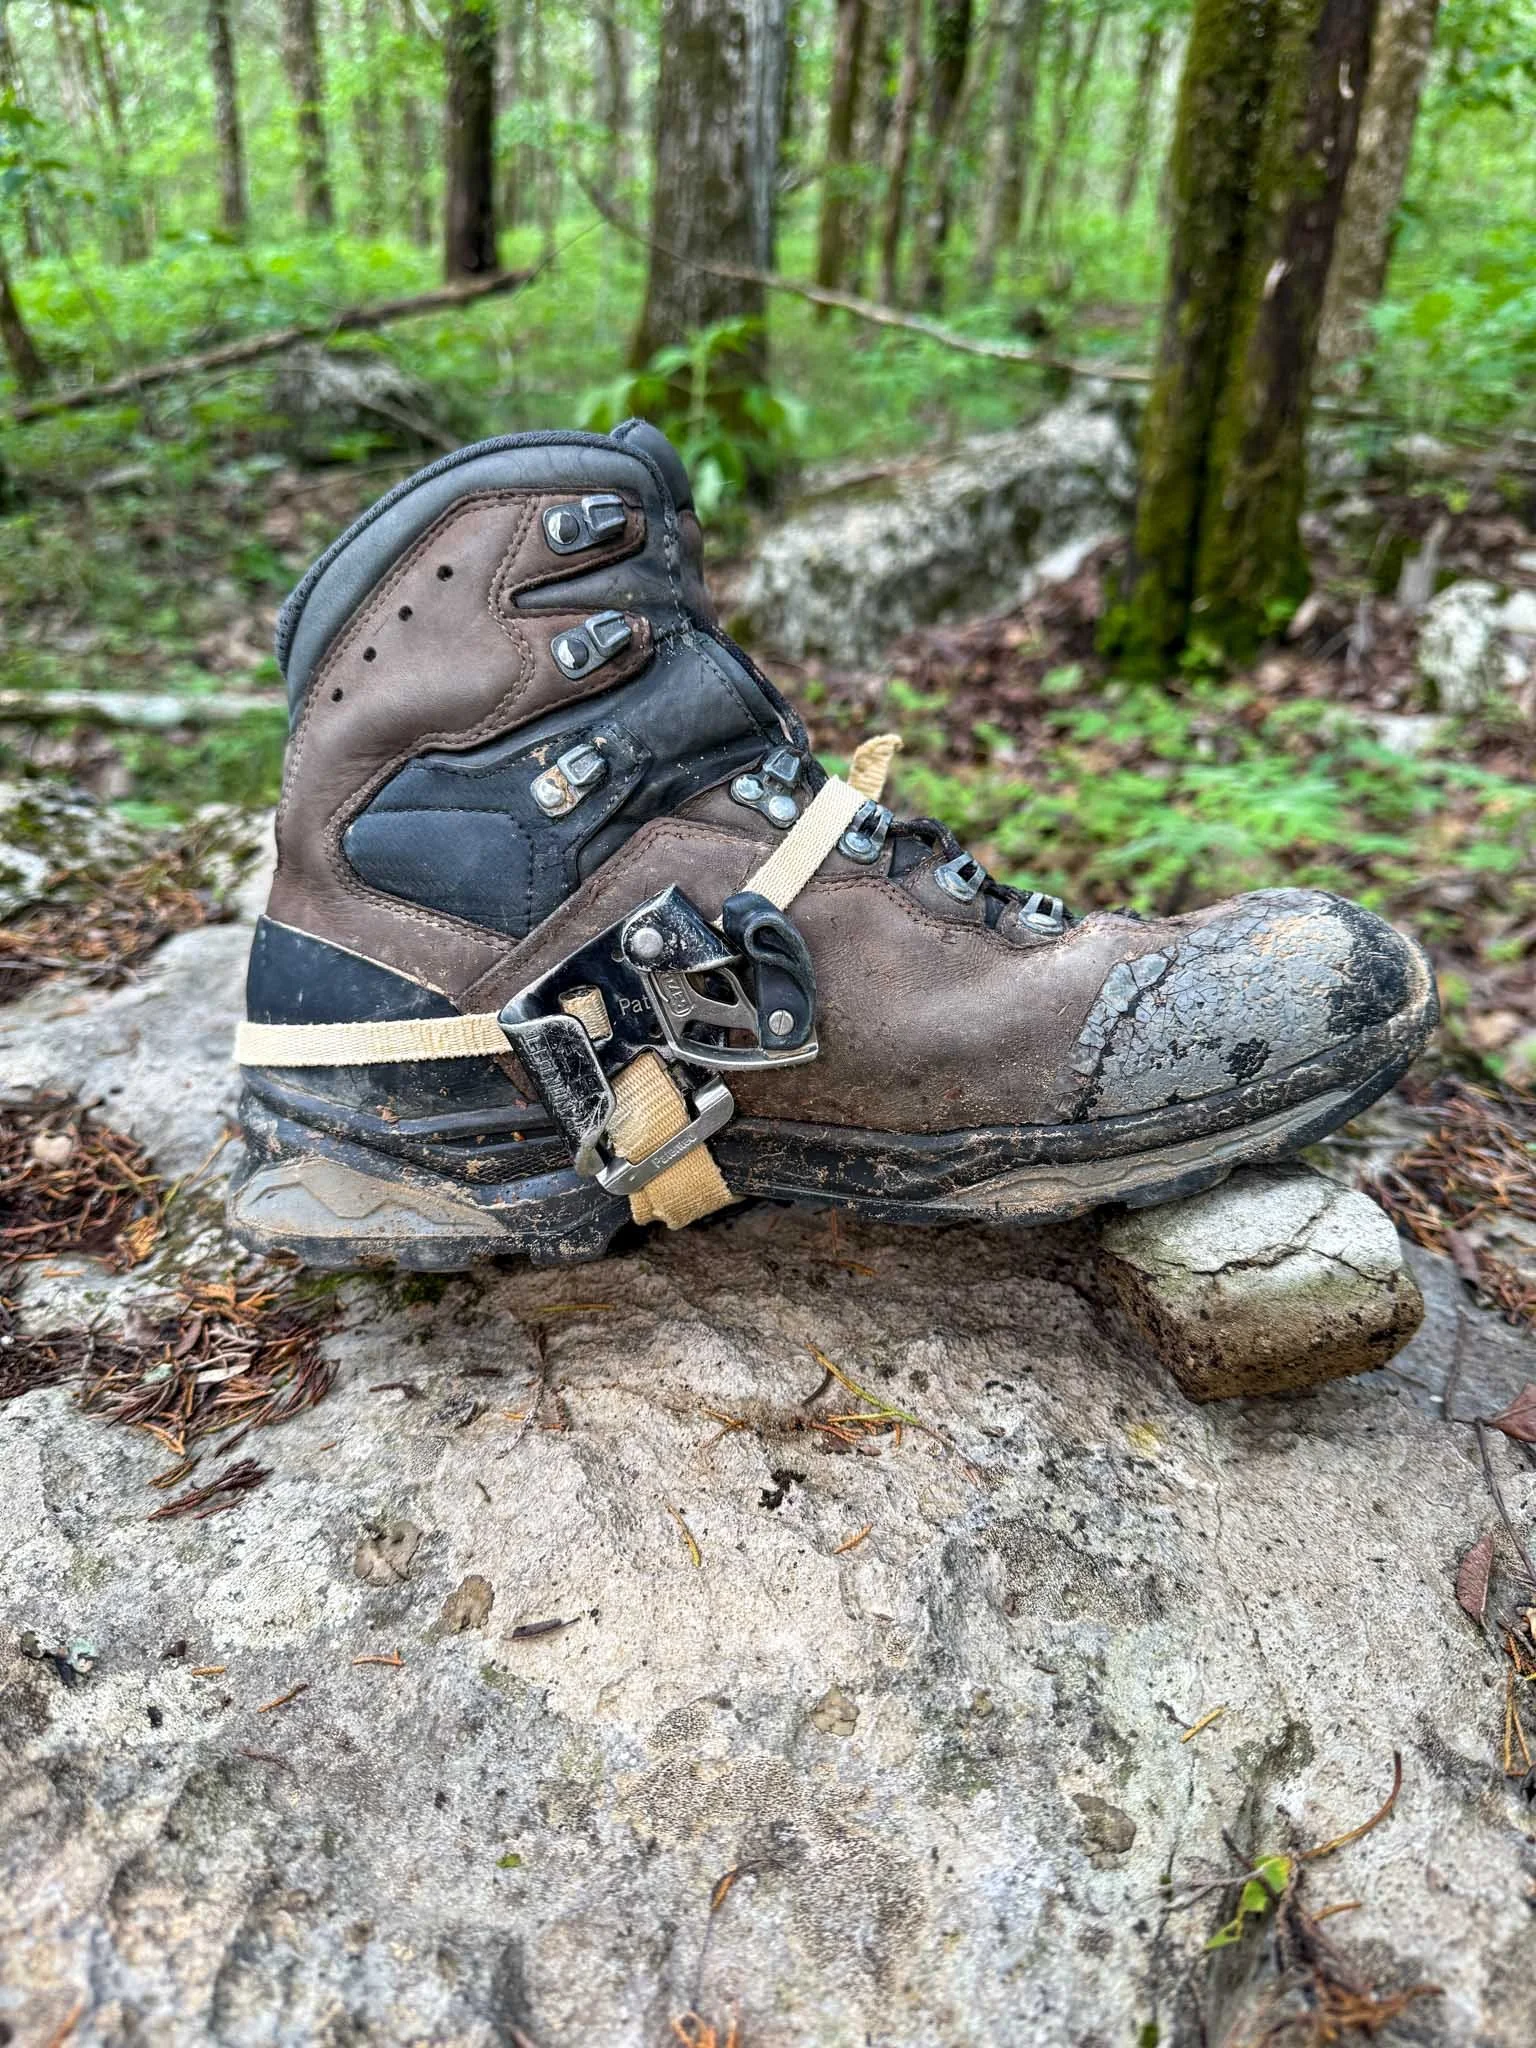
I use the Petzl Pantin Left, but it’s worth noting it doesn’t come with a locking catch — you have to buy and install that separately. I personally prefer having it for added security, but some cavers climb without it just fine.
I’ve also tried Kong’s foot ascender, which performs similarly but has the same catch issue. Most folks stick with Petzl for their foot ascender, but like everything in vertical caving, it comes down to personal style and preference.
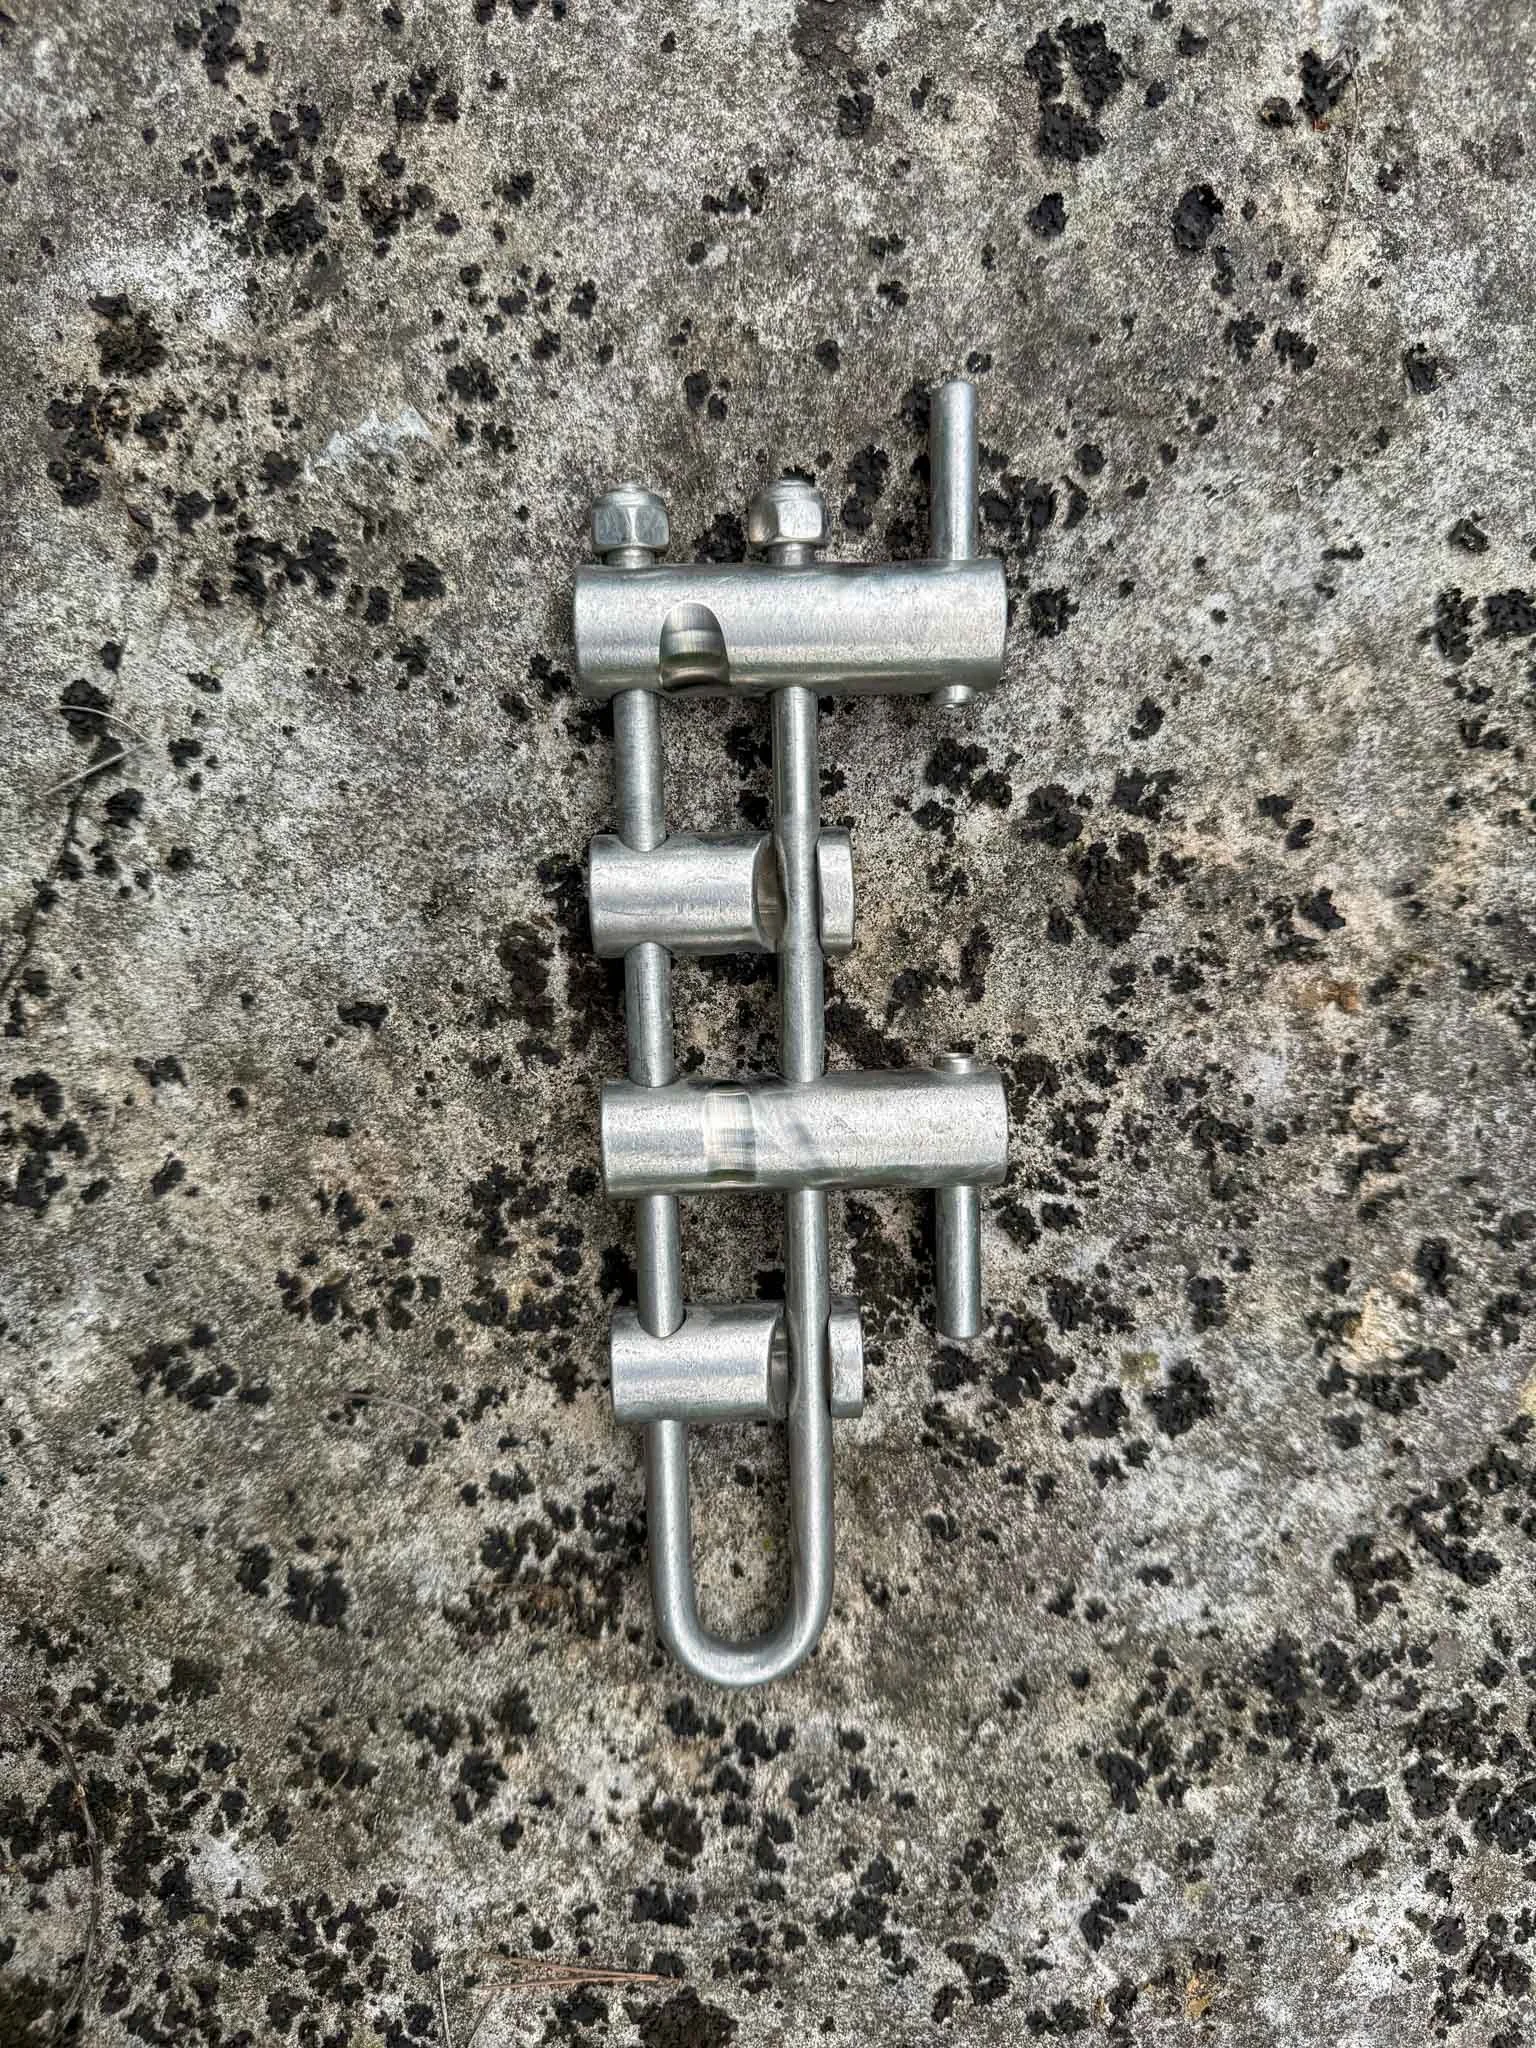
Descenders
Standard full-length racks offer smooth, controlled descents and are great for long drops or heavy loads.
racks
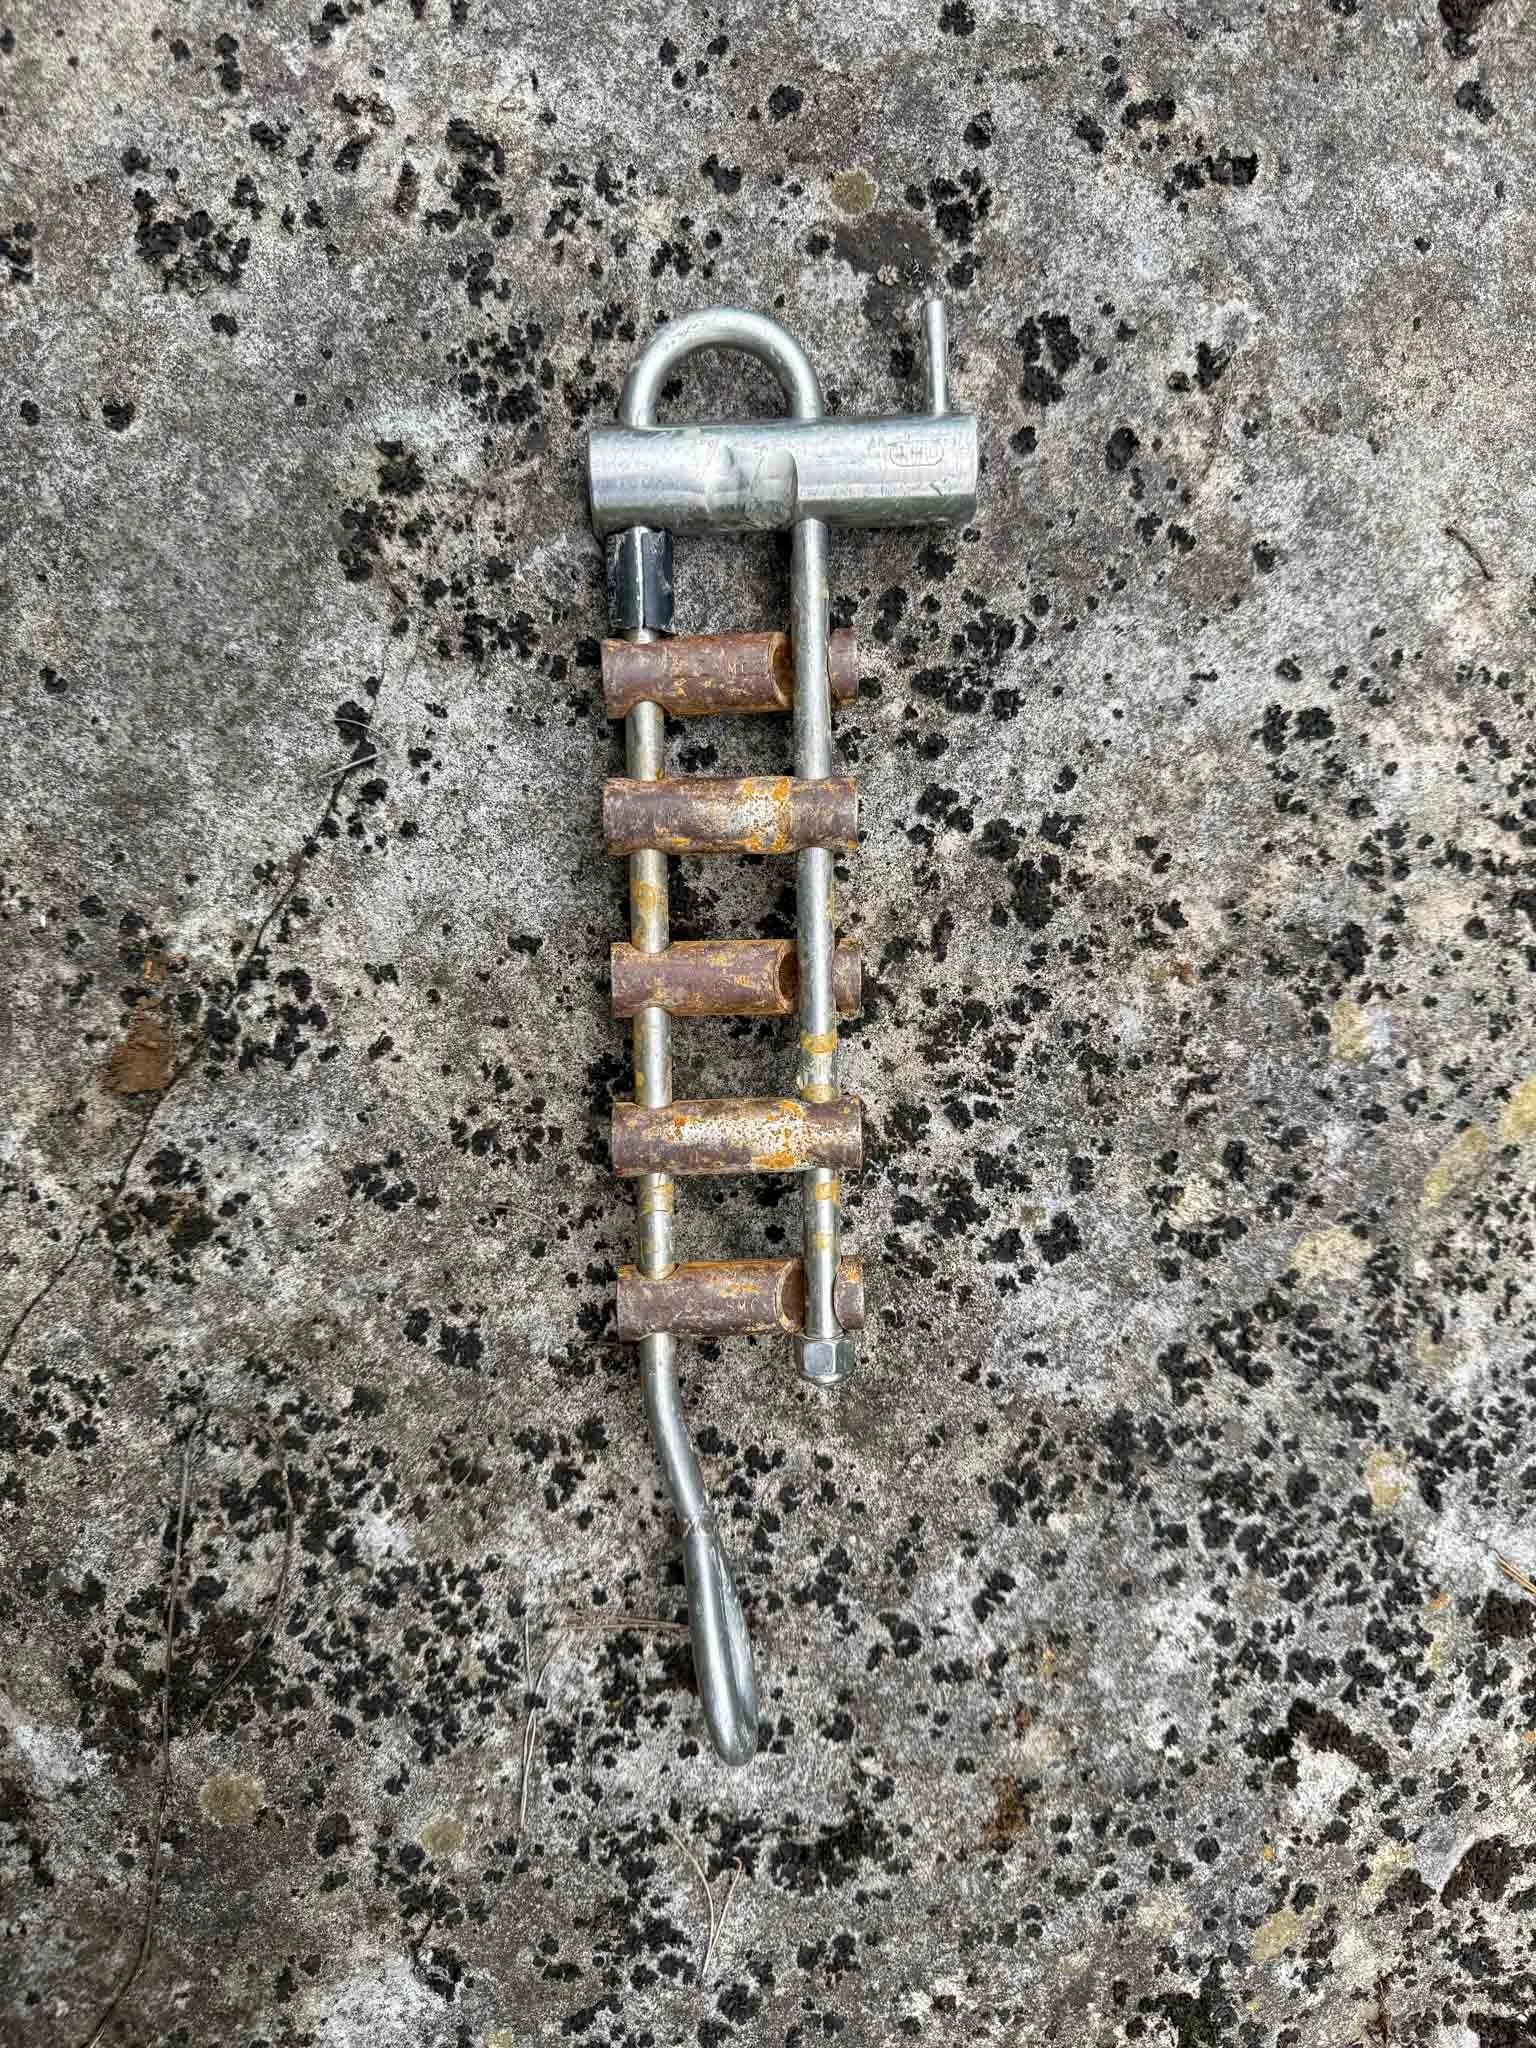
I use a 14-inch full rack with six stainless steel bars — the standard for big vertical drops. Stainless lasts longer and gives less friction than aluminum, but I recommend a hyper bar on top to make lock-offs smoother and give you an emergency friction option.
Some cavers add a flipped hyper bar as their third or fourth bar down for extra wrap-around control. Aluminum bars offer more friction but wear down fast and can coat your rope. Either way, a rack is dependable, smooth, and works for almost any drop.
A compact version of the full rack — lighter, shorter, and ideal for most caving scenarios.
Micro Racks
My go-to is a BMS Micro Rack with a top hyper bar and another flipped further down. It’s compact, stainless steel, and handles almost everything I throw at it — perfect for TAG-style drops and beyond.
Micro racks aren’t ideal for thicker ropes or muddy 11mm lines, but for most situations, they offer plenty of control and are easier to manage than a full rack. It all comes down to rope type, comfort, and attachment style.
Smaller and simpler than racks, bobbins are fast to rig and great for shorter or technical drops.
Bobbins
Bobbins are simple, compact, and great for short to moderate drops. They come with aluminum spools, but you can mod them with stainless steel internals for longer-lasting performance and less wear.
For control, you’ll often pair a bobbin with a friction spur like a Petzl Freino Z carabiner, which adds braking without needing extra gear. They’re not ideal for long drops, but for lightweight travel and thinner ropes, they’re fast, efficient, and fun to use.
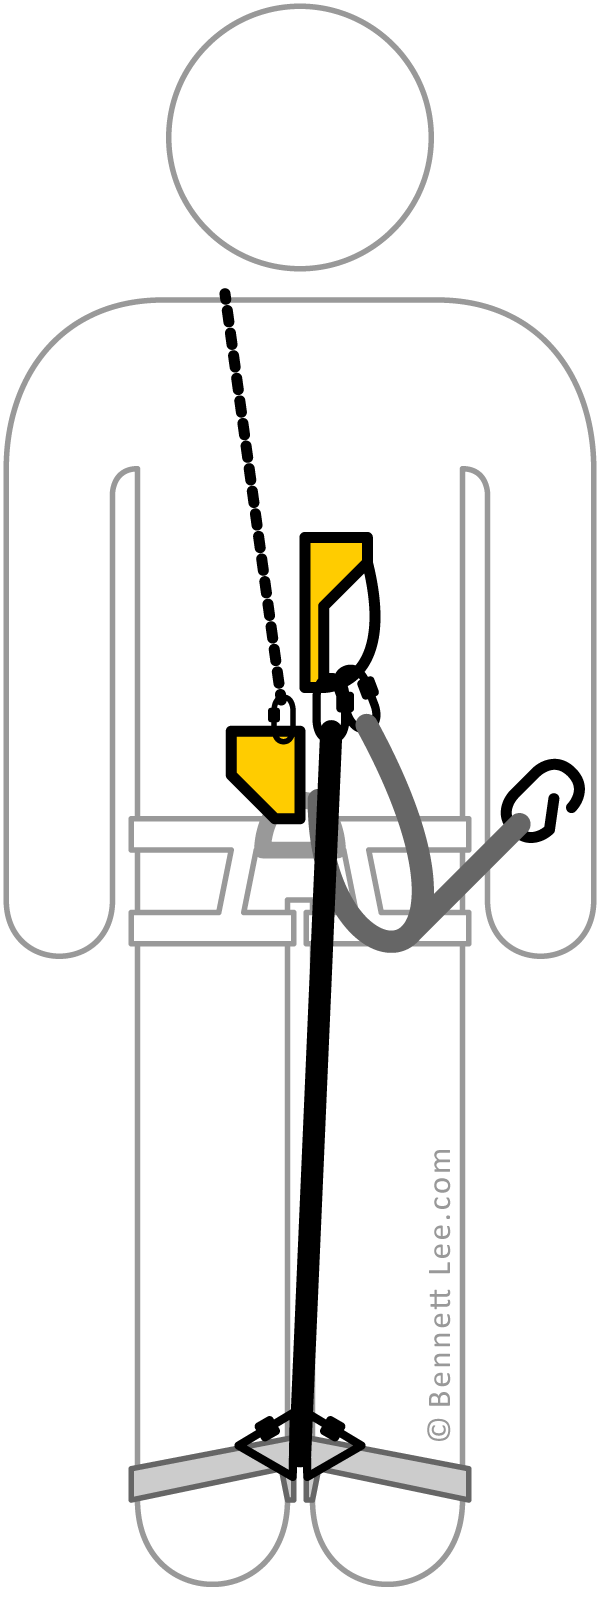
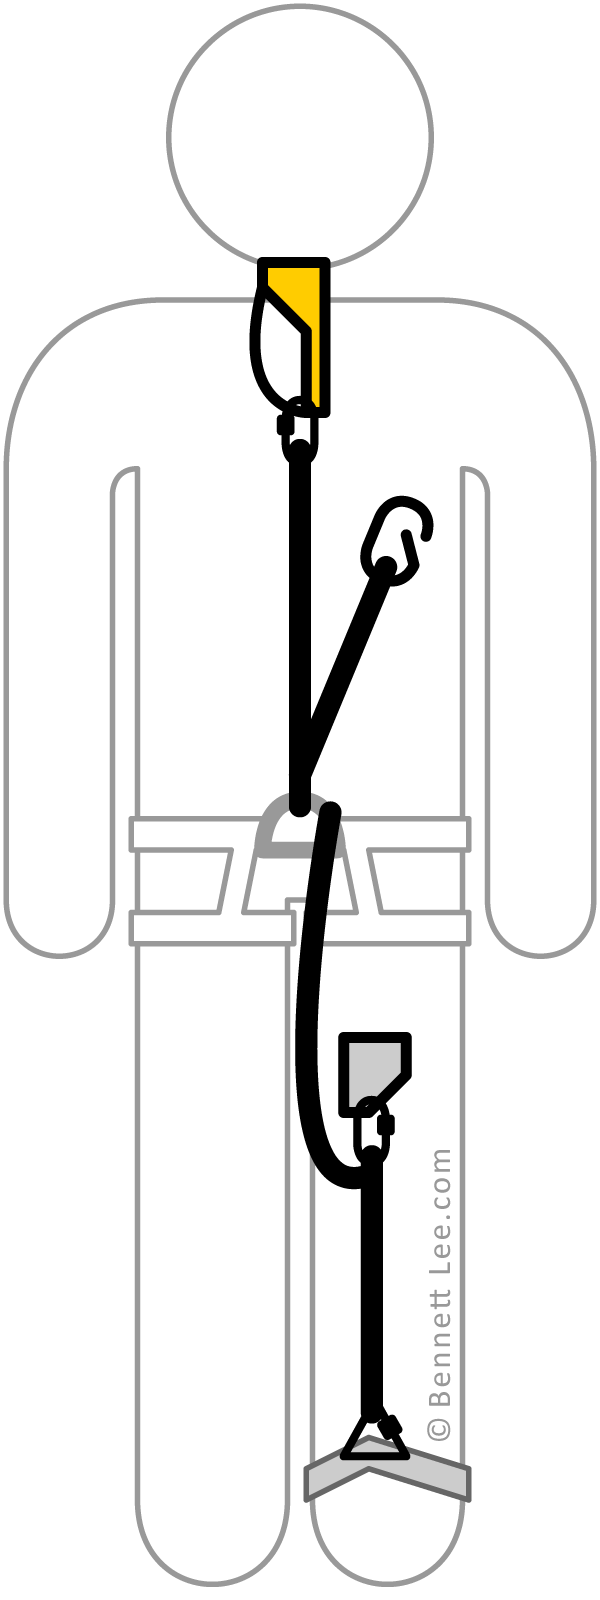
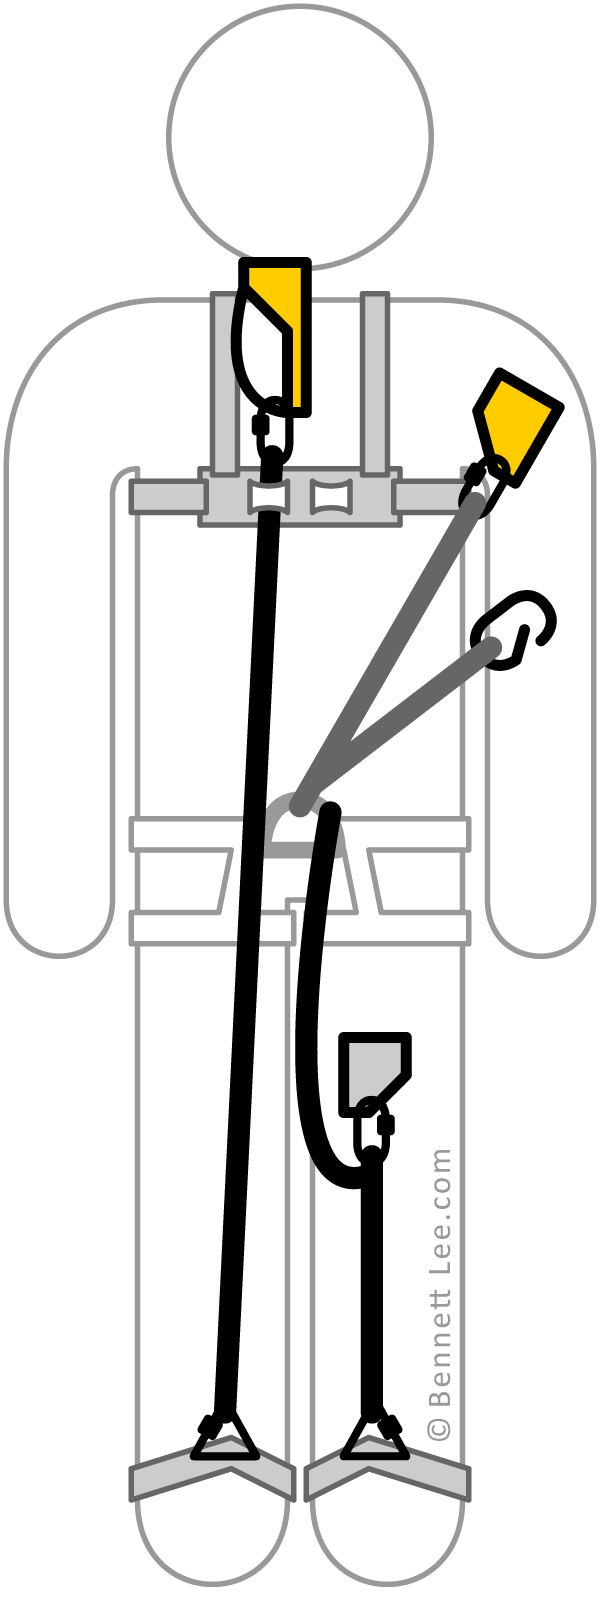
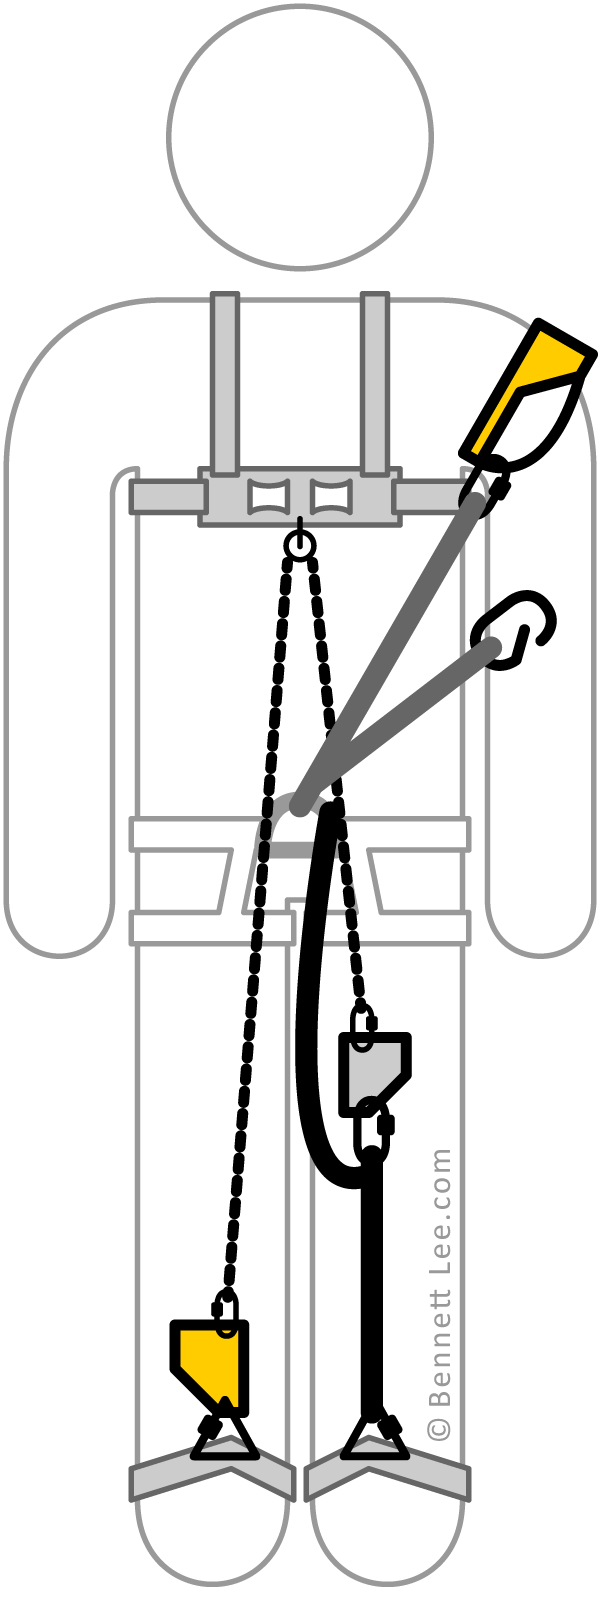
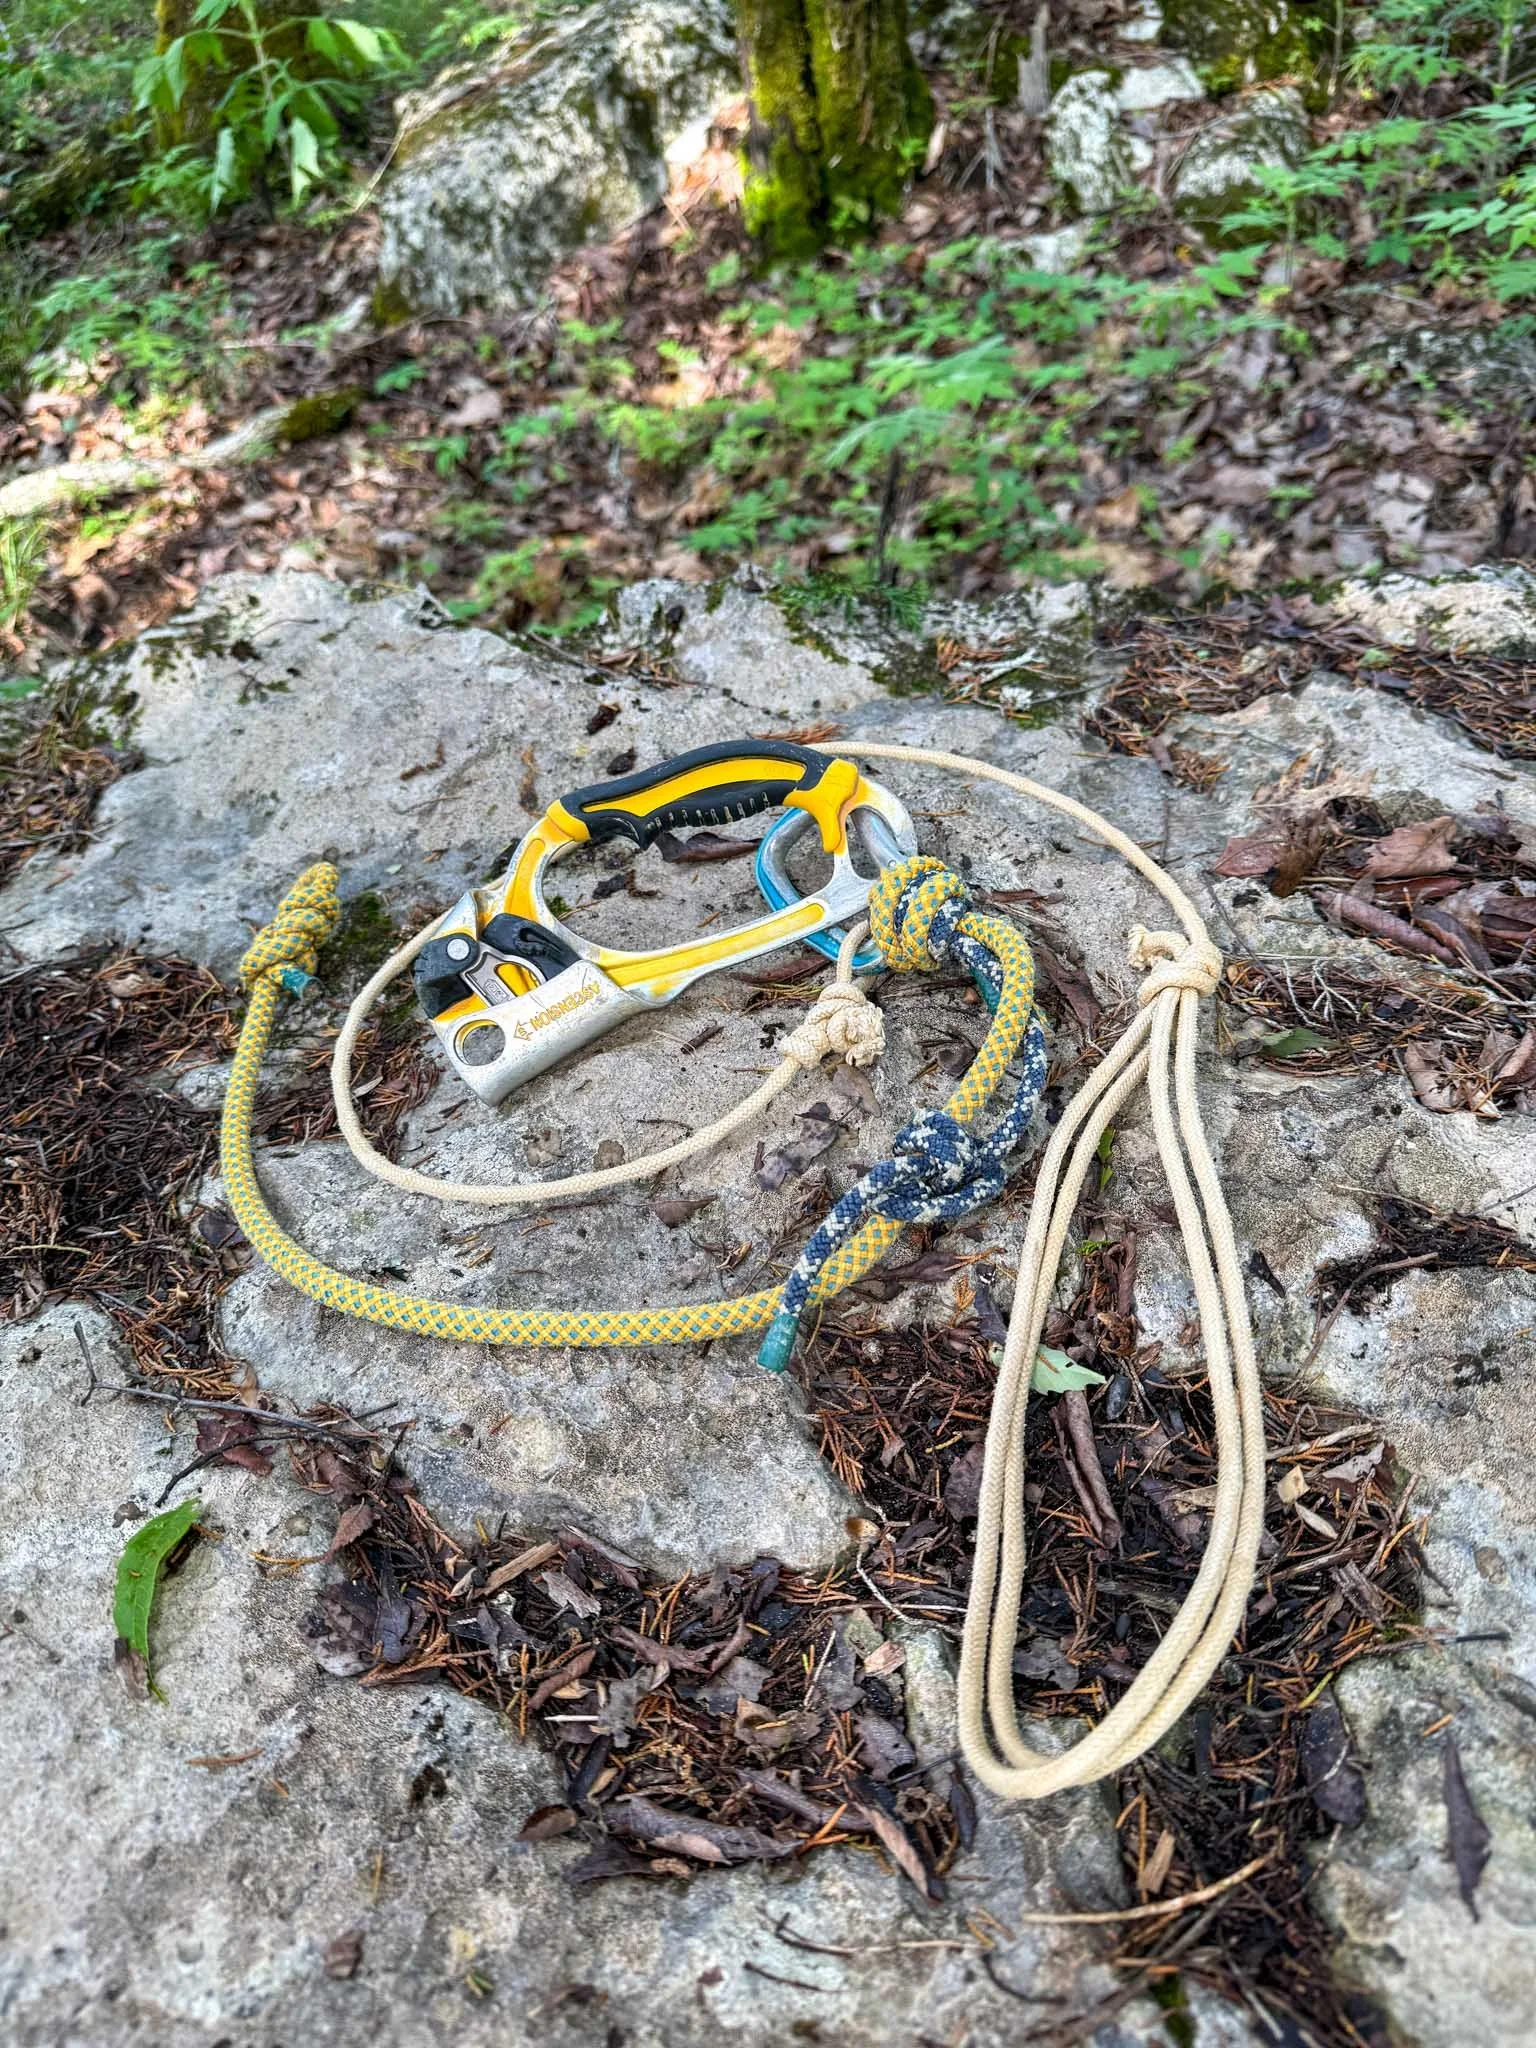
These are your personal safety tethers — used for clipping into bolts, rebelays, or traverses.
Cow’s Tails
and QAS
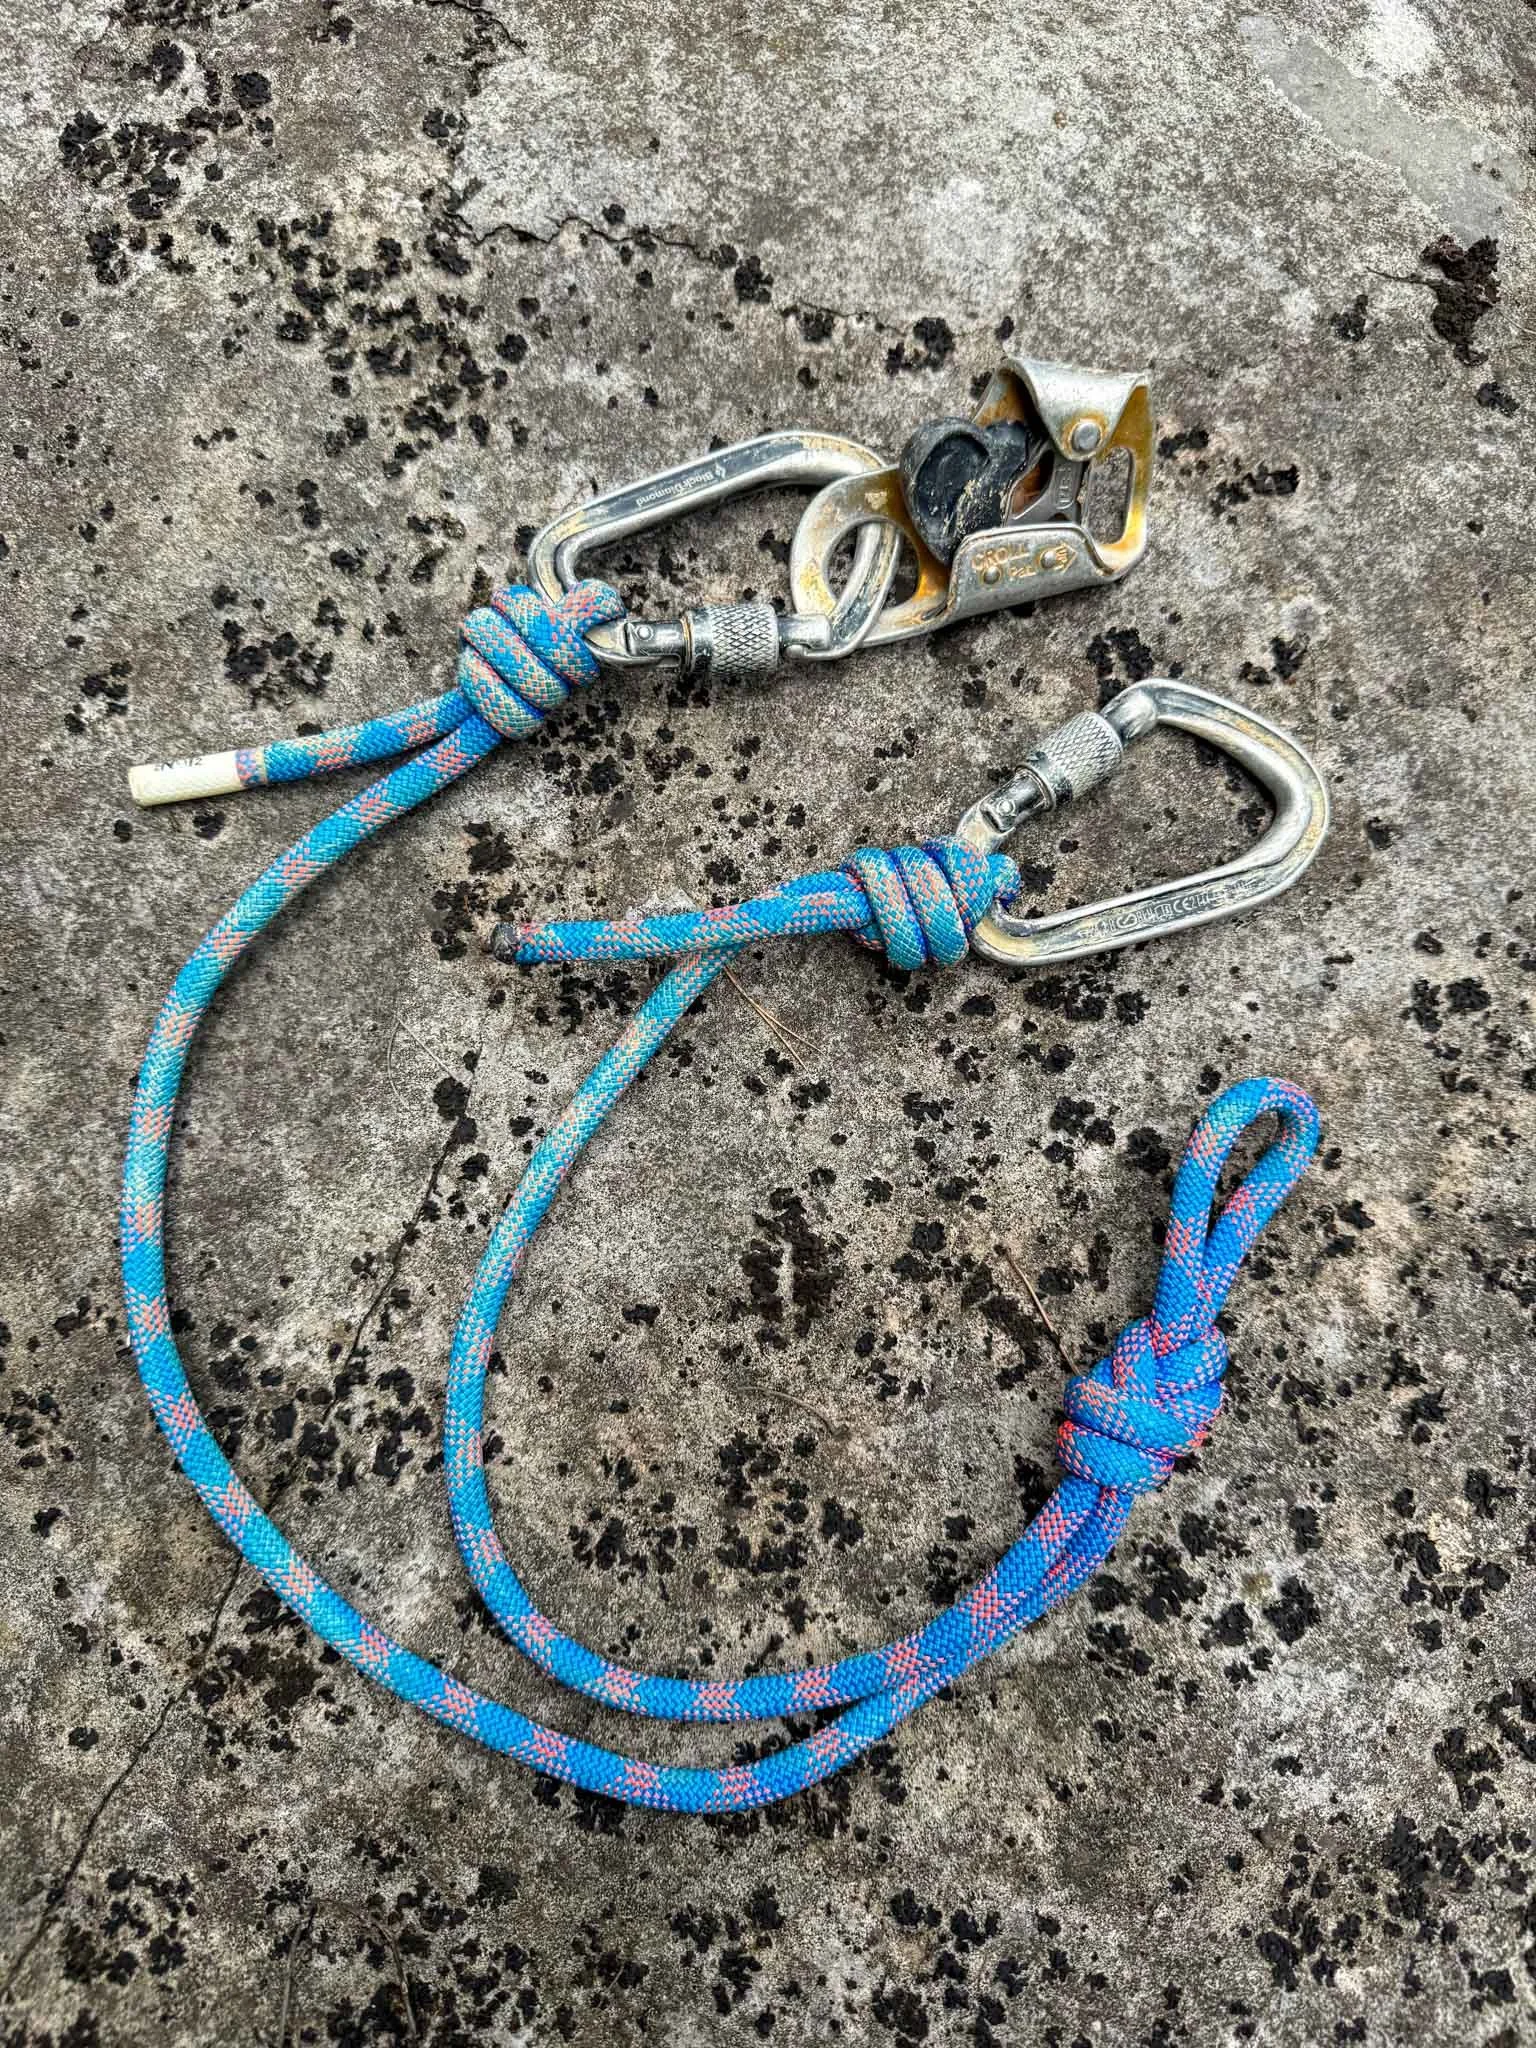
My cow’s tail and QAS setup are built from a single piece of dynamic rope, tied into two separate lengths. One reaches the bottom of my chin, the other about halfway up my face. Both are connected with a figure-eight at the base, finished with triple barrel knots for extra security if shock-loaded.
I clip a chest ascender or hand ascender (like the Petzl Croll S or Basic) into one of those arms depending on what I’m doing. It’s perfect for tricky changeovers, tensioned ropes, and staying clipped in at all times. I always recommend keeping your cow’s tail and ascender on separate loops — especially during free-hanging traverses — so you can stay securely connected with two points at all times.
Your rope is your lifeline, and your hardware is what keeps it all together, this is where strength and trust matter most.
Rope & hardware
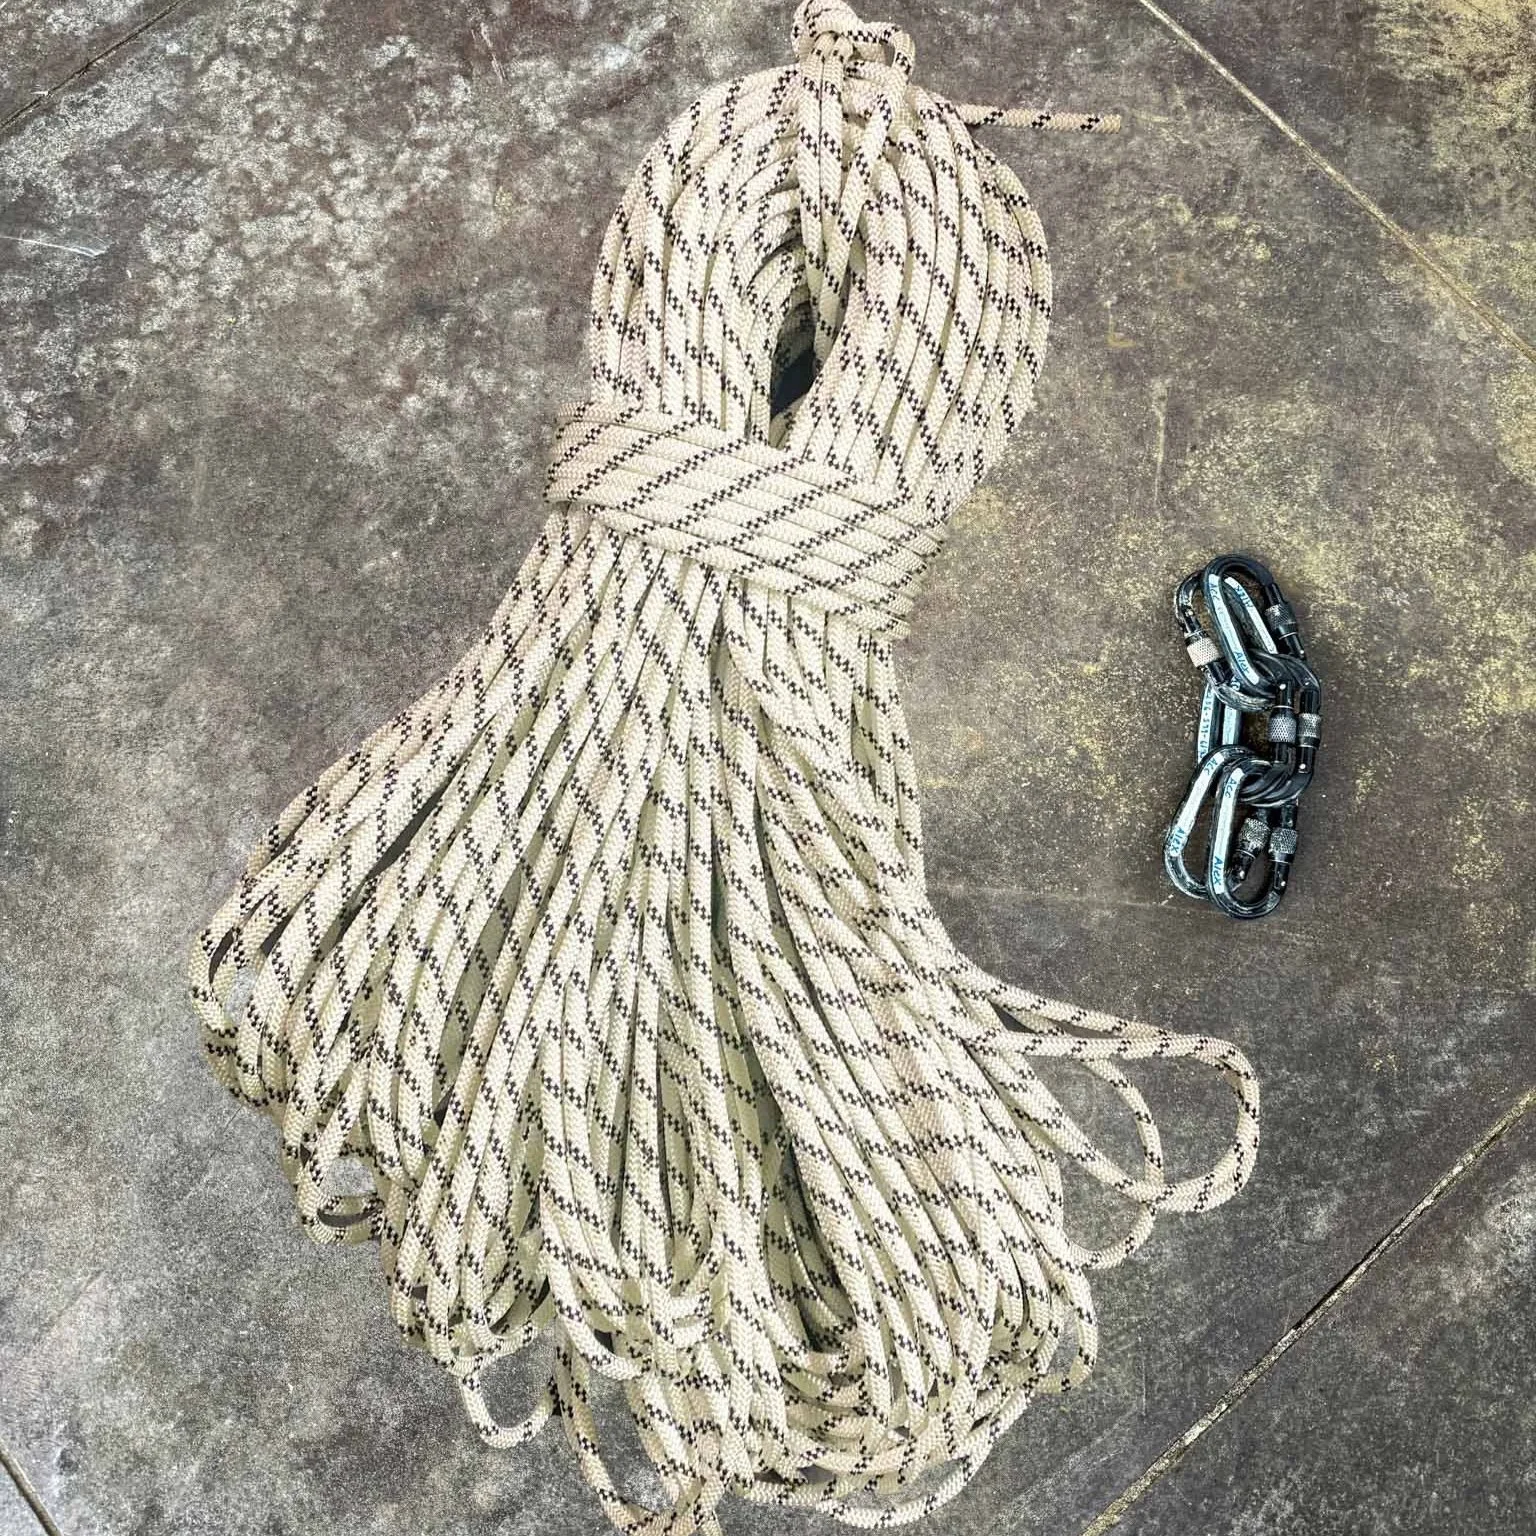
My favorite rope for general caving is PMI Pit Rope — tough, dependable, and holds up well over time. It can be a little bouncy on long drops, so for deeper, straight drops, like Fantastic(568’/179m), I prefer Sterling HTP, which rappels super smooth and climbs like a steel cable. Both are great options depending on the conditions and the kind of cave you’re in.
For hardware, always go with locking carabiners for rigging and safety systems. I prefer oval or pear-shaped screw gates like the Black Diamond Oval Keylock, Hot Forged Screwgate, or the Petzl OK Screw Lock. As long as it’s a durable, locking oval or pear, you’re set — just make sure it’s rated and built to take abuse underground.
When yelling “off rope” doesn’t cut it, a Rocky-Talkie makes communication clean, clear, and easy.
COMMS

I use Rocky-Talkies on almost every vertical trip — especially for long or loud drops where voice communication just isn’t practical. Whether it’s Fantastic Pit, a high-flow entrance like Incredible, or just a noisy drop, these radios make life way easier.
They’re rugged, long-lasting, and built for harsh outdoor conditions. While they aren’t specifically made for caves, they hold up extremely well underground, even in moisture-heavy environments. Clear comms between top and bottom can make a big difference in both safety and flow.

Where explorers are made
Cave Camp
Sleeping underground is a different game — your setup depends on the cave, the temp, and the terrain.
The essentials

Cave camping isn’t like surface camping. Whether you’re on a tarp on the ground or tucked into a sky bivvy or hammock, your system should match the cave’s environment — dry or wet, warm or cold, tight or spacious. Your basic loadout should include a camp stove, a sleeping bag rated for the cave temperature, a camp pillow if you like comfort, and your GRAYL filter for clean water. A pee bottle is a must, and wag bags are non-negotiable — you should never leave waste in a cave. Different regions have different protocols, but the golden rule is simple: take only photos, leave only footprints. Your camp gear doesn’t need to be extensive, but it does need to be reliable, compact, and respectful of the underground.
Sleeping on the cave floor means dealing with moisture from above and below.
ground
setup
Sleeping on the cave floor usually means dealing with moisture, even in “dry” caves where the ground stays damp and ceiling drips are common. I recommend using a Tyvek sheet or old tent footprint as a ground barrier — Tyvek is lightweight, durable, and packs down small. Add a sleeping pad based on the conditions: insulated for colder caves, regular for mild temps, or none at all if you’re on soft sand or dry soil.
For extra protection, I bring a light tarp and string to hang above as a drip shield. It’s like an underground rainfly that keeps you dry through the night. This setup is simple, compact, and covers most cave floor scenarios without overcomplicating your kit.
When the ground’s not an option, sleeping off it is your best move — just come prepared.
suspended setup
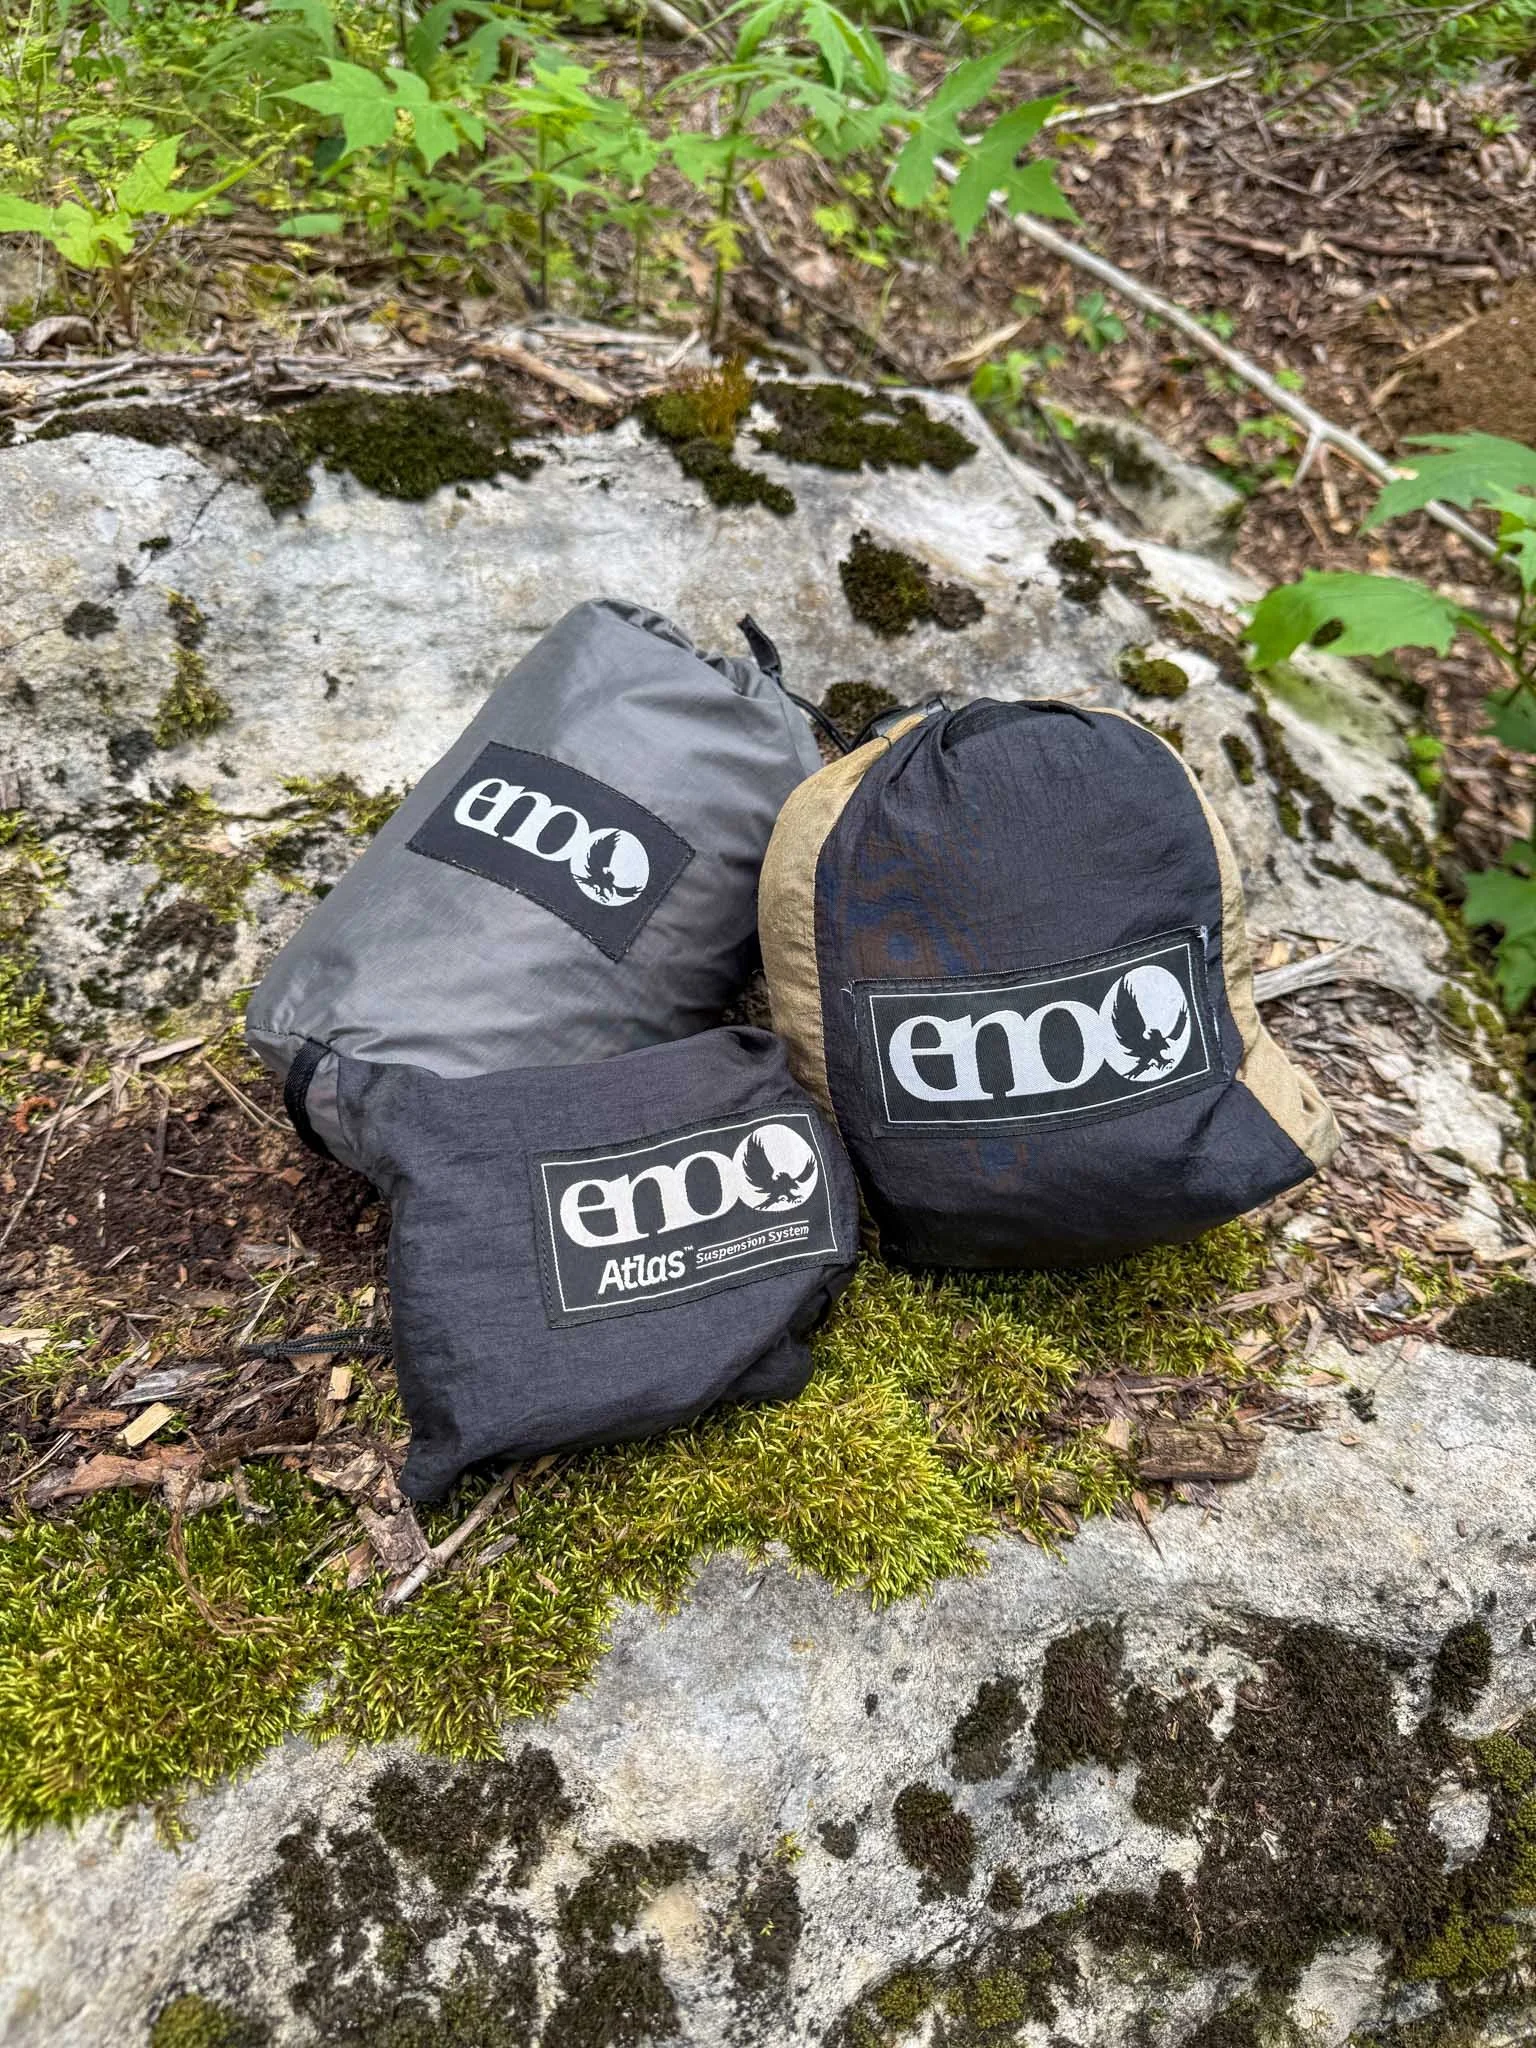
For caves where the floor is too wet or unstable, a hammock or portaledge is your go-to. Hammocks are lightweight, compact, and easy to hang with the right anchor points. Portaledges are bulkier, but if you can haul one in, they offer serious comfort. You’ll want a tarp or rainfly overhead since dripping ceilings are usually the reason you’re suspended in the first place.
I always carry a little trad gear for these setups — a few nuts or a small cam can be perfect for natural anchors if bolting isn’t an option. If you find a solid crack or feature to clip into, you’re golden. It’s a bit of extra weight, but worth it when you need a dry place to sleep.
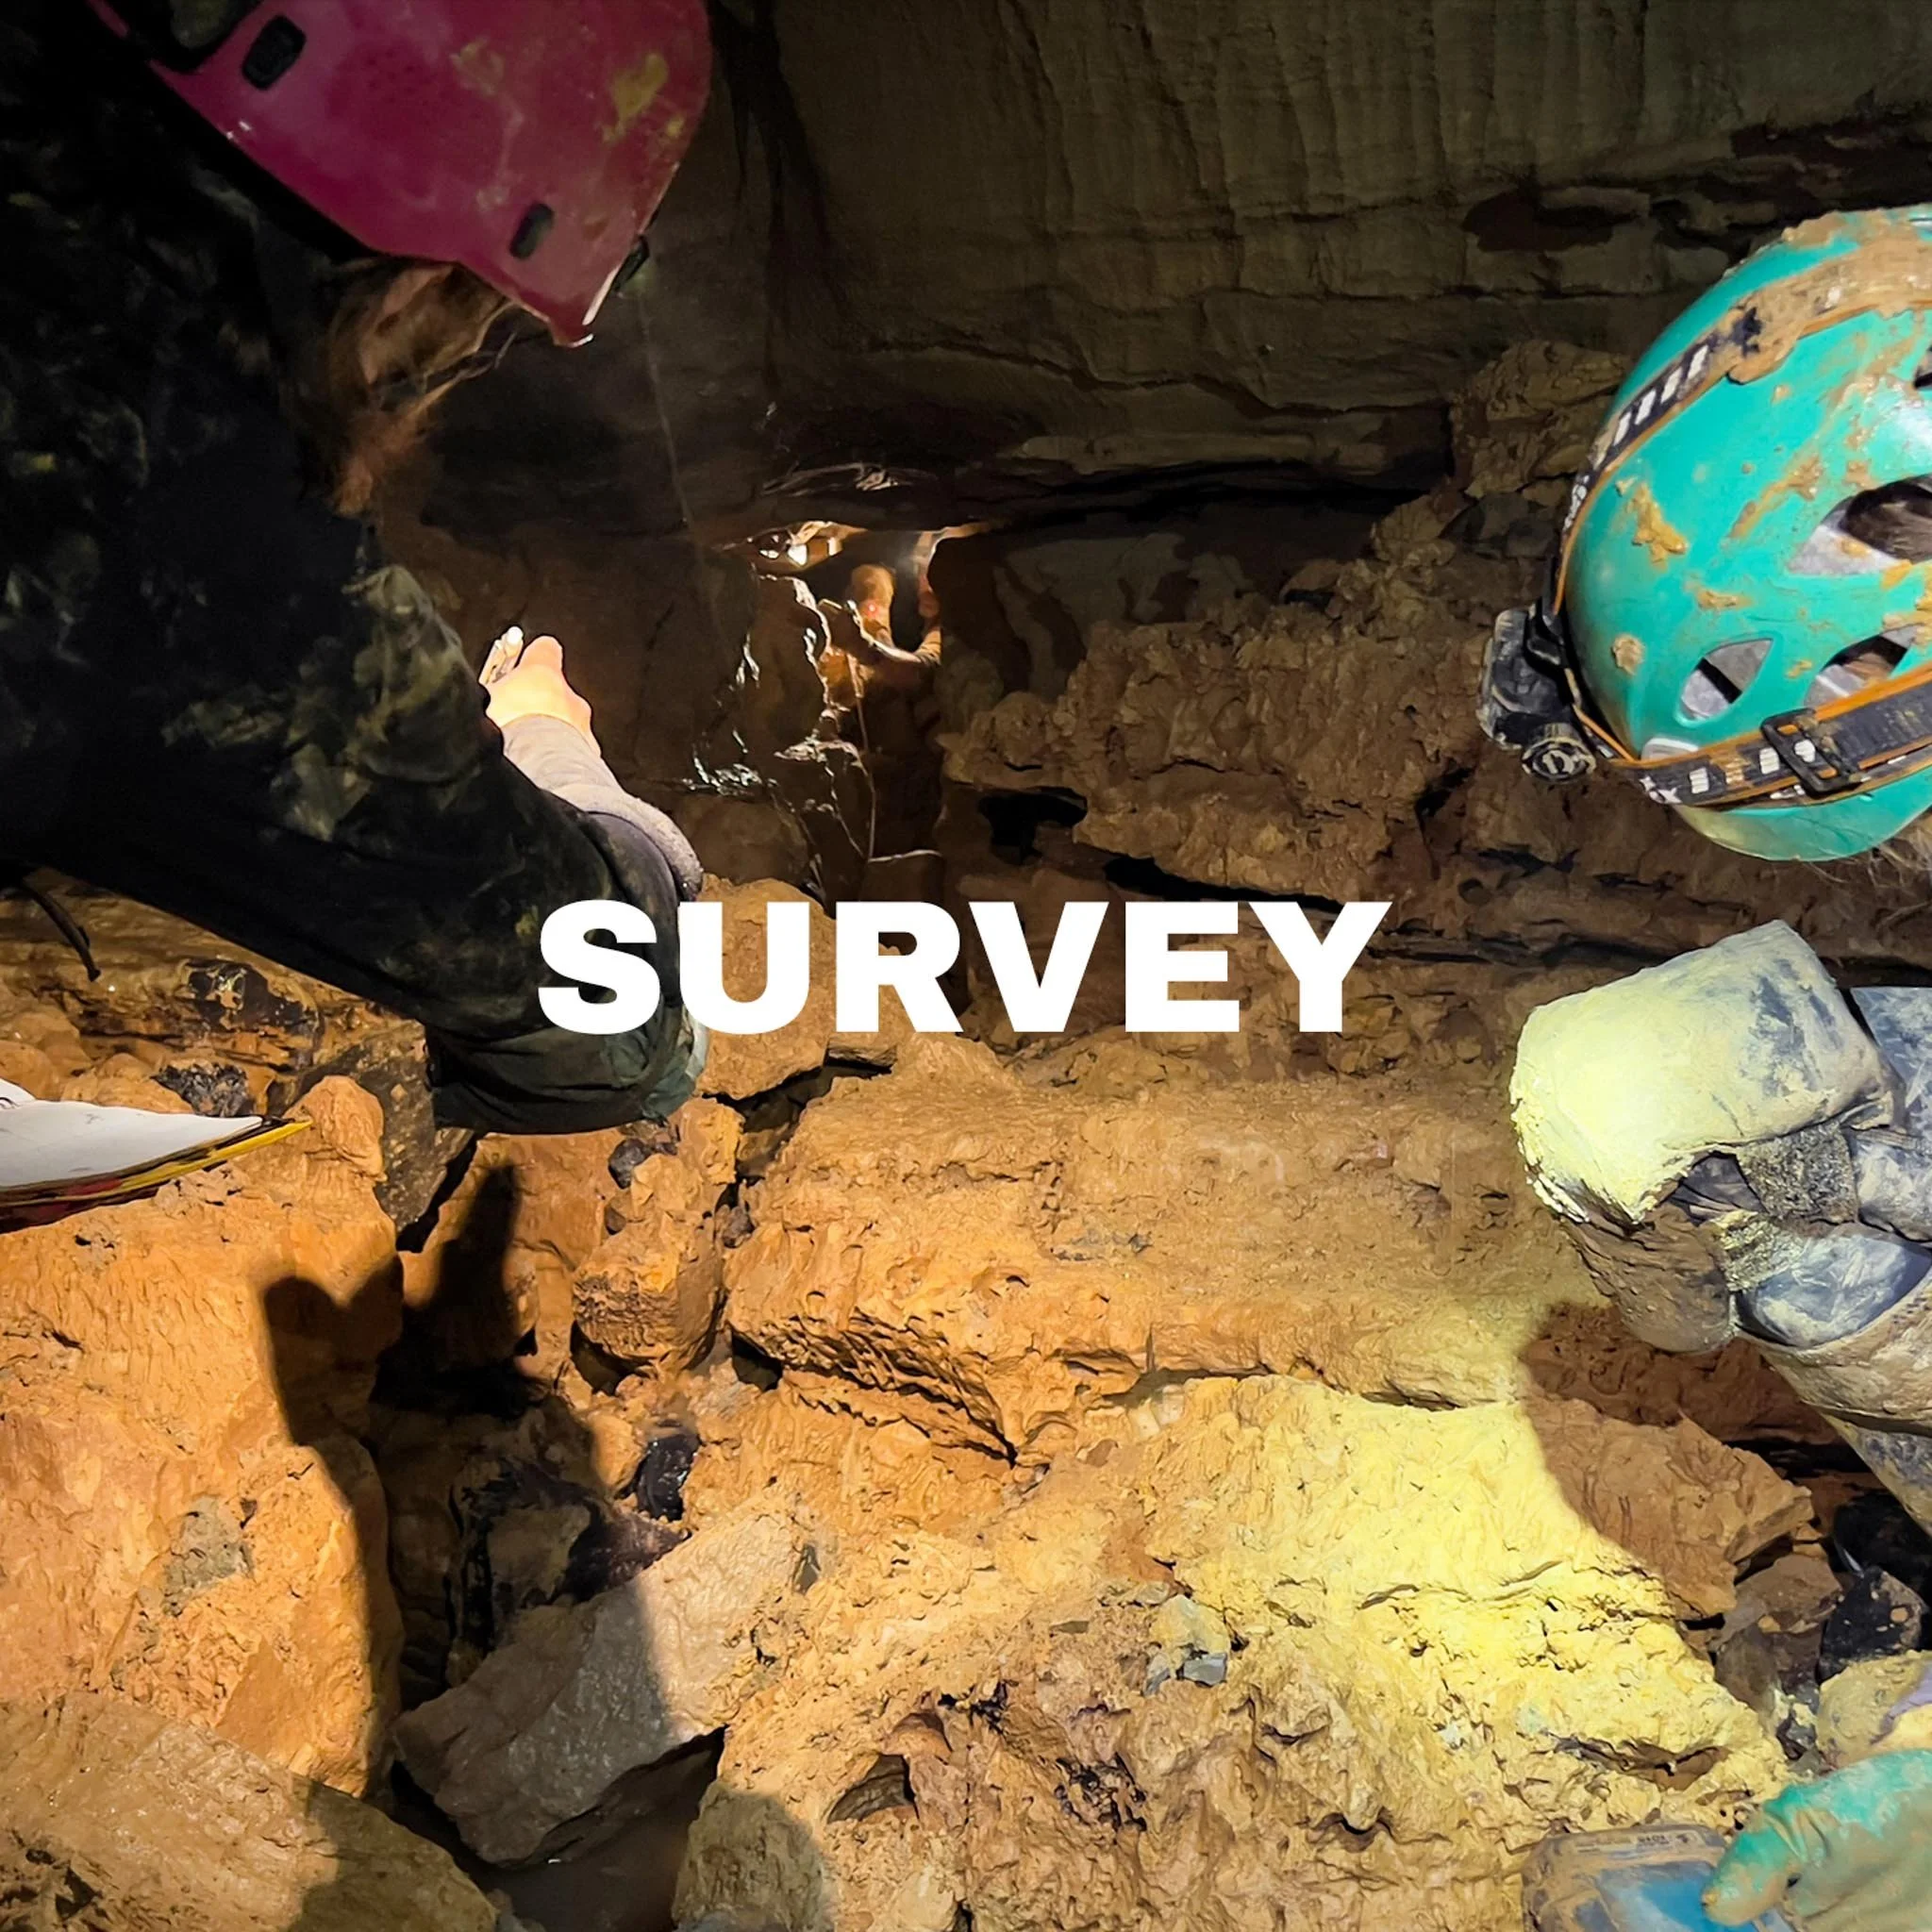
Dont scoop it, survey it
Survey
These are what you use to map the cave — measuring direction, distance, and inclination from point to point.
Survey instruments

I mostly use the BRIC, a rugged caver-made device built for underground conditions. It uses a laser rangefinder, accelerometer, magnetometer, and often a thermometer to capture distance, azimuth, inclination, and temperature — all in one go. They’re waterproof, accurate, and ideal for modern survey work.
Other tools include the DISTO, which is compact and precise, especially when paired for front/back sights, though it needs waterproof mods. The Shetland Attack Pony is a budget-friendly, caver-built option that works well when dialed in. And if you’re going full old-school, you can still use a tape measure, compass, and inclinometer — slow, but it gets the job done when gear fails or budgets are tight.
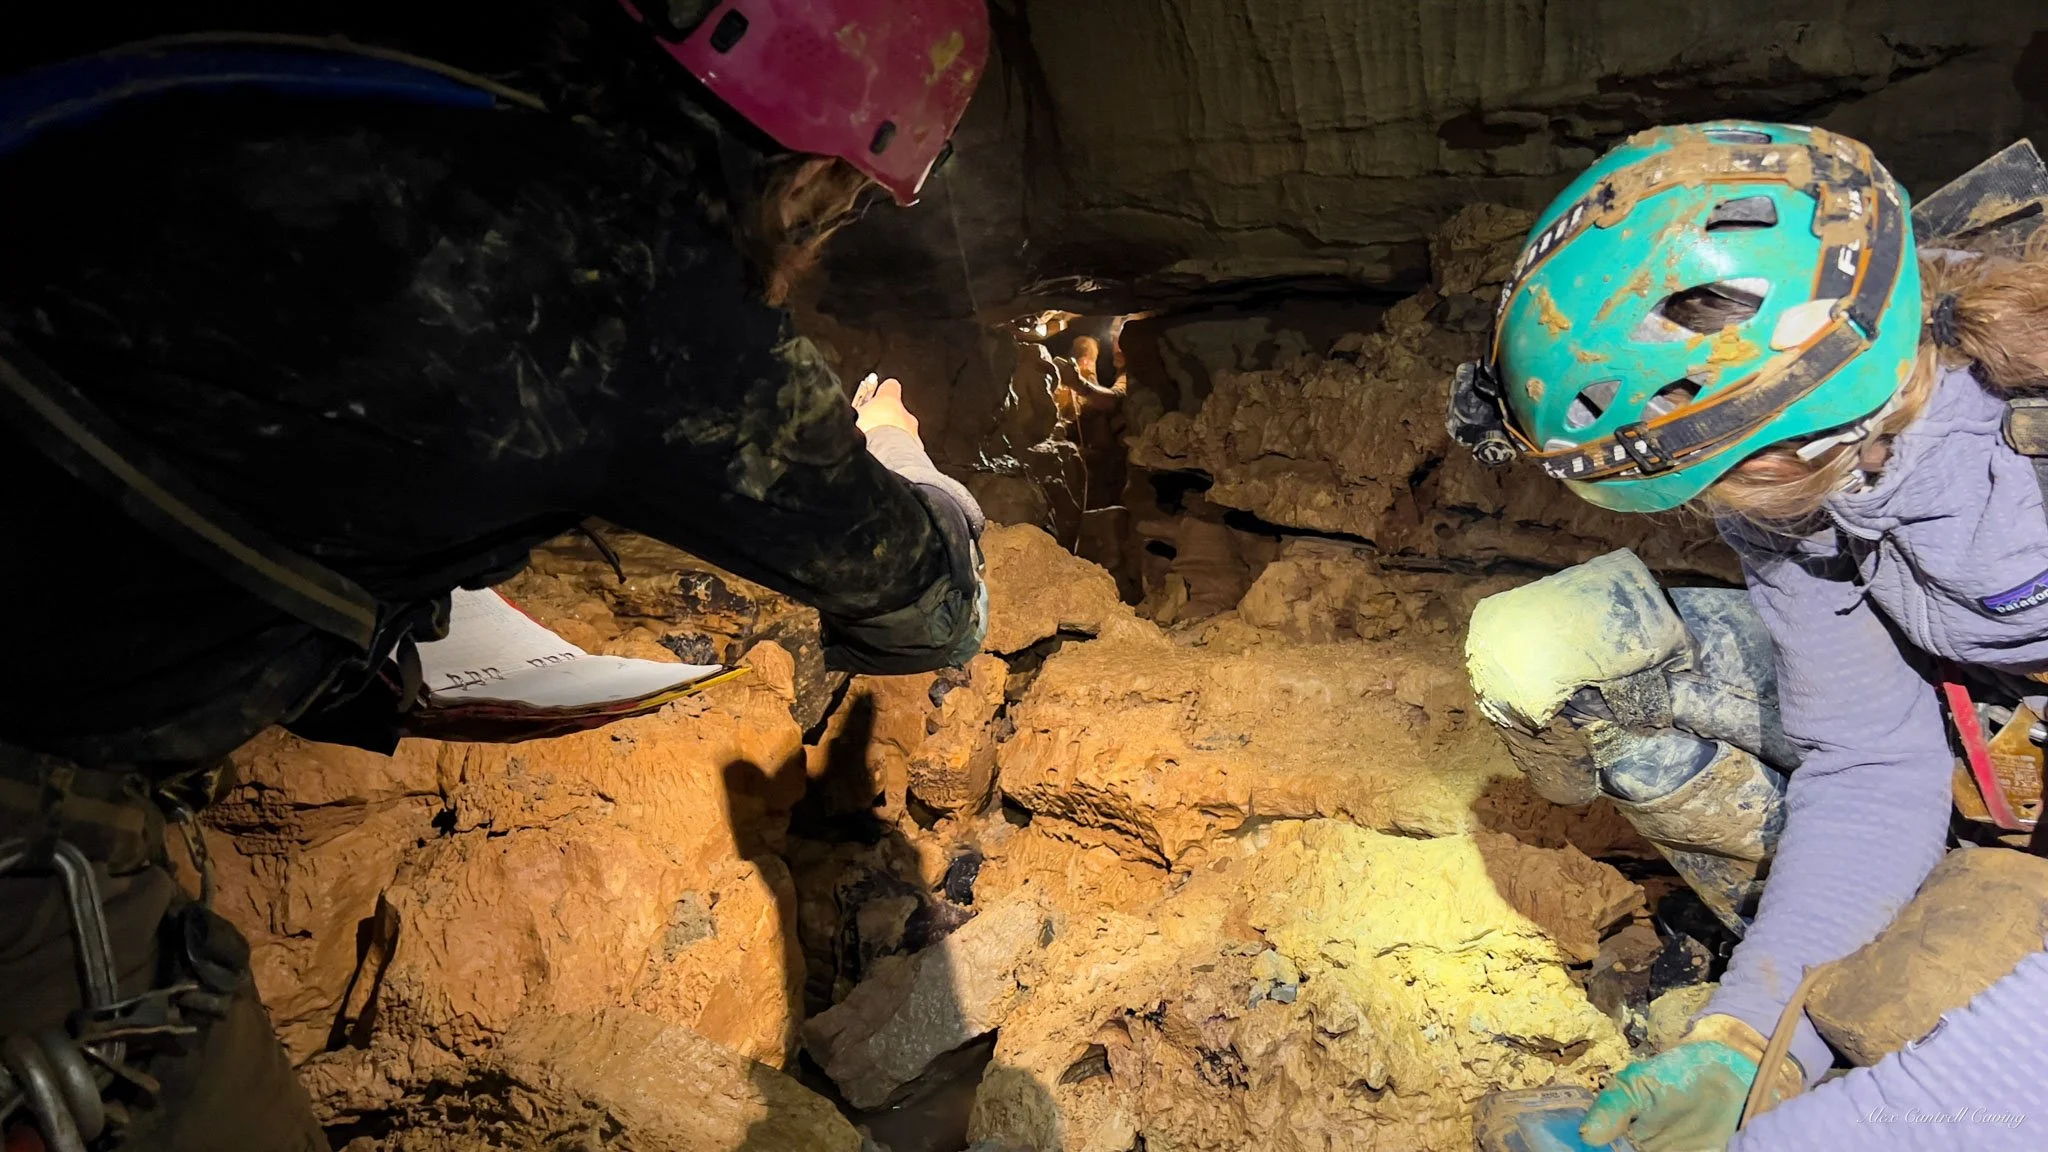
The old-school (but still widely used) way to sketch and record your survey data by hand.
Classic data entry
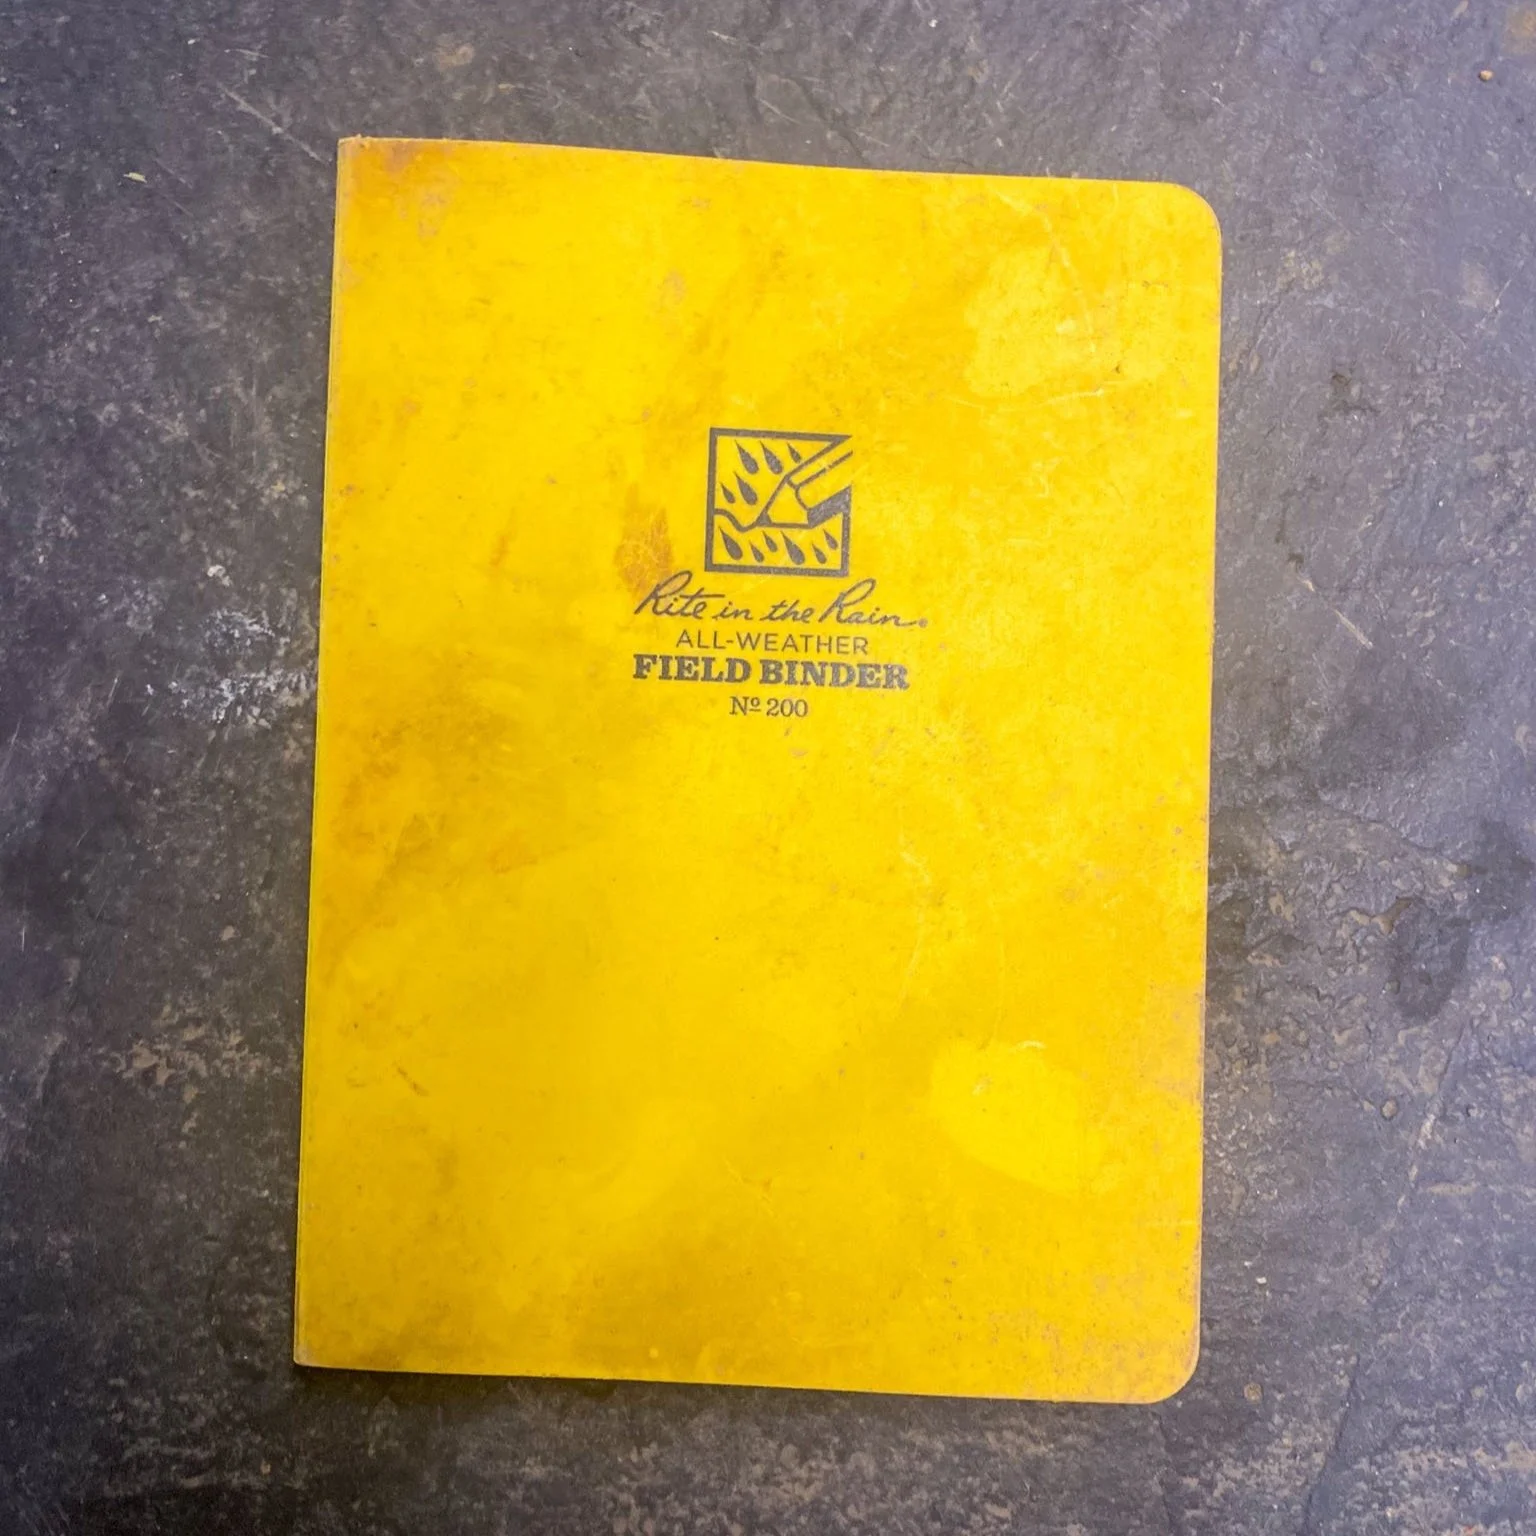
With classic entry, you’re logging data in a waterproof sketchbook, using forms that capture distance, azimuth, inclination, left-right-up-down, and notes at each station. Pages include a grid for scaled sketches, a space for the cave name, page number, and structured fields for front and back sights.
It’s still the most common method because it’s simple, field-tested, and doesn’t rely on tech. All you need is a pencil, waterproof paper, and a headlamp. When done right, it’s a durable, effective way to capture data — and it’s the go-to when reliability is everything.
A tablet-based system that connects to your survey instruments and updates sketches in real time.
Digital
data entry
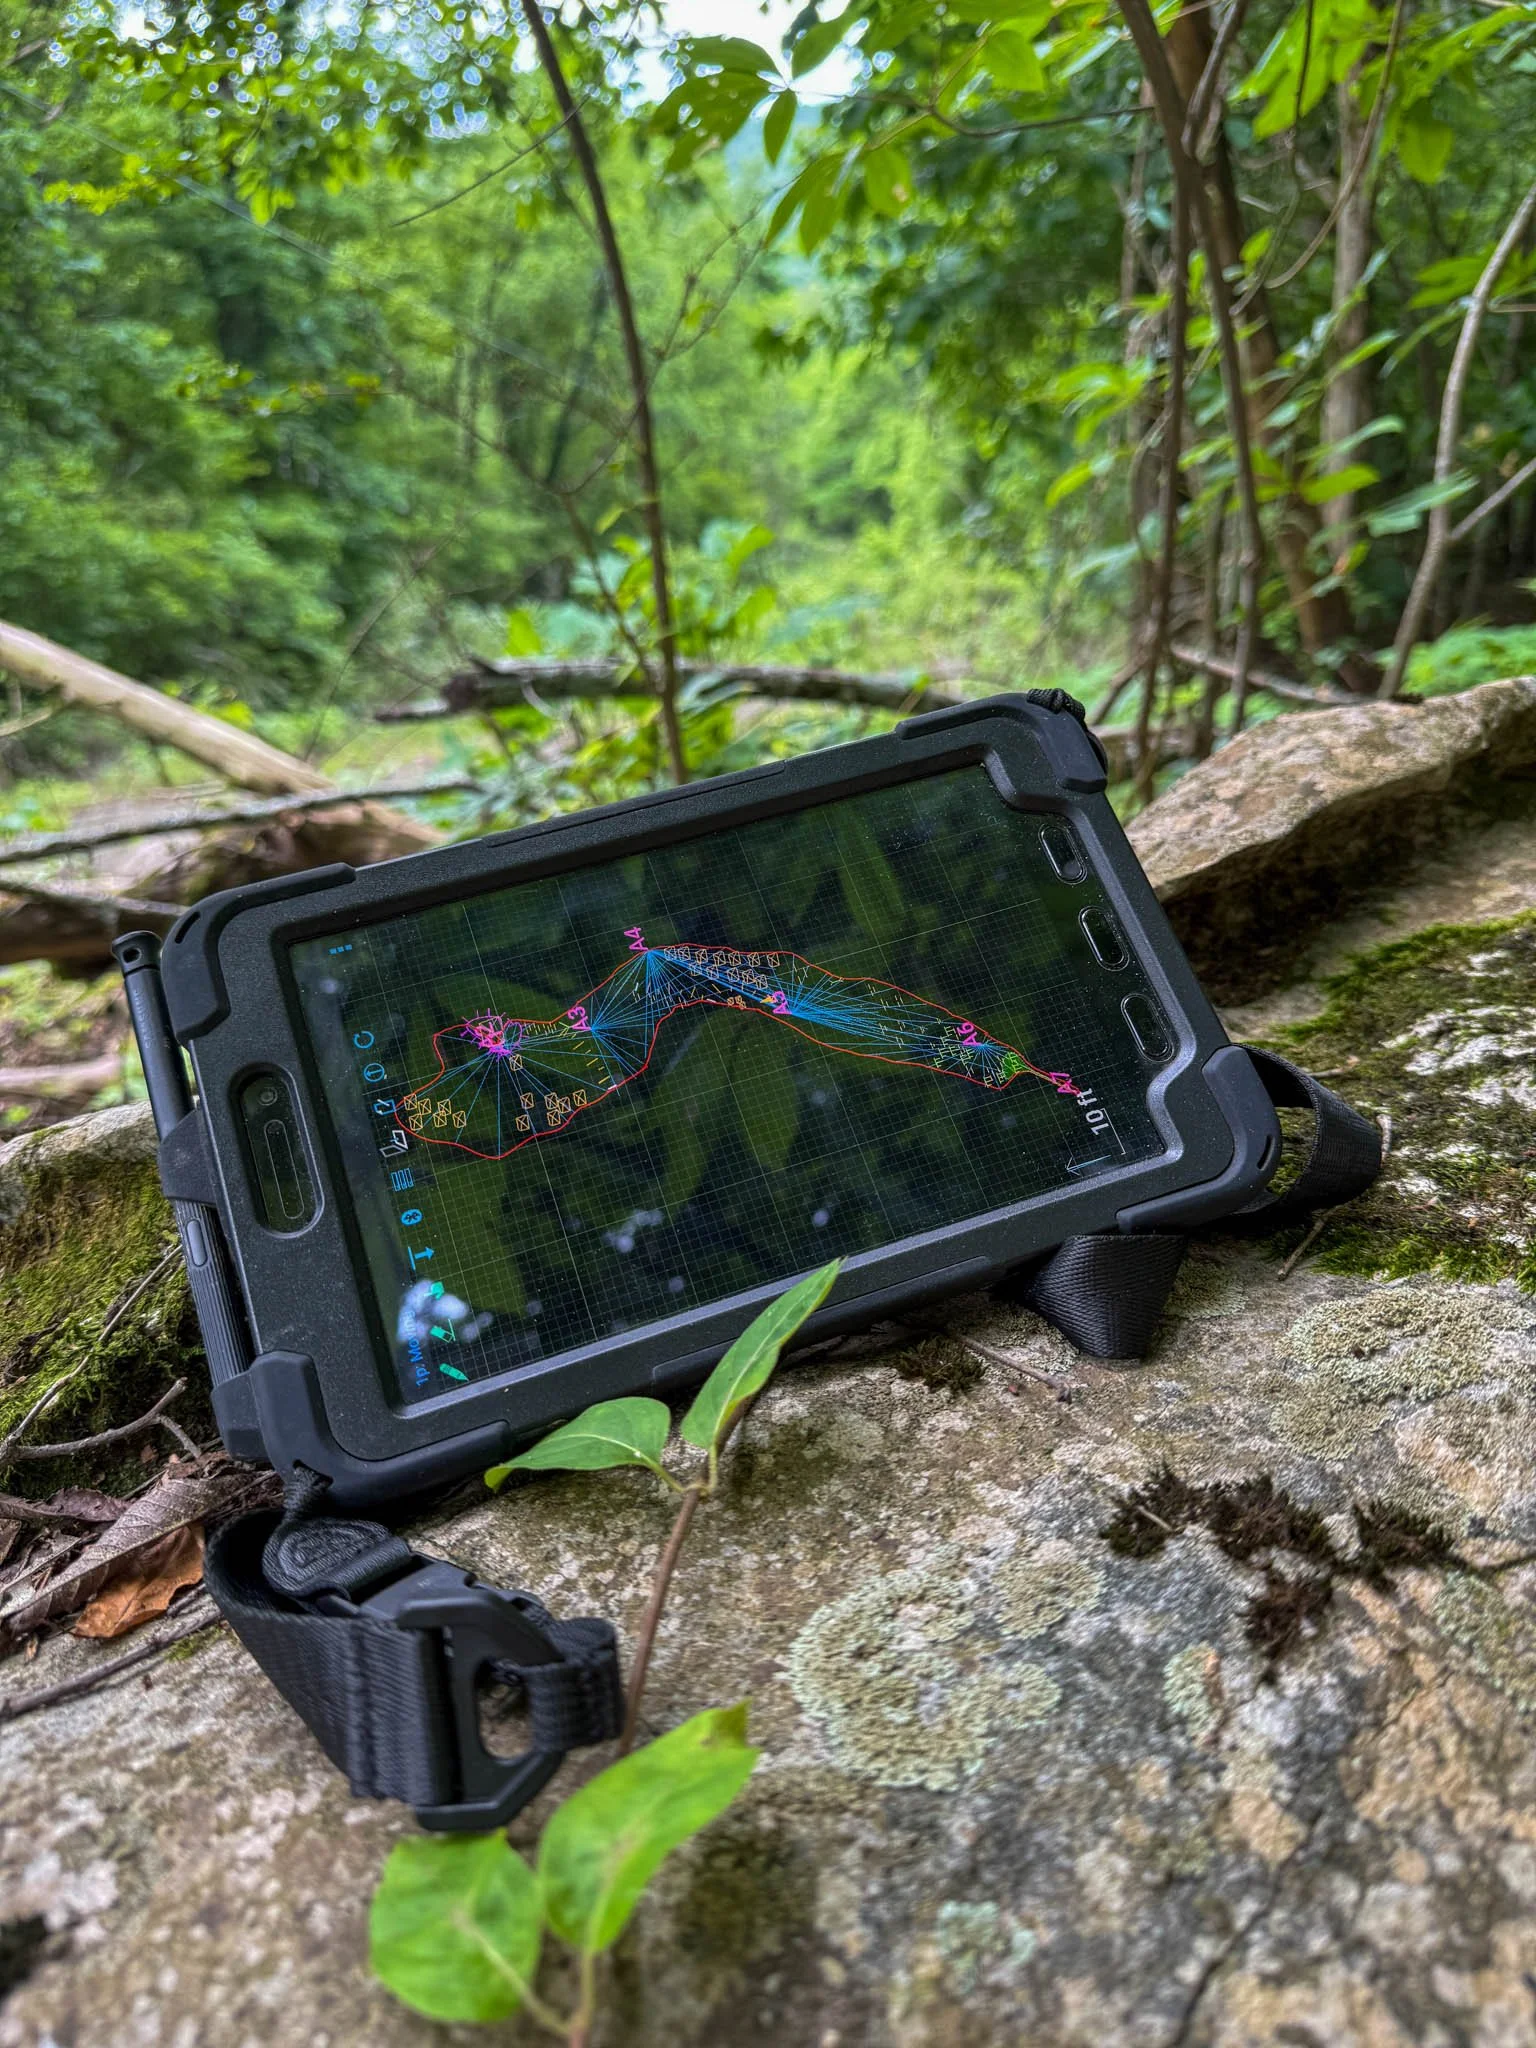
I use a Samsung Active Tab 2, paired with a stylus and rugged case, and it’s been a game changer. It connects via Bluetooth to survey instruments like the BRIC and plots stations as you shoot them. You sketch directly on the screen as data populates around it — saving time and improving accuracy.
With the right gear, digital entry is incredibly efficient. Battery life is solid, and you can charge it underground with a power bank. While classic tools require you to manually input every measurement, digital setups build the framework for you — all you need to do is sketch in the walls and surrounding formations/objects.
Keep in mind — this guide is just what works for me.
Everyone’s setup is different, and what fits my style might not be right for yours. But if this breakdown helps you dial in your kit or gives you a solid place to start, then it’s done its job. Cave responsibly.